Screen formats and projection formats
Most of the times when purchasing a screen, the question about the screen width is at least answered by the spacial conditions and the seat arrangement in the room. The referring screen height results from the screen format, which selection is certainly not an easy matter. There are screens with a square aspect ratio of 1:1, with an aspect ratio of 4:3 as it is the case of the TV's and a widescreen-aspect ratio of 16:9.
The choice of the screen format mainly depends on the planned application (slide-show, computer screen presentation, normal TV, watching DVD) and of course also from the applied projector (slide projector, 4:3-beamer, 16:9-beamer). In the following chapters, by means of many practical examples it is explained what is seen on the screen by using a certain combination of projector and screen format.
Screen size, image size and masking
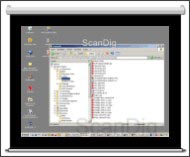
In this chapter, we will first clarify some few important terms related to the size of the screen. For example, those who buy a screen will often get two size indications: the screen size and the actual size for the image that is projected on it. Both sizes are important to consider when buying a screen. Finally, one wants to know the size of the image that is finally seen on the screen, and on the other side, it is also important to know how much space the screen will need on the wall for assembling it.
Let us look at the adjoining image where the measures are drawn in. The blue arrow heads measure the actual screen size; the red arrow heads measure the actual image size. We immediately recognize that the screen size differs from the image size by a black frame that is also described as masking or marginal frame. Here, it is to be mentioned that there are also some light screens that do not have such a black frame in which the size of the screen is equal to the size of the image, as for example a Tripod screen. Now the question arises why the screens are masked with a black marginal frame. What is the purpose of such a black frame?
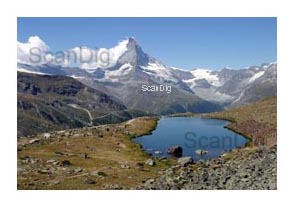
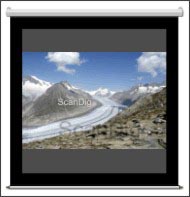
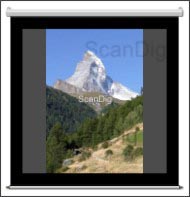
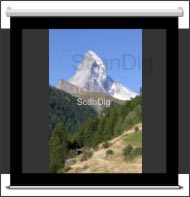
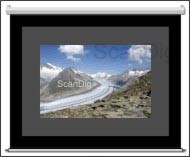
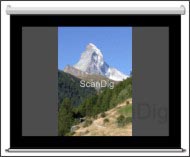
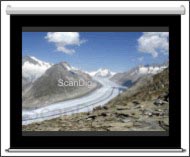
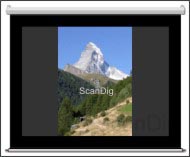
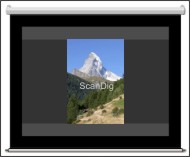
Now, let us look at a beautiful panorama- mountainscape with the Stellisee in the foreground and the Matterhorn in the background. In the following two images, I have inserted the same picture each centrally in a white frame and in a black frame. Thus, what is now the main difference between a white and a black masking? The black frame provides a very tough contrast to the actual frame all around the actual image. As in the photo that has been done in the daylight, no black is contained, the contrast to the black frame is additionally intensified. In the image at the left, to the contrary, the marginal frame has a similar colour to the bright clouds in the sky and the snow on the mountains. Thus, the contrast of the frame to the image is weak; at the upper left edge of the picture, the cloud seem to merge into the frame.

But the human eye does not like any dull images but loves the contrasts either within the image as also between the image and the margin. Examples: those who hang a picture in their living room will normally choose a darker frame so that it outstands from the white painted wall. When a TV station presents a cinema movie, there are some black bars at the upper and the
lower part of the screen due to the image format that is more narrow. Now imagine these bars would not be black but white; thus, during a night scene, one would be blinded by some white bars while the actual darker image would hardly be recognizable. Unimaginable!
Thus, let us keep in mind that a black masking frame provides the actual image with a very good contrast and thus provides an optimal margin to the edge of the image. Those who buy a beamer or a screen and can adjust the projection size of the beamer in a way that the image exactly fits into the image area of a screen with a black masking will enjoy an excellent image with a strong contrast to the screen size. The following chapters explain what is to be considered in this concern and also the reason why these optimal circumstances cannot be always generated.
Image formats in the fields of photography, computer and TV
Before we contemplate the different screen formats and the respectively matching image formats in the following subchapters, we will first have a look at the different image formats and their respective aspect ratios to which a photographer, a PC-user or a fan of the home-cinema are exposed to.
| Format-description |
Aspect ratio |
| 35mm-landscape format (36x24) |
3:2 (1,5:1) |
| 34mm-portrait format (24x36) |
2:3 (0,67:1) |
| 35mm-full-size format (36x36), medium format (6x6) |
1:1 |
| PC-format, TV-format |
4:3 (1,33:1) |
| Widescreen-format (HDTV) |
16:9 (1,78:1) |
| Cinema-format broadband |
1,85:1 |
| Cinema-format cinemascope |
2,35:1 |
Let us start with a very normal slide-photographer who projects his slides to the screen by means of a slide projector. A 35mm image has a size of 36 x 24 mm, thus an aspect ratio of 3:2 and/or 1,5:1. The special thing of the 35mm format is that there is either a landscape-format as also a portrait-format. Thus, the normal slide projectors can either project to the wall some slides in the aspect ratio of a landscape-format 3:2 as also an aspect ratio of a portrait-format 2:3. There are also the so-called full-size slides kept in the archives of some photographers with a size of 36 x 36 mm. Such slides are not exposed with a normal 35mm-camera, but many times they can be readily purchased in different holiday places. This type of full-size slides to which I also consider the medium formats sized 6 x 6 cm have an aspect ratio of exactly 1:1, thus generate a square image.
Let us continue right away with the TV and cinema formats. A normal PC represents 1024 x 768 pixels on a normal 17"-screen; this equals an aspect ratio of exactly 4:3. A normal colour TV represents a standard image in exactly the same aspect ratio. This is why this 4:3-format is called tv-format or PC-format. The modern TVs are already equipped for the high-resolution images (HDTV) and have an aspect ratio of 16:9, thus are more apt for movies than the normal TVs in 4:3-format. Those who have such a standard TV in the living room and watch a movie will be often annoyed by the thick black bars at the upper and the lower edge of the screen. Then, one really wishes a widescreen of 16:9-format. But with such a screen, there are still some bars visible the way one sees them in a cinema movie. The reason for this is that the cinema movies have a more extreme aspect ratio than the format of 16:9. While in the case of the HDTV-format the screen width is bigger than the image height by a factor of 1,78, this factor is 1,85 in case of a cinema movie and even 2,35 in case of a so-called cinemascope-movie.
In the upper graph, there are some different image formats drawn into a squared screen surface. It is clearly visible that the inner light grey area for a cinemascope-movie is of a larger width than the height by a factor exceeding 2. The blue and the yellow bars are generated by watching such a film on a 16:9-TV (blue) and/or on a common 4:3-device and/or PC (yellow). In this image, we can also recognize that the red small image format takes a much bigger space than the TV and cinema formats. By turning a red 35mm by 90°, the red image area with its respective grey outer bars also vertically fits into the squared image surface. And finally, we need the whole squared screen area if we project full-size 35mm-slides on the screen.
Screen format 1:1
In the following, we take a screen with an aspect ratio of 1:1, the way it is available in different sizes, and we analyze how the different image formats are represented on such a light screen from different projection sources. We intentionally choose a screen with a black masking, as in the penultimate chapter we have learned that such a black screen intensifies the contrast to the actual image and optimally borders the image at the sides.
Slide projector format 1:1 with a screen format 1:1
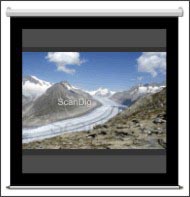
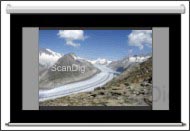
Let us start with the common projection of very normal 35mm slides on such a screen of a format of 1:1. A normal slide projector has the positive feature that it can project some 35mm slides either in landscape as also in portrait. A framed 35mm slide has always the standard size of 5x5 cm; the actual image is either of 36 x 24 mm or 24 x 36 mm or 36 x 36 mm. The following three pictures show how the respective format is represented on our 1:1 screen. In the following examples (and also in the following chapters) the condition is always that the projector in use is adjusted in a way that the image area falls exactly on the screen by means of the zoom-function or the manual positioning.

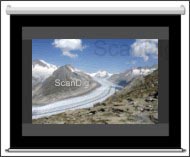
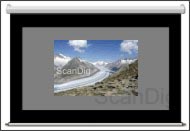
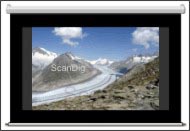
There is a normal 35mm-slide in landscape format in the left picture. It is, by the way, the big Aletsch glacier with the Alps of Bern at the background. Of course, the actual image only takes a partial area of our screen; the projector darkens the rest of the image surface. I intentionally masked this darkening with a dark grey, a real black as the frame colour of our screen is not achieved in the projection by means of the darkening. In a bright room, this area would even turn to white as the screen; in a dark room, this area appears in a dark grey as a result of the reflections and the remaining light. While the contrast of the image to the black screen frame is optimal, at the upper and the lower edge it is only sufficient.
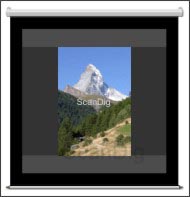
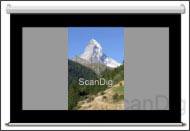
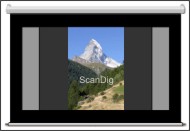
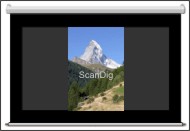
In the central picture we see the Matterhorn exposed in portrait. Here, we do have the opposite conditions of the left picture: at the upper and the lower edge, we do have an optimal contrast to the black screen masking; at he left and at the right, the bars are more or less black. What is characteristical is that on the screen, the left landscape image and the portrait image of the centre appear to be of the same size.
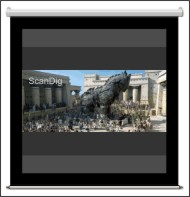
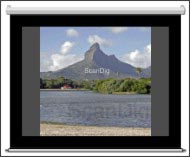
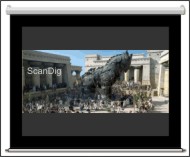
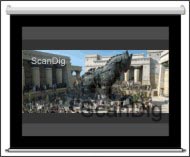
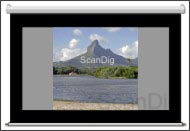
In the right picture, we finally have a full size image, for example a 35mm slide sized 36 x 36 mm or a medium format image sized 6x6 cm. At first sight, one could think that it is also the Matterhorn from a different perspective; but in fact it is not the Matterhorn of Switzerland but the Matterhorn of Mauritius, the Mont du Rempart. For such an image of 1:1, a 1:1-screen is of course optimal, as the image is bordered and contrasted from all sides in an optimal way.
Beamer format 4:3 with a screen format 1:1
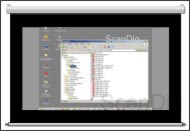
Now we will allow a little luxury to ourselves and replace our slide projector by a beamer in the standard computer format and/or TV-format of 4:3. But first, we contemplate our old slides by means of the beamer on a screen of 1:1 format. Therefore, our slides of course have to be already scanned and recallable on the PC. Thus, we connect a PC to our beamer and get an image on our screen as it is shown on the following picture at the left. As it is the case of a slide projector, the screen area that is not used appears in dark grey when we darken the room; but in the daylight, this area is white as the screen. At the left and right edge of the image, there is an optimal contrast to the black projection masking; at the upper and the lower edge our dark desktop merges almost fluently into the rest of the screen.

Now we bring some digitalized 35mm-images to our desktop with an image viewer and contemplate them on the screen. A landscape image does not exactly fit in our PC-screen and due to this, it also does not fit in our beamer, as the 35mm has an aspect ratio of 1,5:1, while our screen only has 1,33:1. On our computer-screen, we mask the area that is much too big by two black bars;these bars appear in our projection screen in dark grey as the beamer is not able to project a perfect black. But we can live with that (see the upper central image).
It is a little more difficult to project an image in portrait format. We already know the effect from the computer-screen: We certainly use the the full screen height, but at the left and at the right we have some thick black bars that we of course find on our screen as dark grey bars. This situation is certainly the less convenient one: At the left and at the right of the image there are dark grey projected bars and at the upper and the lower side there are some light grey bars that emerge from the remaining brightness. It is not surprising that in the area of the digitalization it prefered to work with the landscape format and the portrait format is increasingly pushed into the background.
If we only contemplate some images in portrait format we can rectify this mishap by using the zoom-function of the beamer: We strongly enlarge the image so that our portrait slide goes up to the upper and the lower edge of our screen. Of course, we also project beyond the screen at the sides, but these are only the dark grey bars that are projected to an empty space, and this is not disturbing in a darkened room. By this way, we can contemplate our image in protrait format in a very common size; but as soon as a landscape image is projected or as soon as we unhide the normal windows-desktop, our image appears fragmented in the room.
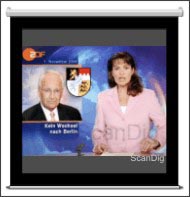
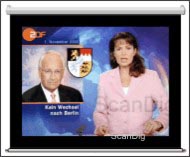
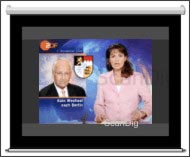
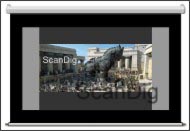
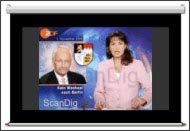
But if we do already have such an excellent beamer, we do not only want to use it for viewing the computer image but also for watching TV. The following pictures show the situations resulting from a 1:1 screen combined with a 4:3 beamer. We first watch a very common TV programe, for example the current news. Our TV image has a format of 4:3, thus, it is equivalent to the one of our beamer. From the following three images, the left one shows this situation: We use a main part of the screen, enlarge the projected image at the left and at the right up to the black masking and have a non-used screen area left at the top and at the bottom that, depending on the daylight, appears in light or dark grey.
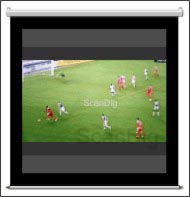
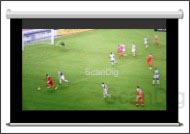
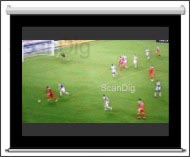
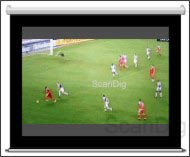
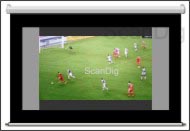
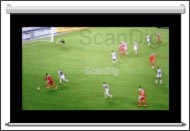
The situation gets interesting with the widescreen formats. Let us watch a football game that is shown in a format of 16:9. As a common TV cuts off the upper and the lower area with some black bars, we see these bars on our screen as some dark grey areas. The bars are dark grey and not black as the screen masking because a beamer cannot perfectly project the colour black. Thus, while at the left and at the right side we have a very good contrast to the black frame of the screen, the contrast at the upper and lower edge of the image is still sufficient.
By watching a movie in the cinemascope-format (2,35:1), exactly the same situation results but more extremely. All together, the projected grey bars are almost as wide as the actual image. It is certainly a pitty for the not used image area, but in case the screen is sufficiently large, the actual image is big enough for enjoying the private cinema.
At the end of this chapter I would like to mention that of course there is no law on earth that forces the beamer to project the image to the centre of the screen. In order to enjoy a football game in the 16:9 HDTV-format, the screen does not need to be fully expanded. Instead, the screen can be drawn out of the tube by a little more than 50%, so that the projected image appears on the lower end of the screen. Additionally, the lower grey bar can be projected on the black masking so that it is not visible anymore. This results in an image that is bordered by the screen frame at three sides; only at the upper side of the screen, the dark grey projection bar is visible. By this way, a common 1:1 screen turns into a perfect 16:9 screen. The same trick can be of course applied in the projection of photos and/or computer images.
Conclusion 1:1-screen
For those who use a screen either for projecting slides with a common slide projector as also for projecting the computer or TV images with a normal 4:3-beamer, a screen with the format of 1:1 is very apt as it is the only one able to use the full screen width and height by projecting the slides, either in landscape, portrait or in full size.
For projecting TV and computer images with a 4:3-beamer, it is not necessary to pull the screen from the tube up to the stop; it is enough to use a little more than 50% of the screen.
Screen format 4:3
While in the last chapter we analyzed some different projections combined with a square 1:1-screen, we choose now a screen in the tv-format 4:3, of which there are also different sizes. For the following advisements, the size does not play any role but only the format. We first have a look to the ratios by using a very common slide projector and change then to a 4:3-beamer. We use again a screen with a black masking so that we have an optimal and contrasty bordering in those areas where the projected image reaches the image margins.
1:1 slide projector with a 4:3-screen
Let us start with a normal slide projector that can project 35mm - originals on our screen either in landscape as also in portrait format. In the case of a 1:1-screen we had the pleasant event that a picture in landscape format fitted into the surface of the screen as also a portrait image did. The following three pictures show that this is not the case anymore with a 4:3 screen. Finally, a landscape image is of the same size than a portrait image, just turned by 90°.
Let us start the analysis with the picture at the right: A slide sized 36 x 36 mm or a 6x6-medium format can be projected on the screen in a way that it touches the screen masking at the top and at the bottom. Thus, at the upper and the lower edge of the image we have an optimal contrast transition from the actual image to the screen frame. At the left and at the right side of the image, a part of the screen remains unused. In the daylight, this part is more or less of the same colour as the screen, while in dark light conditions, it appears in a shade of grey as the result of the remaining light and the reflection.
Now let us look at the picture located in the centre as a second, where we recognize exactly the same effect as in the full-size image, the only difference is that the unused screen areas that are marked in grey are a little wider. In the case of the landscape image (picture of the left), the matter gets interesting: Even though the image could be apparently enlarged, (it still has enough space in all four sides), it only captures the central part of the screen, as once we exactly positioned our slide projector, the portrait image is, as generally known, as large as the landscape image. Thus, we have an unused screen area in all 4 image sides that, depending on the light conditions, appears to be bright or dark.
During a slide show where only landscape images are applied, it is of course possible to adjust the projection size in a way that the area of the landscape image is almost congruent with the screen area. Then, one practically sees an optimal image in a beautiful black frame. But as soon as a portrait image appears, it will be projected far beyond the screen borders. Moreover, I would like to mention that a slide projector is adjusted to a 1:1-screen by means of a portrait slide, as with a landscape slide it is not visible if a following portrait slide will exactly fit into the screen area.
4:3-beamer with a 4:3-screen
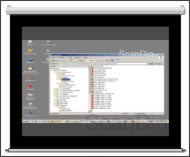
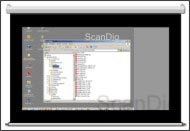
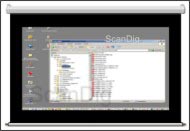
Now we change again our slide projector for a modern 4:3-beamer and connect the device to our PC. A normal windows-desktop the way we see it on a 17-inch screen with a resolution of 1024x768 pixels is exactly represented in this way and of course it also exactly fits into our screen, as either the computer resolution as also the resolution of the beamer do have the same aspect ratio of 4:3 as also our screen does. From the three following pictures, this situation corresponds to the left one.
B representing a scanned 35mm slide on the computer screen, there is a black bar at the upper and at the lower edge of the screen, as the image file has an aspect ratio of 1,5:1, while the aspect ratio of our computer screen is of 1,33:1. Our projector projects this black strip to the screen that reappears in a dark grey, as a projector cannot generate a perfect black colour. We can see this situation in the picture of the middle and will realize that these thin dark grey strips are not disturbing.
At the very right we see the representation of a portrait image. This image either uses the full height of the computer screen as also on the projection screen; at the left and the right side of the image there are some grey areas that are generated by the beamer. It is the same situation as the case of the computer screen that the portrait images appear much smaller than the landscape images. All around, the contrast ratios are very good: the image contrast is sufficient and distinctive, either to the black screen masking as also to the dark grey bars.
Such a screen is practically ideal for the computer applications, as the projected image, no matter what it contains, does exactly fit into the image area of the screen. The condition for this is, of course, the respective zoom-function of the beamer and/or the exact positioning of the beamer. And as a normal TV image also has the same 4:3 format, it is logical that it exactly fits into the image area of a 4:3-screen; this situation can be seen in the following image series in the left picture by the example of a simple news broadcast.
Now we watch again a football game that is shown in the widescreen format (16:9, upper picture in the centre). If we have a 16:9-TV, the whole image surface is filled up with the football field. But our beamer only projects a 4:3 format on the screen. And then we have some black bars at the upper and at the lower edge, as it is the case in a TV, but on the screen they appear in a dark grey as a beamer cannot project the real black colour. If we watch a DVD in cinemascope-format (2,35:1), then we have even have a black bar at the upper and the lower edge in a widescreen TV of a format of 16:9. Of course, these bars are clearly higher on a 4:3-screen; they almost take half of the image (see the upper right picture).
In the previous chapter (1:1-screen) I mentioned in the end that the screen does not have to be pulled out completely if one is not going to use a 1:1-projection. The same of course applies for a 4:3-screen. But in this case, the uncompleted roll out of the screen makes less sense, as the projected image exactly fits into the image area of the screen and the dark grey colour of the beamer does not differ much from the black masking. Moreover, there is of course to consider that in a DVD, the main menu and the specials as a trailer are shown in the normal 4:3-format.
16:9-beamer with a 4:3-screen
Let us allow in the end of this chapter the wickedly expensive luxury of a widescreen projector in the 16:9-format and continue using our 4:3-screen. If the graphic card of the computer generates an image of the format 16:9 and can forward this to the beamer, we get an image on our 4:3-screen that looks more or less as the left one of the three following illustrations. We realize that we only use a central strip of the projection screen; there are some bars at the upper and the lower edge that, depending on the surrounding light, appear in light or dark grey.
If we now represent some digitalized 35mm images on our desktop, we get in the case of the landscape images a situation as it is illustrated in the following central picture and in case of portrait images as represented in the following right picture: at the right and the left side of the image we see some dark grey bars that are generated by our projector. Thus, the images are represented smaller than with the appliance of a 4:3-beamer, please compare the respective pictures of the previous chapter. Thus, connecting the 16:9-beamer to a computer only provides disadvantages.
Also if we project a TV image or a DVD-image with a 16:9 beamer on our 4:3-screen, we only use the central partial area of the screen. In case of a normal TV image (see the left picture with the news), we have the dark bars at the left and at the right side the way we also have them if we watch a normal TV programe on a widescreen. But we do not make full use of the projection screen until we watch our football game in the widescreen format 16:9 and practically have the same ratios as in the case of a 4:3-beamer with the only difference that the upper and lower bars are brighter, as they cannot be generated by the beamer but depend on the remaining light. The same of course also applies to the case of the right image by watching a 2,35:1-DVD. Also in this case we only have disadvantages compared to a 4:3-beamer.
Thus, we conclude that it does not make any sense to spend a lot of money for a widescreen beamer in the format of 16:9 if we only have a normal 4:3-screen available. In any situation of projection, we only have disadvantages in comparison to a normal standard 4:3-beamer. There is still to be mentioned that a widescreen beamer of 16:9 eventually does also support the standard-modus in the 4:3-page format; then we have the same situation as in the previous chapter.
Conclusion 4:3-screen
A screen in the page format 4:3 is either apt for a common slide projector as also for a normal 4:3-beamer. The appliance of a 16:9 widescreen beamer in connection to a 4:3 screen does not make any sense, as we have seen in the previous subchapter.
The computer images and the normal TV programes use the whole image area of a screen, thus are optimally represented with a good contrast to the black screen masking. The films in the widescreen format are certainly represented naturally narrower; but as the beamer does cover the rest of the screen with a dark light, there are very good contrast ratios so that one can enjoy a very good image. The same also applies for the viewing of digital images by means of a PC.
By using a slide projector, the full screen width cannot be used; thus the maximum image size results from the height of the image area of the screen. Thus, a screen with a page format of 4:3 is optimal for those who either project some normal TV programes as also movies and project some PC-images on the screen and occasionally use the slide projector for some slide shows.
Screen-format 16:9
In both last chapters we first analyzed a squared screen with an aspect ratio of 1:1 and then a screen in the standard format of 4:3. Now we take a screen in the widescreen format of 16:9 and visualize again how the image is represented from different light sources. There are also some different sizes of the 16:9-screens; but for the following analysis, only the aspect ratio of 16:9 does play a role. Again, the condition for this is that the projector or the beamer is adjusted by means of the zoom function or the manual adjustment in a way that the projected image exactly meets the image area of the screen.
Slide projector in the format 1:1 with a screen in the format 16:9
We first apply a common slide projector in order to watch a very normal slide show on our 16:9-screen. The three following images barely differ from those of the respective subchapter with a 4:3-screen: The image size results from the portrait image that is exactly adjusted into the image area of the screen. With the height of the portrait image, the width of the landscape image is also determined and we can see in the left picture that a normal landscape slide only takes the central partial area of the screen surface available.
No matter if it is about a landscape slide, a portrait slide or a full-size slide, not even 50% of the screen surface available is exposed. There are some big empty surfaces that appear in bright grey in the daylight and in dark grey in the dark. Respectively, there is no contrasty bordering of the image by the black screen masking; only in the case of the portrait image we could mask the short image edges contrasty.
Thus, we learn that a 16:9-screen is less convenient for the use with a normal slide projector. There is too much screen surface wasted; the projected image does simply not rightly match into the image area of the screen.
4:3-beamer with a 16:9-screen
Now we replace the long-serving slide projector with a modern beamer in the standard TV-format 4:3. As our screen is of a widescreen format 16:9, our beamer can certainly use the full height of the image area of the screen but not the full width. The second image of the following series makes this clear: Our windows-desktop is adapted into the 16:9-screen in the standard format of 4:3. This happens when the zoom-function of the beamer is exactly adjusted to the image area or if the beamer is positioned in the exact distance to the screen.
At the upper and the lower edge of the image, we have an optimal contrast ratio to the black screen masking. But at the left and the right, there are some grey areas left that due to the remaining light appear rather light grey in the daylight and dark grey in a darkened room. Thus there is no good contrast ratio at the side edges as our windows-desktop seems to transit into the empty screen area almost smoothly.
By looking at the central and the right picture, the matter gets very coloured due to the strips. In the central picture, a scanned 35mm slide is projected with our 4:3-beamer on our 16:9-screen. As already mentioned in the case of the left picture, our beamer does not fill the whole screen so that there are some grey vertical bars at the sides. Our landscape image does not fill the whole of our computer screen as it has the format 4:3, while our 35mm-slide has a format of 3:2. Thus, the beamer projects some black bars at the upper and the lower part of the image that appear on the screen in a dark grey colour.
During the projection of a scanned portrait 35mm image, the matter is exactly the way around: The image takes the full height of the computer screen and therewith also the one of the beamer image; but at the left and the right, the beamer projects some black bars on the screen that only appear in a dark grey as there is no beamer that is able to produce a real dark black. The situation of the right image appears to be extreme: at the outer sides, the black bars of the screen masking appear, then some more or less bright/dark bars follow as a result of the not used screen area and around the image, the beamer projects some dark grey marginal bars.
Herein, I would like to point out that it is of course possible not to project the image to the centre of the screen but to the edge. By this way, the beamer-image is bordered at three sides by the black screen frame so that in these three sides, the contrast ratio is very good..
But now we will get into the joy of TV and watch, as we did in the previous chapters, first the news, than a football game and then a movie. As it was already the case in the computer image, our 4:3-Beamer does also not use the full width of our 16:9-screen. There are some bars at the left and at the right side that, depending on the surrounding light, appear in a bright or a dark grey.
Now we first have a look to the news (left picture) and realize that the full acreen height is used; at the left and at the right side, the vertical bars described before remain. But the image is large and at the upper and lower edge it has a good contrast to the black screen frame. During the football game (central picture), the matter gets worse: Apart from the vertical and unused bars, there are some additional dark grey bars that our beamer projects on the screen. These are the famous black bars that we also have by watching a movie on a normal TV. And we have of course exactly the same situation if we watch a DVD (right picture) in the cinemascope-format (2,35:1), the only difference is that the horizontal bars are clearly wider.
Now some readers might be disappointed, as such a real movie-feeling does not come up in such a situation and a 16:9 widescreen-beamer is not in everyone's budget. But therefore, the whole point of the matter comes up: In the upper central image of the football game there are some unused image areas either at the left and at the right side. If our 4:3-beamer has a zoom-function, we simply zoom out our 16:9-image as long as the whole screen surface is filled. This situation is represented in the lower football-image.

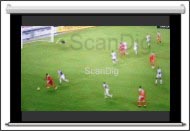
Now we use the whole image area of the projection screen for the football game, thus we almost have some optimal conditions. I say "almost" because the dark grey bars from the beamer are now projected on the upper and the lower part of the black surface masking so that the black colour is slightly brightened, but this is a thing that should not disturb us. And we can of course apply the same zoom-effect on our DVD-film, but the only difference is that in case of a 2,35-cinema format it is not possible to fill the whole image area. There are no dark grey bars remaining that our beamer partly projects into the image area and partly into the black frame of the screen.
Now, this makes the heart happy: If we watch a normal TV programe as the news, we use the full height of the screen as if watching a movie in the widescreen format, we make full use of the image area of our screen. And, at the end of this subchapter, we realize that a 16:9-screen combined with a normal 4:3-beamer is predestinated for watching broadband programes and/or films.
16:9-beamer with a 16:9-screen
Now we use for our 16:9-screen a widescreen-beamer with exactly the same aspect ratio. If the beamer is rightly positioned and/or its zoom-function is used accordingly, the beamer will project the image exactly in the image area of the screen. The left picture of the three following ones shows exactly this situation in the projection of a computer image. Of course, the condition for this is that the graphic card of the computer provides a widescreen format of the aspect ratio of 16:9.
What we now represent on the windows-desktop is optional. By choosing a digitalized landscape 35mm-slide, this will take the whole of the screen height; at the left and the right, the beamer produces some dark bars as we can see on the screen. But these vertical bars are very narrow and dark so that they almost merge with the screen masking. In the representation of a scanned portrait image (see right picture) we also have some vertical bars but almost as wide as the actual portrait image.
Due to the black frame of the screen, we have in both situations an almost optimal contrast. And as our beamer projects an almost black grey colour as marginal bar, our digital image practically shines on a black background. And this is very good for the eye of the viewer.
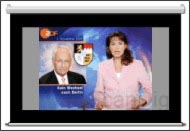
Now we use our 16:9-screen and our 16:9-beamer for the TV. We first start again with a very normal news programe in the standard TV-format (see the left image of the following 3 images). If we watch such a programe on a widescreen TV, there are some vertical bars at the right and the left. Our 16:9-beamer projects exactly this image on our screen whereby the marginal bars do not appear black but in a dark grey, as no beamer can produce a real black colour. But we still have an optimal image on the screen, as we make use of the full height of the screen and our news image outstands very well from the black-grey background.
As next we watch a football game that is broadcasted in HDTV-format (16:9, see following image in the centre). On a widescreen TV, the foorball field takes the whole image area, and this is the same way our 16:9 beamer projects it in the 16:9 screen. Thus, we have some optimal conditions: Our football field takes the whole image surface of the the screen and is perfectly bordered by the black marginal frame. The same of course also applies for a movie broadcastet in 16:9-format.
Finally, we watch our movie on DVD that is played in the cinemascope-widescreen format 2,35:1. We use the full width of a widescreen-TV and get some narrow black bars at the upper and the lower edge of the image. Our 16:9-beamer projects the the image on the screen in the same way. The black horizontal bars are dark grey, as the projector cannot project an ideal black colour. But they hardly differ from the black masking frame so that we get an almost perfect DVD-image on our dark background. This is real home cinema!
Thus, the images above show, as expected, that the combination of a 16:9-screen with a 16:9-beamer is ideal. We can either enjoy the computer images as also TV-images of any format on a black image surface on the projector in a sufficient size without any zoom-switching. Only the portrait digital images appear a little small on the screen.
Conclusion 16:9-screen
As expected, a screen in movie format is optimal for watching widescreen-programes and super-widescreen movies. Thereby, it is possible to use the full image area either with a normal 4:3-beamer as also with a 16:9-widescreen beamer. But by using a 4:3-beamer, one has to apply the zoom-function in order to adapt the image optimally into the image area of the screen, depending on its size. One eventually also has to switch over if one changes in the main menu to DVD that is nearly always projected in the format 4:3-format.
If a 16:9-beamer is used, the computer images are optimally projected. In case of a 4:3-standard-beamer, the image height is quite low and there are some vertical unused areas of the screen. The image sizes are also small if they are projected with a common slide projector on a 16:9-screen.
From the observations of above it gets obvious that a 16:9-screen should be used in case one preferably sees widescreen- programes and movies.
Resume
In the chapter of above, the interplay of different screen formats with different projectors was analyzed. Thereby, it became obvious that to each screen format a certain projector optimally matches:
- A common slide projector (aspect ratio 1:1) optimally matches to a screen of an aspect ratio of 1:1.
- A standard beamer (aspect ratio 4:3) optimally matches to a screen of an aspect ratio of 4:3.
- A widescreen beamer (aspect ratio 16:9) optimally matches to a widescreen-projector screen of an aspect ratio of 16:9.
But there are other projection formats that can be combined less than good with certain screen formats. For the different user groups, the rule of thumb is as follows:
- Slide shows: Those who use their screen mainly for slide shows with a normal slide projector and only occasionally project some other images on the screen will be best off with a screen of an aspect ratio of 1:1, as by using the screen with a beamer, it does not have to be pulled out completely.
- Computer-presentation: Those who mainly use the screen for computer-presentations with the help of a beamer will be best off with a screen and a beamer in the standard format 4:3.The respective combination in 16:9-format is certainly also very apt, but the image height is then clearly lower with a certain width.
- TV: Those who use their screen mainly for watching TV will be best off with a 4:3-screen and a 4:3-beamer, as then, the projected image fully uses the image area of the screen.
- Movies: For those who mainly want to watch some widescreen-programes and movies on their screen, a 16:9-screen and a 16:9-widescreen beamer or the combination of a 4:3-screen and a 4:3-beamer is optimal. In the combination of a 16:9-screen with a 4:3-beamer, the full screen width is only used if the zoom-function of the beamer is applied respectively.
Back to the index projection screens
|