Test report Plustek OpticFilm 120 medium format film scanner
After in the year 2011 first rumors about a new scanner for medium formats from Plustek came up, in the year 2012 the Plustek OpticFilm 120 was presented at the tradeshow photokina for the first time. The official market release, however, was postponed again and again. Starting at January 2013 a couple of singular devices appeared on the market, and also in the following months again and again some singular devices were available. So it is difficult for us to mention an official date for the commercial launch; let's say roughly spring 2013.
When reading the technical data of the Plustek one immediately notices that they sound promising. With a hardware resolution of physical 5300 dpi and interpolated 10600 dpi, a dynamic density of 4.01 and a maximum scannable film size of 60x120 mm here seems a medium format scanner has come onto the market for a reasonable price, for which many medium format photographers, who never had the enjoyment of having a Nikon Super Coolscan 9000ED, have waited for a long time.
How the Plustek OpticFilm 120 proves in practice and which performance it yields, our following test report will show. Of course we will go into the competitor model Reflecta MF5000 againd and again, which came into the market already in September 2011. Also we will examine, if the Plustek OpticFilm 120 can keep up with the leader in the medium format area Nikon Super Coolscan 9000ED, and if the Nikon 9000 can furthermore maintain its leading position in the film scanner field with its outstanding performance data.
The Plustek OpticFilm 120 is not available any more since 2019.
Equipment, accessories and performance data of the Plustek OpticFilm 120
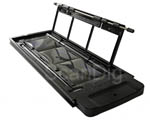
The Plustek 120 is delivered in a box with carrying handle as it is usual for Plustek. This box contains everything you need in order to start scanning directly. The scanner itself has a metal case which is very robust and makes it seem classy. The front of the scanner is made of black high gloss plastic, on which after switch-on the Plustek logo glows blue. By this it is done without a separate status LED. Furthermore there is a button for switching the scanner on and off, which glows red according to the operation mode. And there is a button for ejecting the film holder at the high gloss front of the scanner, which has the dimensions 210 x 374 x 189 mm and weights only 5,7 kg. We can say that it is a light scanner, since compared to the Nikon 900, which weights about 9 kg and is much bigger, the Plustek OpticFilm 120 seems to be a lightweight.

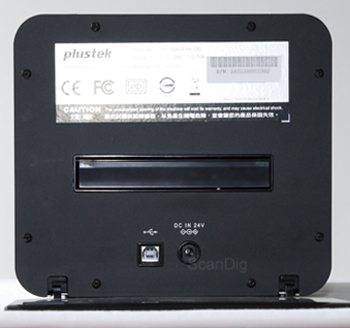
When we have a look at the backside of the scanner it quickly becomes clear, why the Plustek is so small and light: On the back side there is a protection cover, which protects the film holder slot, the USB 2.0 port and the power supply port. In order to set up the scanner, this protection has to be flapped down. The slot for the film holders at the front is protected by an opening flap. This prevents dust getting into the device, while it stands still on the desk. For us it is a mystery what the flap at the backside is good for, since the scanner interior is protected by the flap of the film holer slot and the USB port and the power supply port don't need an additional protection. The only sense, which we can see at the additional flap at the scanner backside, is that you havae to reserve about 10cm behind the scanner, which corresponds to the size of that flap, since the film holder is shifted outwards at the backside of the scanner while scanning. Apart from that this flap is only a disturbing, bothersome part, which lies uselessly on the surface of the desk.
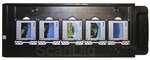
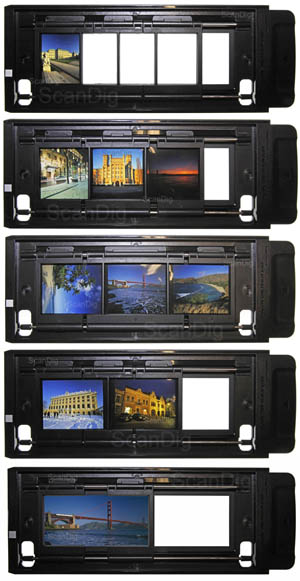
In the scope of delivery there are seven film holders included: two film holders for 35mm films and five for medium format (120/220mm) films. At the first glance one becomes perplex, since other medium format scanners can do with 3 film holders. If the many film holders have an advantage in practice or just make the scanner unnecessarily expensive, we will examine later in this review.
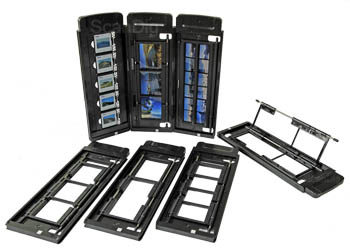
The film holder for mounted 35mm can include maximum 5 frames, and in the film holder for 35mm film strips there can be inserted two strips each maximum 6 frames. That has been known for more than 10 years from the Nikon 9000. In the medium format area there is a separate film holder for each film size. The holder for 6x4,5cm films has place for up to 4 films. In the 6x6cm and in the 6x7cm film holder there can be inserted 3 pictures. And scannning of 6x8cm and 6x9cm films is possible in the double pack, at which these film formats share one film holder. Medium format panorama photos can be scanned separately in the 6x12 film holder.
The injection of the film holders is done via the slot at the front side of the scanner, and as soon as the scanner has grabbed the film holder this is feeded automatically. So it is known from the Nikon 9000. In the scope of delivery there are also two cover foils. They can be used for covering empty parts in the 35mm film strip holder, thus avoiding disturbing light falling onto the film material. We know this also from the Nikon Super Coolscan 9000. Nikon, however, delivers such a cover also for the medium format film holder.

The included power supply unit is suitable for 100-240V and 50-60 Hz. Like at all Plustek OpticFilm scanners the scan software SilverFast is included in the scope of delivery. In the software box there is both the SilverFast Ai Studio 8 DVD and the driver CD from Plustek. However, there is no printed manual. You can find an online version or a PDF version on the Plustek CD. The PDF manual on the CD is available in 12 languages: Enlish, German, French, Spanish, Italian, Portugues, Russion, Plish, Korean, Japanses, and tranditional and simple Chinese. A printed brief instruction, however, is included.
The scanner has a CCD sensor and a LED light source. Plustek gives a physical resolution of 5300 dpi, which can be interpolated to maxiumum 10600 dpi. Professional photographers surely will never the interpolation fuction of the scanner or the scan-software, respectively. If there is something to interpolate, this goes faster in the image editing program. If the Plustek OpticFilm 120 achieves the given 5300 dpi also in practice, our resolution test will show later.

For the density range Plustek gives a value of 4.01, which, however, can only be achieved with the multi exposure function of SilverFast. Since according to information of the software manufacturer Lasersoft Imaging the multi exposure function increases the density range of a scanner up to 1.0, we estimate, that the Plustek OpticFilm 120 has a hardware based density range of about 3.2. That would not be a good value. What the numbers for the density range mean in detail and what a density increas of 0.8 means, is explained on our detailed website Density and density range of scanners.
As additional feature it must be mentioned that the Plustek OpticFilm 120 has an infrared sensor, so that an automatic dust and scratch removal, which is named iSRD within SilverFast Ai Studio, is possible. In the field of simple and professional film scanners this function is nowadays standard. Only extreme low-cost film scanners or high end scanners like the Flextights from Hasselblad don't have such an infrared channel.
An absolute negative point is that the Plustek OpticFilm 120 has no autofocus. Such an expensive scanner without auto focus function? We did not expect that, especially because we are used from low-cost scanners that an automatic focus before the scan is standard.
Installation and setup of the Plustek OpticFilm 120
In order to put into operation the scanner, first you connect the scanner to the power supply net with the power supply unit included in the scope of delivery. Then you connect the scanner with the PC with the included USB cable. It is important that you don't use an USB hub and connect the scanner to an USB port of the PC, which is directly connected with the motherboard. The connection via an USB hub - also one which is located at the front side of many PCs - often leads to problems at the installation and during operation.
Then you can start with the software installation. The Plustek CD, which contains the scanner driver, has to be installed first. This is done with a few mouse clicks. Then you put the SilverFast CD into the DVD drive and start the installation. For us it is a mystery why Plustek makes the installation in 2 steps.Lastly the driver could be installed directly during the SilverFast software installation, like it is possible at many other scanners.
After finishing the software insatllation the computer requires a restart of the system. After that restart you can switch on the scanner and start SilverFast. We recommend to check before the startup, if there are updates for SilverFast. This can be done either on the Lasersoft Imaging homepage or by the service dialogue within the software. Please, note, that the software must to be registered in order to get updates.
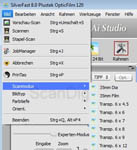
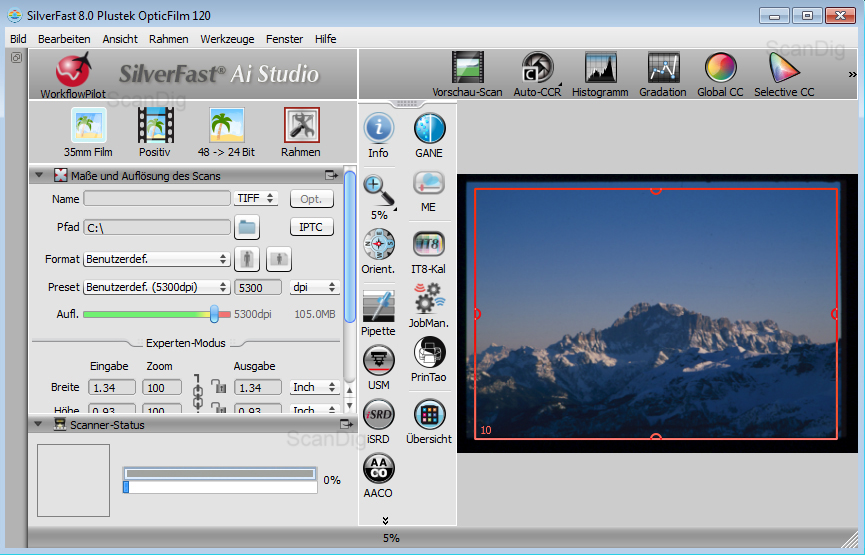
SilverFast can be run in 10 different languages. There is no extra installation necessary for that. On the start screen of SilverFast the language can be set below the image source.
If you start SilverFast you have to choose the scanninh mode before the prescan. Thereby you determine which of the 7 film holders you have fed into the scanner. This selection is necessary since the Plustek OpticFilm 120 does not have an automatic film holder recognition system like, for example, the Nikon Super Coolscan 9000 ED has. If you scan a batch of films of the same format, you have to make the selection of the film holder only once. However, if you digitize different film formats, it becomes very bothersome to select the film holder after each change. At least the selection of the scan mode is possible both before and after inserting the film holder. As soon as the right scan mode is selected the scanner and the software are ready to start working.
Scanning mounted 35mm films and 35mm film strips with the Plustek OpticFilm 120
Although the Plustek 120 mainly is made for medium format photographers, we start with the standard of the analogue photography, the 35mm films. For scanning 35mm slide mounts there is a film holder, which has place for 5 slide mounts. The landscape format slot of this holder has the dimensions of 25 x 37 mm, so that scanning the full format 35mm slide mounts Wess AHX500K is no problem.
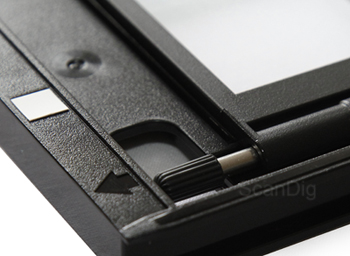
The edgeds of the slots are skewed and dull. This prevents light reflextions caused by the film holder. A kind of spring on one side and a nose on the other side holds the slide mounts safely insode the film holder. Since a spring is a wear part you have to expect that the one or other spring breaks after many insertions and take outs of slide mounts. You can insert slide mounts up to 3mm thickness without problems. The insertion and take out of the slide mounts can be done safely and comfortably. Of course you can also put in conglutinated, double glass mounts, like you may know them from the 70s, howver, the film holder construction does not work well for such special frames. After having loaded the film holder you can start scanning.
Before you insert the film holderinto the scanner it is recommended that remove the mounted slides from dust and dirt, so that they don't get into the scanner. It often suffices to clean them with a specific anti dust spray or by using an anti static brush.
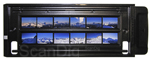
Let us come to digitizing 35mm film strips. You can insert 12 pictures into the 35mm film strip holder. So you can digitize 2 film strips each containing 6 pictures within one working step. Of course you can also insert smaller film strips, it is just limited to 12 pictures. For loading the film strip holder it can be swinged open. There are magnets which make sure that the film holder keeps the film strips safely. Also this film holder has skewed and dull bases in order to prevent light reflexions. You can swing open the film holder for a comfortably loading and you can close it safely with the magnet holding. If you want to fill that film holder with singular pictures or with several film strips of a length of 2 frames, you need a sure instict. For this purpuse you should use tweezers with flattened paddles and you should wear cotton gloves. Two arrows on the film holders show the injection direction for the holders.
There are also two covering foils included in the scope of delivery. You can use them in order to cover empty slots on the film holder thus preventing the film material from other light sources.
The film holder is shifted into the scanner slot in the direction of the arrow on it. The automatic feeder grabs the film holder after a couple of seconds and feeds it fully automatically. Now you have to select the scan mode within the SilverFast software. Now you can get an minature overview of all pictures inside the film holder by using the overview button.  . All images which are marked blue in this overview will be scanned in the batch mode. If you want to get a prescan of the first image, you can directly click at the preview button. After having made all settings you can start scanning. In order to scan the images marked in the overview you start the batch job via the image menu. Now the scanner starts buzzing, comparable to the noise of a mobile phone, which is set to vibration mode, and scans step by step the selected images. . All images which are marked blue in this overview will be scanned in the batch mode. If you want to get a prescan of the first image, you can directly click at the preview button. After having made all settings you can start scanning. In order to scan the images marked in the overview you start the batch job via the image menu. Now the scanner starts buzzing, comparable to the noise of a mobile phone, which is set to vibration mode, and scans step by step the selected images.
After having done all scans the film holder can be ejected by clicking the ejection button at the front side of the scanner. An additional film holder is recommendable in order to load it while the first one is inside the scanner. So a fluent work without interruptions becomes possible. In our online shop there are additional Plustek film holders available.
Since the film holders don't have an automatic recognition systems, you can also scan 35mm panorama photos up to 7,4 cm length with a little trick. Such a panorama film you can insert at the left side on the bottom into the film holder, since there is no separation base at this position. Then you select the 6x8 film holder instead of the 35mm film holder in the SilverFast software. And now you can scan the 35mm panorama photo. However, you only should use the lower frame, since at the frame above it the picture is beeing cut .
Scanning medium format films with the Plustek OpticFilm 120
Scanning medium format films is the main task of the Plustek OpticFilm 120, since for 35mm films there are significantly cheaper solutions on the market. With this scanner also fans of 6x12 cm medium format panorama photos will have their pleasure, since scanning them is also possible with the Plustek OpticFilm 120. For each film size there is one of the 5 120/220 mm film holders suitable. On the first glance you can detect a couple of parallels to the film holders of the Nikon 9000. Size and weight are approximately equal, both are black and made of plastic. Also the film holders of the Plustek scanner have at the leading sides one which is smooth and one which has bases, so that the film holder feeder can grab the film holders. There are also black arrows at both manufacturers which show the injection direction. But here the similarities finish.

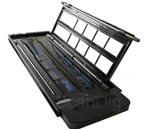
Each of the five medium format film holders is equipped with a manually adjustable mask. This mask consists of several parts and can be moved horizontally. These masks make it possible to set the separating strips in a way that the complete image is covered and hold black at its edges. So you also can load the film holders in a flexible way. At the two film holders for 6x6 cm and 6x7 cm medium format films the separation strips, however, are not moveable, and at the 4,5x6 cm film holder the dimensions for the two exterior frames are fix. Also at the medium format film holders faint plastic was used for the separation bases and there are slightly flattened edges for avoiding light reflexions. Hinges with an aglet make sure that even after multiple loading of the film holder there is no wearing. Magnes make sure that the film holders can be closed and opend safely without taking the risk to break something. Unfortunately there is no moveable flap with a locking feeder to strain the films, as it is already known from the Nikon 9000 or the reflecta MF-5000. So a perfect flatness of the images is not always possible. For strongly curved and/or curled films there cannot be achived an optimal flatness inside the film holder so that you have to expect blurs.
The loading of the film holders with medium format films can be done in an uncomplicated way. If you have cut singular frames, you have to be more precise. But also this becomes easier and easier the more experience you have. tweezers with flattened paddels make the insertion of the film material much more comfortable. Of course also when working with medium format films you should wear cotton gloves by all means. Also you should clean the film material before scanning with compressed air and/or an anti static brush.
You should consider, that the variable separation base construction covers the image only completely if the elements are shifted close to each other. If this is not the case there remain small gaps which can cause stray light effects. This effect can be very noticeable at negatives, since here the film edge is light transmissive in the contrary to positives. Since stray light influences can be heavy, the question arrises what the separation strips are good for and why Plustek has not set them fix.
Since the edges of the film holders are flat, you can also insert longer film strips or film strips which are not cut exactly. Hence an additional cut of the film is not necessary. A film strip may have the maximum length of 27,5 cm. However, you have to consider, that the maximum scan area is 6x12 cm.
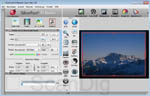
After the film holder is loaded you can shift it into the scanner. Also here the scanner grabs the film holder and feeds it automatically inside. In SilverFast you have to choose the right scan mode, since if it is set to 35mm slide, for example, only a part of the image will be scanned. After having chosen the right scan mode you can start the prescan. With the overview button all pictures inside the film holder can be displayed in miniature. Now you can select, for which images you want to make a prescan in order to make suitable settings for it. For these settings the full power spectrum of the SilverFast Ai Studio scan software is available.
If you start the main scan, the scanner makes a dull buzzing, which is comparable to the noise of a mobile phone which is set to vibration mode. Then you ear a load creaking and then the scanner starts digitizing the images. In between you may hear a buzzing and clattering, all in all noises which are normal for film scanners. After having done the scaning, the scanner waits silently until the processing within the software is finished. When SilverFast shows the message that the processing is finished you can take out the film holder by clicking the eject button at the front side of the scanner and insert the next film holder. If you have to scan many films of one sort, e.g. a complete archive of 6x6 images, we recommend to purchase a second film holder, so that you can load it while first one is inside the scanner.
Where are the limits of the Plustek OpticFilm 120? The maximum film size is 6 x 12 cm; larger panorama films can not be scanned with the Plustek 120. Furthermore the medium format films have to be taken out of slide mounts or passe-partout before scanning.
The software of the Plustek OpticFilm 120
In the contrary to many other manufacturers Plustek does without an own scan software and delivers the OpticFilm 120 only with SilverFast Ai Studio 8 from Lasersoft Imaging. With an opionally available IT8 calibration target this software also enables the calibration of the scanner. From Lasersoft Imaging there are IT-8 calibration targets available on Kodak-, Fuji- and Kodachrome film. SilverFast Ai Studio can create and manage several colour profiles. If you want to scan both Kodak films and Fuji films, you can create a suitable colour profile with the help of a Kodak and a Fuji calibration target and you can select the corresponding profile before scanning.
SilverFast Ai Studio offers a variety of editing possibilities, which enable the user to get the optimum out of the film material. For instance, the function multi exposure increases the dynamic range of the scanner, so that one gets enough drawing both in bright and in dark parts of the image.
With the optionally available Archive Suite (a combination of SilverFast Ai Studio and SilverFast HDR Studio) it is also possible to make RAW scans, in order to do the processing later in the HDR software. With the option to scan films in the HDRi format you have the possibility, to use the information of the infrared channel in an optimal way in the postprocessing. For the professional use it is recommended by all means to use the Archive Suite. You can find detailed information about SilverFast and its functions on our website SilverFast - Questions and answers.
The imag equality of the Plustek OpticFilm 120
Let's get to the most important questions of the review: Which image quality can the Plustek OpticFilm 120 achieve? Is the image quality sufficient for high value medium format scans and can it even keep up with the top quality of the Nikon 9000?
Effective resolution of the Plustek OpticFilm 120
We first have a look at the data of the manufacturer. Here Plustek gives a maximum optical resolution of 5300 ppi. This would result in a pixel dimension of 12500 x 14600 px at a 6x7 cm medium format film. Multiplied this results in 182 megapixels for a 6x7 cm medium format scan. This is more than the double amount which is possible with a state of the art digital medium format camera.
These numbers first sound spectacular. But how about the effectively achievable resolution, which depends from much more factors than the physical resolution of the CCD sensor of the scanner, we now want to check by doing a resolution test with a USAF-1951 test chart (see our page resolution) for more infos about it):
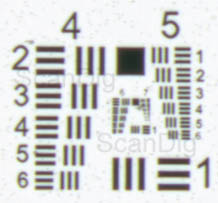
The adjacent image shows the interior part of the scan of a USAF target. At a scan with 5300 dpi there are recognizable and distinguishable the horizontal lines of the element 2 of the group 6 (corresponds to 3649 dpi) and the vertical lines of the element 1 of the group 6 (corresponds to 3251 dpi). From these two values we can calculate a medium effective resolution of 3450 dpi. This corresponds to about 65% of the nominal resolution given by Plustek. This is a considerably higher value than at other film scanners from Plustek. What does it mean in practice?
A 6x7 cm medium format film scanned with 3450 dpi has the pixel dimension of approx. 8150 x 9500. This corresponds to 77 million pixels. Such an image file has a file size of about 230 MB in the uncompressed TIF format. An image file with so many pixels makes it possible to produce high value prints up to 70x85 cm.
In order to achieve a scan with the effective resolution of 3450 dpi it has to be done witht the optical resolution of 5300 dpi. The disadvantage is, that you create an image file with 182 million pixels, of which, however, only 77 million are real. Thus more than 100 million pixels are double and triple and should be eliminated by a compression method after scanning. Scanning with the very high nominal resolution results in very long scanning times (see our chapter scan speed) and in an enormous effort for the postprocessing of the images. Since not only for the digitalization but also for the postprocessing and compression an extremely powerful computer is needed.
The Plustek OpticFilm 120 achieves an effective resolution of 3450 dpi at scans with the optical resolution of 5300 dpi and thus achieves effectively 65% of its nominal resolution.
Finally we take a look at the competitor models: The Nikon Super Coolscan 9000ED scans nominally only with 4000 dpi resolution, but achieves in practice 3900 dpi, i.e. effectively 98% of its nominal resolution. Thus a Nikon user can do without the time-consuming compression of the bloated image files after scanning. Also the Reflecta MF5000 achieves a very high effective resolution compared to the optical resolution, so that one can do without the data compression after scanning. With a resolution of 3450 dpi the Plustek OpticFilm 120 lies about in the middle between the Nikon LS-9000 ED and the Reflecta MF-5000.
Automatic dust and scratch removal iSRD

The hardware based dust and scratch removal function is decisive for the image quality at scanning, in this case it is iSRD within SilverFast Ai Studio. A well working automatic dust and scratch correction contributes to a good image quality without a time consuming postprocessing. Here we compare the Plustek OpticFilm 120 with the Nikon Super Coolscan 9000. If you click at the adjacent picture the view changes between the scan without iSRD, with iSRD of the Plustek OpticFilm 120 and the scan with the Nikon 9000.
This picture shows a detail of a 6x7 cm slide. This part has the size of about 11x15mm in the original slide. You can see, that the iSRD function of the Plustek can remove a lot of dust particles and scratches. However, you can also recognize, that there are some remainings of the big scratch below the palm leaf. In the scan with the Nikon Coolscan 9000 wird also this scratch has been eliminated by the dust and scratch correction function completely.
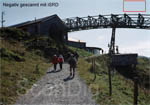
As the following picture shows, this effect becomes even clearer at negative filmes beeing scanned with the Plustek OpticFilm 120. In spite of the applicated automatic dust and scratch removal function there remain significant traces of the scratches especially in homogenous areas like the sky. If you click at the adjacent image the view changes between the view of the red marked detail. The arrows point the the areas, where a manual editing in Photoshop® is necessary after scanning. You can control the recognition by setting the recognition in steps of 1-20 and the defect size in steps of 1-10, respectively, within the expert dialogue, however, if you choose a level, which is too high, some details of the real image may be recognized as dust. For our test we have chosen the setting "recognition 6" and "defect size 3".
So our summary for the dust and scratch removal function is, that it works rather well at positive films, but that larger scratches have to be corrected manually within Photoshop® after scanning. Also one cannot do without the postprocessing of scratched negative scans. All in all the automatic dust correction and scratch correction function iSRD does a good job, and it contributes to the increase of the image quality essentialy. We will look at the results of the dust and scratch correction for Kodachrome scans later in a separate chapter.
Colours, shadows, lights

An important criterium in the scope of image quality is the display of the colour rendering and the drawing in shadow and light parts. At the colour reproduction we compare the Plustek OpticFilm 120 with the Reflecta MF 5000 with SilverFast Ai Studio. Both scanner are calibrated before scanning with an IT-8 calibration target. In the adjacent image you can see a photo scanned with both scanners. If you click at the picture, an animation starts, which changes between the two scans. So you can see clearly, that the differences are minimal. The Plustek shows the picture in a warmer colour than the Reflecta MF 5000. Which variant you consider to be better is a matter of taste.
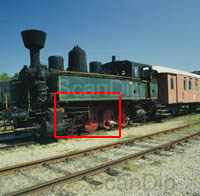
On railway photos you often find many shadowy and dark parts. The wheel cases and the parts close to the rail usually are dark, and the locomotives are often black while other image areas (background) are bright. For railway friends it is very important to take out the maximum from these dark parts. That's why our example shows a photo of a railway. If you click at the thumbnail a new windows opens and shows the red marked area enlarged. In order to use the full dynamik range the photo was scanned with multi-exposure with both scanners. You can still recognize the technical details of the railway well. There are no "black holes". What applies for railway friends of course also applies for other motives with shadow areas. And at high contrast photos there are also the lights except the shadows, in which there should be enough drawing.
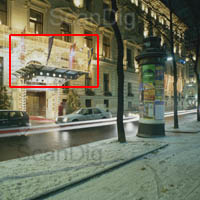
In order to examine the drawing in the lights we have scanned a positive slide, which shows a hotel illuminated by Christmas light. Also here, we have scanned with multi exposure in order to use the maximum density of 4.01 given by Plustek. Like at the example with the shadows also here per mouse click a detail with the red marked area is shown in a new window. In the enlargement you can see very well, that the small light bulbs of the light chains can be recognized well and that there is enough drawing. Also at the brighly illuminated hotel facade you can recognize the structure of the wall very well. Simple film scanners show only light grey areas at such details. In order to achieve this density it is absolutely necessary to scan with multi exposure. How this influences the scanning time we will see later in the table with the scan times.
What we also noticed during our tests again and again is, that there occur colour fringes at high contrasts. If you look at the scan as a full screen display, you will not notice them, however, they become visible when you enlarge a part of the scan to 100%. So you would also see these colour fringes at large format prints.
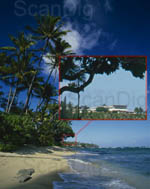
On our example photo, a 6x7 cm medium format slide, which was scanned with a resolution of 5300 dpi, you can see very well at the edge of the palms, which lie in the shadow, that the leafs are surrounded by a colour fringe in cyan. This distinguishes clearly from the light blue sky in the background. On a bow of a branch, on the left side in the detail view, you can also recognize a red colour fringe. A click on the thumbnail shows an 100% enlarged version of the red marked area.
All in all one can conclude that the image quality of the Plustek OpticFilm 120 is sufficient for scanning medium formats in good quality. If you have highes demands to colour rendering, there are the extremely expensive medium format scanners Nikon Super Coolscan 9000ED or Hasselblad Flextight X1 available. But these devices play in a different league both in terms of quality and in terms of price.
Image quality at Kodachrome scans
The Plustek OpticFilm 120 is supposed to be a medium format scanner in order to scan medium format 120/220 films in high quality and high resolution. Of course the Plustek OpticFilm 120 can process 35m films like any other medium format scanner. A special sort of 35mm films are Kodachrome films, which make extremely high demands on a scanner. Kodachrome slides are an especial challenge for each film scanner. The silver part in the film has the consequence, that the utilisation of the automatic dust and scratch removal function is impossible at many film scanners. We have scanned a Kodachrome slide both with the Nikon 9000 and with the Plustek OpticFilm 120. The automatic scratch and dust correction, which is the difficulty at scanning Kodachrome slides, has been activated at both scanners.
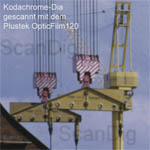
Both scans have been made with 4000 dpi in order not to have differences at the resolution and to be able to compare the images directly next to each other. In order to make the detail clear, we show a part of both scans with 100% view. You can immediatley recognize that the Plustek OpticFilm 120 has its limits for scanning Kodachrome slides. On the one hand side you can see very clearly, that all dust particles have been removed in the scan of the Nikon Super Coolscan 9000, and on the other hand side you can still read the writing on the crane clearly. At the scan of the Plustek OpticFilm 120 these details get lost. It is clearly recognizable, that the scan of the Plustek OpticFilm 120 is much unsharper than that of the Nikon.
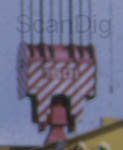
If you look at a detail of the scan of the Plustek OpticFilm 120 closely, you will recognize, that there is a kind of color fringe around the picture. The dust particles, which are on the film, look like water drops in the scan. The focus seems not to have worked correctly, mybe by the surface which is relief-like on a Kodachrome slide. It seems that the recognized "errors" lie on the focs plane and the real photo below it.
For Kodachrome photographers the Nikon Super Coolscan 9000 remains the unchallened number 1 in the field of film scanners. The quality deficits of the Plustek at this sensitive film material are just too high. But at last the Plustek OpticFilm 120 was not built in order to scan Kodachrome slides, but medium formats in different sizes.
The scan speed of the Plustek OpticFilm 120
A very important question when assessing a film scanner is the scanning speed. If you only occasionally scan a slide the speed is not so important. However, if you want to archive a larger inventory of photos or if you even use your film scanner professionally, then the scanning speed is a decicive buying criterium.
In the following table we have measured and listed different procedures at scanning with the Plustek OpticFilm 120. The scanning period without iSRD, i.e. without automatic dust and scratch removal, is more academical, since one usually never does without it (at least at colour photos). So the times in the column Duration with iSRD are more realistic. Since the Plustek OpticFilm 120 shows its real magnitude and the given dynamic range only with switched on multi exposure, the scanning times in the last column are the ones, which can be found in practice mostly.
We have measured the scanning times in the table with a computer with Intel Core i7 processor and 8 GB memory. The time mesurement of medium format scans in high resolution with dust and scratch removal and multi exposure switched on often could not be measured, since the software crashed or never finished the processing step. That's why there are only estimation values three times. Maybe the 8 GB memory in our computer were not sufficient.
| Procedure |
Duration without iSRD |
Duration with iSRD |
Duration with iSRD + Multi-Exposure |
| 35mm prescan |
22 s |
1:28 min |
- |
| 35mm scan with 5300 ppi resolution |
1:41 min |
6:38 min |
9:24 min |
| 35mm scan with 10600 ppi resolution |
3:24 min |
19:05 min |
27:15 min |
| 6x7cm prescan |
42 s |
2:46 min |
- |
| 6x7cm scan with 2650 ppi resolution |
2:58 min |
13:52 min |
26:57 min |
| 6x7cm scan with 5300 ppi resolution |
29:21 min |
1h 16 min |
1h 45 min 1) |
| 6x7cm scan with 10600 ppi resolution |
3h 16 min |
4h 24 min |
6 h 1) |
| 6x12cm scan with 2650 ppi resolution |
4:11 min |
20:13 min |
26:35 min |
| 6x12cm scan with 5300 ppi resolution |
56:20 min |
4 h 21 min |
6 h 1) |
1) Estimated value since a time measurement was not possible on our computer (Intel Core i7, 8 GB memory)
The scanning times of positives and negatives don't differ; that's why we did not list them separately. Other scanners sometimes have significantly longer scanning times at negatives compared to positives. If you want to digitize your 35mm slides with the optical resolution of 5300 ppi with switched-on scratch and dust correction and switched-on multi exposure, you only get about 6 scans per hour with an average scan time of approx. 10 minutes per picture. Since you can insert 5 mounted slides into the slide mount holder and the scanner scans them automatically in the batch mode you can leave the scanner alone for almost an hour and do something else. It is even better if you scan negative film strips: Here you can insert 12 pictures into the film holder. Thus the scanner digitizes 12 pictures in the batch mode and takes about 2 hours for it.
While one can passably live with a scan time of about 10 minutes per picture, the scan duration of almost half an hour for a 35mm picture at the interpolated resolution of 10600 ppi is not acceptable any more.
When scanning medium formats, for which the Plustek OpticFilm 120 was mainly built, the scanning times really explode. Depending on the size of the film the scanning times are in the range of 1 to 4 hours at the nominal resolution of 5300 ppi and automatic dust and scratch removal function. If you scan with the interpolated resolution of 10600 ppi the scanning times even become astronomical. The computing power which is needed to scan and process a medium format film in high resolution and switched-on dust and scratch removal iSRD and multi-exposure is so immense, that you even don't think about doing something else with that computer. The computer needs all processor cores in order to to the elaborate computations.
If you want to digitize medium format films with the Plustek OpticFilm 120 you need a very powerful computer with much memory. With our Intel Core i7 processor and only 8 GB memory we have experienced the limits of such a PCs quickly. Let's conclude:
The Plustek OpticFilm 120 is a very slow film scanner. In order to scan medium format films in high quality a very powerful PC with much memory is needed.
Finally we take a look at the competitor models: With the Nikon Super Coolscan 9000 ED we have measured a scan time of about 5 minutes for a 6x7 slide with 4000 dpi resolution and switched-on automatic dust and scratch removal function. However, that test was done in the year 2003 with a PC, which was on the state of the art at that time. So the Nikon 9000 beats the Plustek OpticFilm 120 with a factor in the range of 10 to 20 in terms of scanning speed. Unbelievable, what Nikon has brought on the market more than 10 years before the Plustek. With the Reflecta MF 5000 we have measured a scan time of about 4 minutes for a 6x6 slide with automatic dust and scratch removal function. Thus the MF-5000 beats the Plustek OpticFilm 120 with a time factor of more than 10, in which, however, one has to consider, that the MF-5000 scans with a lower resolution and therefore has to process less image data.
Summary, conclusion
With the OpticFilm 120 Plustek has brought a film scanner to the market, with which one can digitize medium format films and 35mm films in good quality. Thanks to the professional scan software SilverFast Ai Studio one achieves a sufficient image quality for most application and one can enjoy good details in the shadows and lights thanks to the multi exposure function
Less enjoyable is the scan speed: The Plustek OpticFilm 120 is an extremely low scanner. The long scan durations are acceptable for the occasional scanning of singular photos. However, for users, who use the device commercially or who want to digitze a complete film archive, the scanning times are not acceptable. By the possibility of automatic batch scans the shortcoming of the low scanning speed is a bit attenuated: Several 35mm films or medium format photos can be scanned automatically in the batch mode.
A very big deficit of the Plustek OpticFilm 120 is the missing autofocus function, so that you have to expect unsharp scans again and again. Here Plustek has to to an essential rework.
The Plustek OpticFilm 120 does not have many competitors on the film scanner market. The extremely fast film scanners Nikon Super Coolscan 9000ED or Hasselblad Flextight X1/X5 play in a different league both in terms of price and in terms of quality. The Reflecta MF5000 is cheapter and much faster than the Plustek OpticFilm 120 and delivers a similar image quality, however, in a lower resolution. Flatbed scaner like the Epson Perfection V750Pro don't achieve the image quality of the Plustek.
Since we and lots of our customers had many problems with the Plustek OpticFilm 120, we have taken that scanner out of our assortment.
Back to the film scanner tests index
|
)
)
)
)
)
)
)
)
)
)
)
)
)