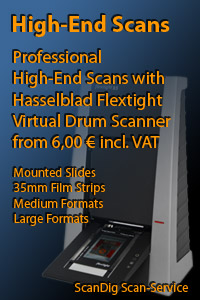
Test report Reflecta Filmscanner ProScan 7200
In the end of November 2009, the German company reflecta introduced the film scanner ProScan 7200 into the market - a scanner for which the film scanner - community has been waiting for a long time and of which appearance many people already gave up hope since a long time, as when the production of the previous model ProScan 4000 was stopped, a really good device disappeared from the market for which there was no equivalent substitution.
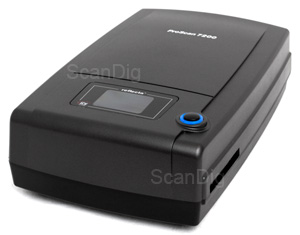
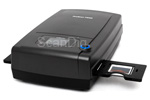
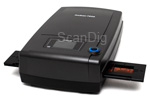
In March 2014 the reflecta ProScan 7200 has been replaced by its successor Reflecta ProScan 10T. Additional film holders for the ProScan 7200 are still available in our online shop. But the new ProScan 7200 is not a straight succesor of the ProScan 4000 but rather a completely new device. It is recognizable at first sight that the ProScan 7200 has a completely new case that barely has similarities with the one of the previous model. While the ProScan 4000 was standing upright on the desk, ProScan 7200 lays flat on the table as all other current CCD-scanners of reflecta.
While ProScan 4000 has an automatic film strip feeder and it was possible to insert some single framed slides from the front into the scanner, the new ProScan 7200 works with film adapters that are manually positioned into the scanner. Therewith, ProScan 7200 gets a straight competitor of the Plustek OpticFilm 8200i. Also the technical data make guess that the ProScan 7200 straightly competes against the Plustek OpticFilm 8200i. But the technical data also state that concerning the equipment, quality and functions, the ProScan 7200 is positioned within the reflecta scanner series between the models CrystalScan 7200 and RPS 7200 Professional. Our following detailed test report will show how this device performs in detail.
Equipment, accessoires and performance data of the ProScan 7200
The Reflecta ProScan 7200 is delivered in a small and narrow box that, beside the scanner itself, contains everything needed for getting started immediately and processing one´s images: For framed slides and for film strips, there is each a film adapter that can take up to four framed slides and/or film strips of a length up to six images. The film adapters are inserted sidewise into the device; over a viewing window that is placed at the top part of the scanner it is possible to control which slide and/or which negative is currently placed in front of the sensor.
The software equipment is small but complete: Within the standard scope of delivery there is the in-house scanning software of Reflecta, Cyberview X, as also the popular image processing programe Photoshop® Elements. With Cyberview, those scannings are accomplished that can be processed afterwards in Photoshop® Elements. A USB-cable and, of course, a mains adapter for power supply are included as also a printed instruction manual.
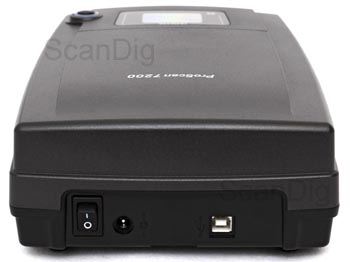
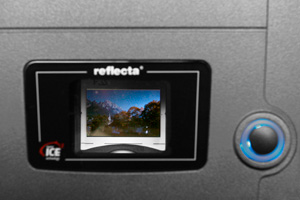
On the top side of the device there is a single button beside the viewing window which border shines and/or blinks in blue colour when the device is on. At the backside of the device there is the power switch, a power socket and the USB socket. The scanner is connected to the PC by an USB-cable (1.1 or 2.0). There are no further control elements. Commendably, a printed manual in German and six other languages is attached to the device, a thing that today is unfortunately not a matter of course any more. Another small brochure about the ICE³-functions is also included in the package.
The optical resolution of the scanner is not of 7200 dpi, as the product description makes one guess. No, as reflecta "only" declares a nominal resolution of 3600 dpi for the film scanner. Therewith, reflecta clearly positions against the trend of the past years in which almost all scanners were shown off with a nominal resolution of 7200 dpi (but in practice did not achieve even 50% of this). In the case of a 35-mm image scan with a colour depth of 24Bit, a resolution of 3600ppi results in an image file of a size of approximately 45MB in the uncompressed TIF-format.
Such a file contains about 16 million pixels, whith which the scanner beats most of the current digital cameras in this concern. The resolution that is actually achieved in practice is shown further down in our resolution text. The maximum density of the scanner is announced with 3,8 Dmax, a thing that results in a range of density of more than 3. The high resolution and the large range of density make hope for a good image quality during the scanning. The scanner has the ICE³-technology with the hardware-base dust and scratch correction ICE, the colour restauration ROC and the film grain equalization GEM.
Installation and starting up the scanner
The attached software is contained in a total of three discs and is very easy and comfortable to install. As it is the case in most USB-devices, the installation of the reflecta ProScan 7200 takes place after the following scheme: First, the driver software is installed on the computer. Therefore, one simply puts the CD into the drive and follows the instructions on the screen. The installation is fully automatically run, and after a few clicks of confirmation, the installation is completed.
Then, one can connect the scanner first to the power net, and then per USB to the computer. Now, by switching the device on with the switch that is located at the backside of the device, the operating system will recognize a new hardware and, a few seconds afterwards, the device is ready for operation. After having switched it on, one must first wait for a few seconds until the blue small lamp stops blinking but permanently glows. Now, one only has to start the scan software to start scanning.
The printed manual also provides a good help in case some questions arise during the installation. Unfortunately, the manual is very general, so that it can be used for several different scanner models: The title is "CyberView X-SF for 1800/2700/3600/7200 dpi scanner". But fortunately, a DIN-A3 leaflet that treats the specific functions of the ProScan 7200 is included in the manual. For those who want to get introduced into the basics of the scanning, I recommend the book Scanning Negatives and Slides from Sascha Steinhoff. In this excellent technical book, many basic terms, methods and ways to proceed in the fields of scanning and image processing are explained in detail. For those who operate the scanner with the scan software of SilverFast, I recommend the book of Taz Tally SilverFast - the official book; it guides one step by step into the handling of the scan software of SilverFast.
Normally, the installation of the reflecta ProScan 7200 is a matter that takes less than 5 minutes. Those who after the installation have the problem that the scanner is not recognized anymore and/or does not react, should first remove all connected USB devices (printer, headset, handy, external hard discs etc.) from the PC and connect the scanner straighty to the PC, thus not over an USB-hub, and therewith restart the installation.
Scanning framed 35-mm slides
In order to digitalise some framed slides, first, one has to load the film adapter. This adapter consists on black plastic and has four orifices at the bottom in which the slides can be inserted. They are sustained in position by each two springy plastic bridges fixed on each side and that due to their slightly inwards curved shape are pushed outside while inserting the slide and therewith hold the slides by frictional resistance. The slots are consecutively numbered from the left to the right with the digits 1-4. The slide holder takes any frame up to a thickness of 3mm.
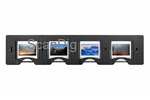
The arrows located at the left and the right end of the slide holder already indicate a thing that is very pleasing in practice: The holder can be pushed from both sides into the scanner and move it in the scanner in both directions. This is very practice-oriented and absolutely different compared to some other constructions in which the film holder can be only moved in one direction, a thing that can be very annoying if one has pushed the holder too far by mistake.
One simply pushes the holder sidewards into the scanner where due to some index marks it snaps in into the right positions, thus with a slide right in front of the sensor. Due to the integrated viewing window it is now possible to see which slide is currently positioned in front of the sensor. By this way, one does not have to estimate or count which slot is currently in use and additionally memorize which slight is at which position - one simply looks through the window, a very practical feature.
Once the desired image is positioned in front of the sensor, it is possible to make a preview-scan. Therefore, one sets the scanning frame on the image cutout to be scanned and adapts either the resolution as also other parameters. In this concern SilverFast offers considerably more possibilities of adjustments than the in-house scan software of Reflecta that is CyberView. While with CyberView it is only possible to determine some very basic values, SilverFast offers to the user a wide range of tools with which the result can be optimized and fully adapted in accordance to one's preferences. Thereby, either the professional user as also the "normal" home user will find the suitable tools, as SilverFast either offers a wide range of pre-set adjustments and controls that are easy to handle and understand as also some professional tools for which proper use a certain knowledge is required.
Once the fine scan is accomplished, the slide holder has to be pushed manually to the next position. Here, one makes again a preview-scan and, if necessary, some image adjustments before acomplishing the fine scan. Unfortunately, it is not possible to scan the slides that are inserted into the holder in the batch modus, thus it is always only possible to scan only one slide and after that one has to move the slide holder manually ahead by one position.
If one wants to scan all four inserted slides consecutively, there is a practical method offered by using the scan button that is located at the top of the device: While the scan software is runnning, one only has to push the button and a dialogue box appears for saving the file. By a further press to the button, the fine scan is accomplished under consideration of the adjustments previously made. Once the software is switched to the batch modus, one only needs to move the holder further and press the button again. Then the next slide is scanned without having to do anything further in the computer. By this way, it can be continued until all slides in the holder are scanned. Unfortunately, this type of "batch modus" is only possible with the in-house scan software CyberView. The button does not have any function if SilverFast is applied.
It can be said in total that the scanning of framed slides with the ProScan 7200 is a very pleasant and easy to handle matter. The insertion of the slides into the slide holder work in a proper and safe way. For those who would like to optimize their work a little I can recommend a second slide holder; because then it is possible to load it with some new slides while the first is in the scanner. I would also like to recommend the coarse cleaning of the slides before the scanning. The scanner certainly has a dust and scratch correction but it anyway does not make any wonders in the case of strong dust and dirt. A simple blowing of the slides that are inserted in the holder with some cleaned compressed air helps a lot and avoids the coarse dust particles getting into the interior of the scanner. The coarse dust can be also removed by the use of an airbrush.
Scanning 35mm - slides with ProScan 7200
Principally, the scanning of 35mm film strips takes place in the same way as in case of the scanning of slides: One inserts the film material into the respective holder, pushes it into the scanner, does a pre-scan, sets the adjustments and accomplishes the fine scan. The film strips can be both either negatives or positives; the scanner can proceed both types.
The film strip holder can take film strips up to a length of six images. It has some division bridges between each of the images, through which the curved film material is pressed flat so that no problems arise with the focusing. For inserting the film strip one simply opens the holder after having unlocked a small slide latch downwards at the long side. Thereby, the lid can be opened up to 180° and even further, so that is does not disturb during the insertion and one has a free access. Once the film strip is positioned, the lid is closed and locked again by pushing downwards the small slide latch at the top(see right image above in the centre).
For inserting the film strips, we highly recommend the use of cotton gloves, as only then it is possible to touch the film material in a safe and proper way without dirtying or damaging the surface. Specially in the case of strongly waved or curved film strips, the insertion into the film holder results to be a little tricky, and it is important to be able to hold the film properly in order to maintain it in the right position until the lid is closed again. By the way, it is also possible to insert some single images or several short film strips into the film strip holder; but then the inserting and the positioning of the images between the division bars gets more laborious.
As it is the case in the slide holder, each of the image windows are consecutively numbered, in the case of the film strip adapter according to the the maximum image number from 1 to 6. The film strip adapter can be also pushed from both sides into the scanner so that it snaps into the right positions. What we already wrote concerning the scanning of slides also applies to the scanning of negatives: The software attached CyberView X only offers very marginal possibilities of adjustment for the adaptions of the scans.The significantly better and more comprehensive tool set for optimizing the scans is offered by SilverFast that enables some perfectly tuned colour profiles for all common negative types of film with its NegaFix-dialogue.
Also in case of scanning some film strips one should always roughly clean the films before the scanning, for example with a compressed air spray, in order to avoid that coarse dust particles get into the interior of the scanner. Specially in the case of film strips that are more laborious to insert into the film holder than the 35-mm slides, the use of an additional film strip holder is very recommendable, because then one can unhurriedly insert and position some single images or film strips into the holder while the other is in the scanner.
In total, it can be said that the negative film strip holder of the ProScan 7200 is very well designed so that it is easy to handle it. Those who have a lot of film strips to scan will miss the automatic batch modus as, for example, the Reflecta RPS 7200 Professional offers. The RPS 7200 automatically absorbs a film strip and scans it consecutively image by image. But therefore, the use of the film strip holders in case of the ProScan 7200 offers the advantage that it is also possible to insert some single images or short film strips into the film strip holder. In the case of the RPS 7200 Professional, the single images have to be framed with slide frames before they can be scanned.
The software provided with reflecta ProScan 7200
The software equipment of Reflecta ProScan 7200 is small but complete: Within the scope of delivery of our test device there was beside the scan software CyberView X also an older version of the excellent image processing software Adobe® Photoshop® Elements. Both programs are attached in versions suitable for Windows PC and Apple Macintosh. More programs as for example an image administration software are not included .
CyberView X is the in-house scan software of Reflecta. As already mentioned, it only offers the user some limited possibilities of adjustments. The only tools for the image adjustments consist on so-called variations, the colour balance as also the curves and plains. With the help of the variations one can control the colourfulness and the brightness of the image over some small preview images. The colour balance offers three controls (RGB), one brightness-, one contrast- and one colour saturation-control. With the curves and plains tool one can control the gradiation curves. Unfortunately, the adjustment cannot precisely done in the case of all tools, and further tools as for example a selective colour correction are not there at all. Due to this reason, the scan software of SilverFast with its professional tools for the image optimization is highly recommended.
Photoshop® Elements is a very reduced version of the professional image processing software Adobe® Photoshop®. But the range of functions is fully sufficient for the private use and the home user will not feel like missing something. It is rather the opposite: The software offers countless possibilities for the image optimization after the scanning, for the alienation, for the creation of composings and the edition to different media. Meanwhile, several new versions of n Photoshop® Elements appeared; with the help of a Photoshop® upgrade it is possible to update the attached version to the newest one.
Please look in the product description of the respective dealer if Photoshop® Elements is included and/or which version it is. The equipment varies from dealer to dealer and from time to time.
If you purchase Proscan 7200 bundled with the professional SilverFast-software, you will get the best scan software that is available in the market. SilverFast Ai is not only attractive because of its wide range of functions for the optimization of a scan but also due to its excellent algorithms for the image processing that simply take more out of the device than CyberView. SilverFast Ai is available in several versions, the version Ai Standard, the Ai Studio-version as also the Archive Suite.
The Studio-version differs from the standard version mainly by the multi-exposure feature; thereby, a double scan with different exposures is accomplished and from these two scans, an optimalized image is computed. The multi-exposure increases the range of density of the scanner. SilverFast Archive Suite additionally offers the possibility to create raw scans and process them afterwards. In our page FAQ SilverFast, you will find some detailed informations about the different versions of SilverFast.
The image quality of reflecta ProScan 7200
If there are no other criteria on focus as for example the automatic batch modus, it is finally the image quality (beside the price) the decisive criteria in the purchase of a film scanner. in the following chapter we will show you what the Reflecta ProScan 7200 has to offer in this concern.
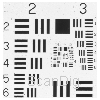
Let us start with a resolution test. Reflecta announces the nominal resolution of the scanner with a value of 3600 dpi. In the scan of the USAF-test charts with a nominal resolution of 3600 dpi the horizontal and the vertical lines of the element 6.1 can be barely distinguished. According to our resolution table, this results in an effective resolution of approximately 3250ppi. This is approximately 90% of the nominal resolution of 3600ppi announced by the producer. Kudos to that. It has been a long time ago since we tested a scanner with such a good performance. Other film scanners that have a nominal resolution of 7200ppi do have effectively not more capacity or even achieve less than the 3250ppi of ProScan 7200. Finally, again a film scanner appeared that actually achieves the resolution value indicated by the producer(at least 90%) in practice! A scan with 3250 dpi provides an image file with approximately 14 million pixels. Such image files have enough detail information to create some strong amplifications and high quality prints.
In the case of many devices, an extremely high optical resolution is announced but in practice, the device barely achieves 50% of that or less, as for example in case of the Plustek OpticFilm 8200i: The producer announces an optical resolution of 7200ppi, but effectively, the scanner only achieves a value of 3250ppi, thus exactly as much as Reflecta ProScan 7200. It is a big advantage to the user if ProScan 7200 achieves approximately 90% of the nominal resolution in practice, as by scanning with 3600 dpi, one gets fast scans almost without any redundant pixels. For example, in order to get the same effective resolution of 3250 dpi with Plustek OpticFilm 8200i, one has to accomplish the scans with 7200 dpi (as a scan with 3600 dpi only provides 2600 dpi); those take extremely long time and provide some image files of approximately 70 million pixels, but from which approximately 56 millions are redundant, thus useless. Thus, from these 70 million pixels one has to create after the scanning some smaller image files in the image processing program by removing the redundant pixels - a laborious process for which some extremely fast computers are required.
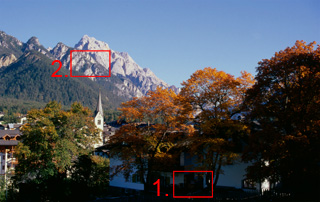
If one operates the scanner witth SilverFast, Reflecta ProScan 7200 provides some very good image results. For comparison purposes, we have scanned the adjacent image either with SilverFast Ai as also with CyberView. Due to the the IT-8 calibration that is possible with SilverFast Ai and due to the excellent image processing algorithms, some true coloured scans are generated with enough drawing in the bright and the shade areas. A straight comparison clearly shows that the in-house scan software of Reflecta, CyberView, is far of making use of the full capacity of the scanner. Contrary to the scans of SilverFast, the image files generated with CyberView show a clear magenta cast and unsightly colour hems specially in the dark image areas. In the shade areas, the scans done with CyberView have clearly less drawing. Those colour casts that every scanner has up to a certain grade, are perfectly removed by the IT-8 colour calibration of the scan software of SilverFast.

By clicking on the adjacent thumbnail, an image window opens that switches any three seconds between the scan done with SilverFast and the scan done with CyberView. As you will see, the image generated with SilverFast appears to be of much more natural colours. In the scan done with CyberView Scan, the trees do not represent the warm summer weather as the scan done with SilverFast. By having a deeper look into the marked cutouts above, the big difference between both programs gets even more obvious.
The cutout number 1 shows a dark area of the image of our test slide. By clicking on the thumbnail, an image window opens showing the cutout number 1 in original size (100%-representation). Also here, it is switched any three seconds between the results of both scan programs. While the scan made with CyberView barely shows any details, the scan done with SilverFast shows some nicely drawn shade areas without any disturbing colour hems and colour casts as in the case of the scan made with CyberView. It is clearly visible that in the scan done with CyberView, each bar of the garden fence disappear in the darkness, while there are still recognizable in the scan made with SilverFast. Thus, there are more details visible on the scan done wth SilverFast, although both scans have been made with the same resolution.
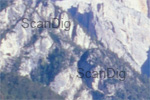
The cutout number 2 (click on the adjacent thumbnail for an image window in original size) shows a light image area at the rock face. Also here is a clear difference between the scan done with CyberView and the one made with Silverfast: In the scan of CyberView, the rocks appear to be white; one could actually think there is some snow on them. In the scan made with the software of SilverFast, one recognizes some finer sructures in the rocks; single crevices and ledges get visible. Due to the IT-8 colour calibration, the colours of the scan done with SilverFast appear to be more homogeneous and realistic.
Thus, the Reflecta ProScan 7200 only provides really good image results in conjunction with the scan software SilverFast Ai, while the results of the scans done with the in-house scan software CyberView are not convincing. In a straight comparison with its competitor Plustek OpticFilm 8200i, that includes the scan software SilverFast in the standard scope of delivery, ProScan 7200 is slightly one step ahead concerning the general image quality, but the results barely differ from each other.

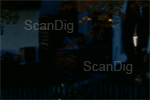
But the dust and scatch correction of ProScan 7200 works clearly better than the one of the competitor of Plustek. While this device remains many dust particles untouched, the ICE-function of ProScan 7200 works quite thoroughly. The finished scans only have some few single dust spots, but the major part has been completely removed. The image cutout of the sky shows how well the dust and scratch correction of Reflecta ProScan 7200 works. The small dust particles are practically completely removed, only the very big dust spot at the left upper side of the image partly remains. Thereby it gets noticeable that a hardware-based dust and scratch correction does have some limitations. Small dust particles are perfectly removed, but the coarse dust particles should be blown away from the film with the help of an anti dust spray before the scanning. Therewith, one makes the life of the dust and scratch correction easier and one also avoids that coarse dust particles get into the interior of the scanner.
Scan speed of reflecta ProScan 7200
In order to detect the scanning times, the scanner has been connected via USB 2.0 to a computer with a DualCore processor with 2.39 GHz and 4GB main memory. In the following table, our measuring results are represented:
| Process |
Duration without ICE (CyberView) |
Duration without ICE (SilverFast) |
Duration with ICE (CyberView) |
Duration with ICE (SilverFast) |
| preview |
0:10 min |
0:27 min |
0:10 min |
0:27 min |
| Scan of a positive with a resolution of 1800 ppi |
0:55 min |
0:37 min |
1:21 min |
1:22 min |
| Scan of a positive with a resolution of 2400 ppi |
1:31 min |
1:15 min |
1:39 min |
1:43 min |
| Scan of a positive with a resolution of 3600 ppi |
2:28 min |
1:15 min |
2:51 min |
2:00 min |
| Scan of a negative with a resolution of 1800 ppi |
1:01 min |
0:38 min |
1:33 min |
1:25 min |
| Scan of a negative with a resolution of 2400 ppi |
1:47 min |
0:54 min |
1:53 min |
1:51 min |
| Scan of a negative with a resolution of 3600 ppi |
2:51 min |
0:55 min |
3:08 min |
2:05 min |
The Reflecta ProScan 7200 is a very fast scanner. If the scanning times with Cyberview are already very short, the scanner operated with SilverFast tops that in speed, specially in case of high resolutions: A slide scan in full resolution with an activated dust and scratch correction ICE takes barely three minutes with CyberView, while the same scan done with SilverFast only takes two minutes. The difference is even bigger in case of a negative scan without ICE with 3600 dpi: CyberView needs 2:51 minutes for this, while SilverFast accomplishes the same scan in only 55 seconds.
What is outstanding is that the scans made with SilverFast and with 2400 dpi practically take the same time as the ones with 3600 dpi. In case of the Cyberview-scans, this is different, as here, a scan with 2400 dpi takes clearly less time than one with 3600 dpi. A possible explanation for this could be that SilverFast is not able to adapt the hardware straight for a 2400 dpi scan, but it is scanned in this resolution with 3600 dpi and the software computes the image down. Another indication for that is also that in SilverFast, it is not possible to adjust 2400 dpi over the resolution slide control: after 1800 dpi, 3600 dpi immediately follows as a next step - in order to scan with 2400 dpi one has to type in this value straight into the number field.
The scanning speed is, together with the achievement of 90% of the nominal resolution, the big advantage that reflecta ProScan 7200 offers. By making a scan with the nominal resolution of 3600 dpi with reflecta Proscan 7200 and with an activated dust and scratch correction ICE, one gets with SilverFast after two minutes an image file with some effective 3250 dpi, thus approximately 14 megapixels. Therewith, ProScan 7200 beats either its bigger and smaller siblings as the CrystalScan 7200, the RPS 7200 Professional and the DigitDia 6000, but also its competitor Plustek OpticFilm 8200i many times over, that, in order to achieve the same result needs a quarter of an hour, thus 5 times more and then accomplishes a time consuming image compression afterwards in the image processing program. Thus, the reflecta ProScan 7200 rightly deserves the title of being fast.
Resume, conclusion
The Reflecta ProScan 7200 is a fast film scanner for framed slides and film strips; it provides good scanning results at a reasonable price. Unfortunately, it does not have the automatic film strip feeder as its previous model, so that although it has film adapters that implicate a possible batch modus, it can be only handled manually, thus it is always only possible to scan one single image before having to push the film adapter one position further.
The included scan software CyberView does not make use of the full potential of capacity of the scanner. Those who want to obtain the best possible results with ProScan 7200 will have to make use of the scan software SilverFast Ai. With SilverFast Ai, ProScan 7200 provides very good pictures, and additionally one is also rewarded with a speed advantage.
Reflecta Proscan 7200 beats its straight competitor Plustek OpticFilm 8200i specially concerning the speed: it is many times faster and despite of a lower nominal resolution it generates some scans with the same effective resolution of 3250 dpi. As the achieved effective resolution is within the margin of the nominal resolution, one saves the time consuming compression of the scan files in the image processing program after the scanning.
Back to the film scanner tests index
|
)
)
)
)
)
)
)
)
)
)