Test report DxO Optics Pro Standard/Elite
Those who just arrived well recovered from their dream holidays and have made loads of pictures with their digital camera know exactly what is in store for them: There are hundreds of images stored in the memory card that have to be sorted out, classified and processed before the digital photo album of the holidays is done. The sorting out of the redundant or bad images might be still accomplished in a quick way; but the image processing and correction after that can take some hours, days or even weeks until one obtains a satisfying and optimal result. The tricky thing in that is that many times, the time is short, as one wants to show the album to friends and this album should preferrably contain the processed and optimized images straight away.
While the sorting out, the classification and the renaming of the images can be still quite easily done in the Windows-data manager, the image optimization requires a laborious loading and processing of each of the images in an image processing program as Adobe® Photoshop®. By calculating a process time of 5 minutes for each picture, in case of 300 holiday pictures, the total resulting processing time is of 1500 minutes; these are, finally, 25 hours, thus 3 full-time working days. And some vacationers just coming back from Australia will not return with only 300 pictures but will have several full memory cards that result in a total picture amount of several thousands.
In order to shorten and automatize this step there are some automatic image processing programes as DxO Optics Pro. This software accomplishes in the batch modus the automatic image correction for a whole batch of digital images. Thereby, the user can either trust in the pre-adjustments or determine some individual correction measurements. I work with the Version DxO Optics Pro Elite since long ago and I would like to transmit my experiences with this image optimization software.
What does the software DxO Optics Pro Elite do?
DxO Optics Pro is an image processing- and image optimization software and also a software for the correction of hardware errors. DxO Optics Pro can accomplish in the digital images some very normal image processing functions as the brightness correction, the contrast correction, the tonal value adaptation, the sharpness correction, the noise reduction or the image cutting. These functions are known from all image processing programes. In DxO Optics Pro Elite, it is possible to load each of the images as in Photoshop® and correct them with the above mentioned correction tools; but it is also possible to determine certain corrections for a whole batch of images. By this way, it is, for example, possible to accomplish the unsharp masking together with the moise reduction for 500 images at once.
But DxO Optics Pro is more than an image processing program with an automatic batch modus. The actual highlight of this software is something completely different: DxO knows the features and the errors of the digital cameras and lenses and offers some automatic correction tools. This feature already outstands during the installation of the software: One has to determine one´s model of digital camera with all available lenses; then the software loads all necessary correction modules. The new modules as for example those needed after purchasing a new digital camera or new lenses can be added later on.
The following picture shows the modules I had installed at the time of this test report. For my Canon EOS 40D, 4 lenses are installed. Actually, I do not use my previous camera EOS 20D anymore, but the modules of the respective (and partly identical) lenses are still installed in order to process the old image files.
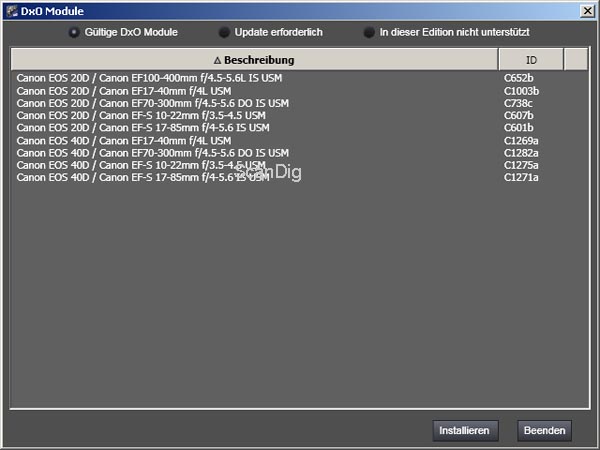
Thus, the software DxO Optics Pro Elite knows exactly with which camera and with which lenses I photograph and therewith, the software also knows the sources of the errors caused during the digital photography. For example: By doing a wide field photography with my Canon-lense EF-S 10-22mm with a focal length of 10mm, I recognize a clear vignetting in the picture, that means an edge shadowing that reflects in the dark corners. I know this phenomenon as a photograher, and my image correction software DxO Optics Pro also knows it and accomplishes an automatic image correction in the edge areas of the picture. But to the contrary, if I make a wide field photography with my Canon-lense EF 17-40mm with a focal length of 17mm, then I hardly get a vignetting, as on one hand, the lense is of a higher quality and on the other hand, my digital camera only uses an inner area of the lense (focal lenght exposure factor of 1,6), so the edges of the lense are not used. As a photographer, I also know this fact and my image correction software DxO Optics Pro Elite also does.
As this example shows the effect of the vignetting, there are a lot of other errors that might be caused by a camera, a lense and/or a camera-lense combination. The barrel or pincushion distortions in the horizintal or vertical edges, the appearing of fringings at the lines and edges of the images or the sensor noise of the digital camera with some high ISO-adjustments are further examples. DxO Optics Pro knows these errors of the most usual digital cameras and lenses and can correct them automatically or in the user dialogue. And this is exactly the point in which DxO Optics Pro differs from a normal image processing software; this is also the reason why I prefer to speak about an image processing- and image correction software.
Finally, there is still to be mentioned that DxO_Optics_Pro recognizes on the basis of the EXIF-data with which camera, with which lense, with which focal length, with which exposure and with which aperture I have photographed. These data are necessary in order to correct the errors of the camera and the lense. DxO Optics Pro either processes the finished image files (JPG-Format) as also the RAW-data coming straight from the camera. It is obvious that the corrections can be better made in the raw data than in the JPG-files.
Different versions of DxO Optics Pro
Before I get into the details of the software I would like to mention the different versions of DxO Optics Pro. DxO Optics Pro is available in different versions:
- DxO Optics Pro Standard
for digital SLR´s and their lenses
- DxO Optics Pro Elite
for professional digital SLR´s and their lenses
Even though the standard-version is already available for approximately one hundred euros, DxO Optics Pro is not a software for hobby photographers who buy a cheap camera in the supermarket. Those who own a good digital SRL will need DxO Optics Pro Standard; this version supports the high quality compact cameras and the common SRL´s to acceptable prices and the respective lenses. Those who invest thousands of euros in their professional DSR will need the version DxO Optics Pro Elite that support such kind of top models. The versions are downward compatible, that means that those who have bought the Elite-version will have the features and the supported models of the standard version included.
DxO Optics Pro can be used for several cameras and lenses at the same time, as all modules are included in the purchase price.
My personal workflow - This is the way I work with DxO Optics Pro
In this cahpter, I would like to explain how I use to work with the software DxO Optics Pro. DxO Optics Pro itself offers different modes for the processing: there is a full automatical modus, a detailled modus with a user guide and a modus for the expert in which one can make all adjustments manually. The modus with which a person works depends on the application and the requirement. I work with the expert modus, and within this modus there are also different procedures, of course. In the following I will describe the way I proceed.
Step 1: Preparation and creation of a project
When I work with DxO Optics Pro, there is normally a photo series of approximately 500 pictures to be processed that I either made during my holidays or that I have made during a festive occasion. From this series, approximately half of the amount should remain for the further processing; the remaining ones are sorted out.
In my case, getting prepared means that all image files are numbered consecutively in a folder. As i photograph in the raw format (RAW-data), I have the best conditions for the automatic image correction with DxO OpticsPro.
The very first thing to be done in DxO is to create a project that for example is named Mallorca2007. Then I select those pictures from the image series that I would like to continue using. I can do this by myself in DxO Optics Pro; but the selection is faster and more comfortable if done from the normal file explorer of Windows displayed in thumbnail size. After this first sorting process, approximately half of the amount of a total of 500 pictures remain that I want to use for my photo album.
Step 2: Adjustment of the standard image corrections
Now I determine in the expert modus those corrections that should be applied to all images during the processing. Distortions, colour errors and vignettes should be corrected in all images; DxO Optics Pro accomplishes this on the basis of the EXIF-data that are saved in every raw data. With a slight unsharp masking, I obtain a better impression of sharpness in each image. Moreover, I switch on a slight noise reduction that is necessary for example if I had photographed with an ISO 1600. Moreover, DxO OpticsPro accomplishes an automatic exposition if necessary.
I apply these standard adjustments on all 250 images that should be processed afterwards. I intentionally do not adjust any extreme values in the correction functions as the noise reduction or the unsharp masking in order not to falsify or damage the images. These standard correction asjustments normally match into 95% of all images. Now the individual adjustments are to be set in each of the special images.
Step 3: Adjustment of special corrections for selected images
After having determined the standard corrections and standard optimizations, I actually could start the batch modus; but before that I introduce some individual corrections for some special images. Thereby, DxO Optics Pro supports me with a prectical project browser that displays all images of my project in thumbnail size. The size of these thumbnails is stepless (!!!) variable, so that from a determined size, I can recognize well the details and the image contence.
During the horizontal scrolling, my meanwhile routined view immediately recognizes the images in which I want to make some special adjustments. In case of the night shots, I usually accomplish an individual correction of the tonal value in order to get enough details without falsifying the night atmosphere. In case of the pictures of buildings, either from the exterior as also from the interior, most of the times, there is a trapezoidal distortion to be corrected or a spherical/cylindrical anamorphosis correction is to be accomplished. During the application of such correction tools, the image must be also cut. And if I know in the case of some photographies that I have made them with an ISO 1600, then I increase the noise suppression filter. By this way, there is a series of special photographies that require such kind of individual corrections.
DxO Optics Pro supports me in an excellent way in the accomplishment of these adjustments: In the before/after graphics I see immediately the effect the corrections have on the picture. Moreover, the shooting data of the camera and the lense (exposure, focal length, ISO-value etc.) are transparently displayed on the picture if wanted. The special adjustments can be accomplished for a single image or for several selected ones. It is also possible to transfer some adjustments from one to another picture.
Step 4: Batch modus processing applied on all images
Thus, after having accomplished the standard correction adjustments on all images and some special correction- and optimization adjustments for some selected images, the actual processing can be started. I change to the processing module and select all images for the batch processing. I determine my target directory and the desired output format (JPG or TIF). In case of a JPG-edition I can determine a compression factor; in case of generatig a TIF-file, a compression is appliable without any losses.
The processing then starts by pressing a button and then the PC works a good hour for 250 images (depending of the corrections and adjustments). With DxO Optics Pro, I need a total of half a day for 250 images, while in former times, the individual processing of every image with Photoshop® took several days.
Step 5: Displaying the results
DxO Optics Pro can of course display the images before and after the correction. The thing is very interesting due to the reason that any time two images are displayed on the screen, thus the same image in the original version and the version after the correction. It is sometimes very amazing what the software tool can take out of the original.
But the viewer with the before/afterwards view is quite slow if the original data are in the raw format. This is why I preferrably do the before/after comparison with IrfanView by positioning two windows beside each other on the screen and browse through each of the image batches.
Conclusion
The above mentioned workflow is a possibility of use of DxO Optics Pro. The software offers numerous more possibilities as for example the creation of individual batches within the project, the application of filters or the final batch processing of the images with certain features.
Every user of DxO Optics Pro has to experiment with the software in order to make own experiences with the software until he will finally find out the workflow that is more suitable for him. But once found, a foto series is optimized in a fast and comfortable way and specially according to one´s scheme.
Results with DxO Optics Pro
In the follwing I would like to show on the basis of some images which results I have achieved with DxO Optics Pro. The small pictures can be enlarged by a mouseclick. I made all photographies in the RAW-format. I extracted the originals right from the raw data as JPG´s and reduced their size in Photoshop®. The processed images where taken by DxO Optics Pro Elite from the raw images, processed, corrected and saved as JPG´s; then a reduction was made in Adobe® Photoshop® Elements.
Standard-image correction
In the previous chapter I mentioned in the subchapter Step 2 that for a project of several hundred pitures I accomplish some standard-correction adjustments that are applied on each of the images.


My first example shows in the original image a much too dark hotel lobby. Making such a photography made with automatic exposition without flash is quite difficult, as the esposure meter is deceived by the bright windows. DxO Optics Pro has exposed the dark areas perfectly with my standard adjustments for the image correction, so that one gets a real insight into the lobby. Those who have a deep look into the image will still see some deficits in the corrected image: As it is a wide field photography (focal length 10 mm plus the focal length exposure factor 1,6), there are some distortions visible in the image: The columns at the right side of the wall are inclided to the right at the top, and the parquet floor down at the left arches downwards. Thus, here, a volume-anarmophosis would have been suitable that I normally accomplish according to the Step 3 individually on each image.


In my second example I show a landscape photography (it is the Castell de Capdepera in the north of Mallorca), that had been zoomed from the distance with a focal length of 250 mm. In such super-zoom-photographies, the image gets oftenly much too weak, specially if the air is not clear and clean. In case of such a photography, a classic correction of the tonal value is enough in order to brighten the ceiling in a bright blue colour and the trees in a natural green. In Photoshop®, such an auto-correction of the tonal value is done by a single key combination; DxO Optics Pro Elite accomplishes this correction with my standard corrections (Step 2) fully automatically.
Manual correction of the tonal value, noise reduction, unsharp masking
The third example shows an hotel building with a pool in front of it at night. I have made this picture with a focal length of 17 mm and an exposure time of 3 s. As I did not take any tripod with me, I positioned the camera on a wall and supported it with my hands, so that due to the shakings a certain loss of sharpness occured.


As I already described in the previous chapter under Step 3, to me, the night shots are always those pictures in which I intervene manually. Due to the increase of the shadows in the gradiation curve of DxO I could better inscene the blue water of the pool and make appear the reflections on the wet plates in front of it. I also increased the adjustment of the unsharp masking in this image to a higher level than I do in my standard adjustments in order to get a better impression of sharpness. Moreover, I manually increased the image noise.
Automatic correction of the vignetting
Also my 4th example image has been made in Mallorca; It is the monument Ermita de Sant Salvador in the south east of the island. I have made the shot with a Canon EF-S 17-85mm lense, whereby I adjusted the most little focal length of 17 mm. This is why I had to take a noticeable vignetting.


The vignetting was even increased as I fixed a polarizing filter on the lense. Even in the thumbnail version, the disturbing dark areas were visible in all four image corners. But apart from that, I am not very happy with this shot at all because the polarizing filter was indeed not optimally adjusted. The picture corrected with DXO Optics Pro impressively demonstrates how these errors have been corrected automatically by the software. Moreover, the disturbing vignetting has been almost completely eliminated. If I would not have had an additional polarizing filter on the lense, the vignetrting would have completely disappeared. What is impressive is the fact that I get these corrections done with my standard adjustments (Step 2), thus I have no need to intervene manually.
A manual intervention would have been suitable in order to move the monument 0,5 degreees to the right in order to get the vertical position. Such a correction is made in DxO Optics Pro with a horizontal correction (see example below).
Correction of the geometry
In my example no. 5 we make a jump to Venice and have a look to the Casa Rezzonico. I have made the shot of this palace right from the boat; thus my position was underneath the building. Due to my view up to the building, some vanishing point-like edges of building were originated.


For such cases, DxO Optics Pro offers a trapeziodal distortion correction. A trapeziodal distortion correction has to be done almost always when one mades some arquitectonical shots and some high buildings are photographed from the exterior. According to my opinion, such a correction cannot be automatized but is to be applied nanually on each image. In the corrected image version it is clearly recognizable how I managed to set the walls more or less vertically straight, so that it appears as if I had been standing at a good distance in the centre of the front of the building. In such a trapezoidal distortion correction, some parts of the images are cut, so that the resulting image is a little more narrow than the original. I oftenly do corrections like these, as on many photographies, the walls are leaning.
DxO Optics Pro offers a series of tools for the correction of the geometrical distortions. By this way, it is, for example, possible to force a rectangular, which means I determine the four corners of the building and the image correction software of DxO Optics Pro then accomplishes all steps automatically in order to get the selected outcut as desired. Also the correction of the horizon is easily possible by the determination of two points (see the following example).
Horizon correction
In my 6th example we have a trip to the Island Mauritius and have a look to a colonial house. In the original image we recognize that the house seems to stand inclined, one does not hold the camera completely horizontally or vertically, so that the shot gets crooked.


Through a simple image rotation one gets some straight edges in the image processing software. Therefore, DxO Optics Pro has a tool within the geometry correction named align horizon. It is a very comfortable tool with which one can comfortably align the horizon of an image. Therefore, one simply selects to points on the image that are supposed to form the horizon and DxO Optics Pro accomplishes the required rotation automatically. In my colony house image I simply selected two points of the roof edge, as they are supposed to run horizontally. Therewith, the house stands up straight again; but the fact that the street seems to run inclined is due to the reason that I was not standing at the centre of the front of the house.
Strengths and weaknesses of the software DxO Optics Pro
What are actually the advantages of DxO Optics Pro? Wat does this software has more to offer as for example Adobe® Photoshop® CSx? DxO Optics Pro is not an image processing program as Photoshop® is but rather an image correction software. Features as the artistic, brush strokes or levels tool are typical in the image processing programs. DxO Optics Pro outstands in the feature that in one project, hundreds or even thousands of images can be processed at once and that numerous correction adjustments for single images or complete batches of them can be transferred and that the actual processing automatically runs in the batch modus.
While many colour corrections as the contrast- and the tonal value adaptation are nothing special, the geometry corrections in which the lense errors are corrected are sensational and have not been priced several times for nothing. With DxO Optics Pro, I could manage to reduce the work that I normally had with a series of 500 images from several days to half a day, as due to the standard corrections a lot of laborious routine work can be saved.
But there is also a thing of the software I have to criticise: The user surface of the image correction software is indeed clear but there is really a need of getting used to it. Specially as a newcomer it is not easy to navigate and to find the operating elements. The user is forced to use a black window layout; white font on a dark background are not everyone´s cup of tea. Therefore, we finally have the Windows-desktop-adjustments; if I wish to have a sunshine yellow background colour in the summer time and in the winter a cold blue, this should be not modified to a deep black by a user software.
Another point of criticism is the installation of the software: By purchasing the software, one does not get a CD with a full installation package but only with an installer that, after determining the desired camera and lense modules, downloads several umpteen megabytes of data from the internet. This is not a problem for those who have a fast DSL-connection, but a big obstacle for those users who work mobily or with the "old" ISDN.
DxO OpticsPro shows numerous modifications live in the corrected image preview. But the speed is oftenly affected by this. A fast computer with a fast graphic card and a large main memory is indispensable. The support system of the software needs to be improved. There is no real supporting system integrated; there is a PDF-instruction and a link to the online-support.
Conclusion
I clearly recommend the image optimization software DxO Optics Pro. The image optimization function and image correction functions perform an excellent work and save a lot of working time of the user in the processing of a large image series.
But there is also a recommendation for the software developers of the company DxO: The surface is well done indeed, but the colour display should be left to the user as it is the case in Windows.
Back to the index software tests
|
)
)
)
)
)
)
)
)
)
)
)
)
