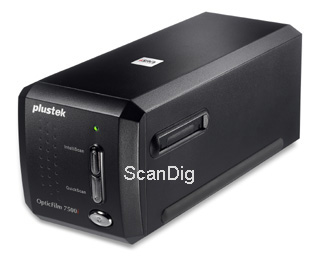
Test report Plustek film scanner OpticFilm 7500i
In August of 2007 Plustek introduced the slide scanner OpticFilm 7500i as a new device to the market - it's a consistent advancement of the Plustek OpticFilm 7200i. I speak consciously of an advancement and not of a follow-up model, since Plustek isn’t giving up the sale of the "old" device for the time beeing. The OpticFilm 7500i starts out with an extremely attractive price against strong competitors like the Nikon Coolscan 5 ED or the Reflecta RPS 7200 and wins in any case already a plus for the purchase price.
What changed in the new model? Whoever compares the two models, will notice outwardly only marginal differences. Also the technical data of the two devices are almost identical. One feature has changed essentially: multisampling and multi-exposure. This becomes apparent in the scanning software: while the OpticFilm 7200i was available either with the SilverFast version SE or Ai, the OpticFilm 7500i is delivered either with the SilverFast version SE plus or with the Ai-Studio version. This software upgrade becomes of course also apparent in the price. Our test device has the Ai-version.
Multisampling and multi-exposure are much promising features. Multiple scanning of the film is supposed to increase the dynamic range of the scanner. Plustek indicated a maximum density of 3.3 for the old OpticFilm 7200i; the density range was about mere 2.8.
For the OpticFilm 7500i Plustek indicates a density range of 3.5. That's at least on the paper a much promising figure, which suggests high-quality scans. Does the multi-exposure function really increase the density range by 0.7? That would be indeed an astronomical quality increase. Skepticism is the word: many photographers regard multi-exposure just as a marketing joke, which doesn't work satisfying in practice. We want to find out!
Important: the film scanner Plustek OpticFilm 7500i runs only on PC's with Windows operating system, thus not on Apple computers. The company Quato developed a Mac driver for this device and sells the identically constructed device by the name of Quato Intelli Scan 5000.
Equipment, accessories and performance data of the film scanner
In the delivered box of the Plustek OpticFilm 7500i is everything, which one needs for the digitization of 35mm-films included: beside the scanner itself there are film holders for film strips with up to six pictures and for up to four framed slides. Furthermore a power supply, an USB cable, a carrying bag (which no one really needs) and the software package are included. This consists of the NewSoft Presto! toolset, the Plustek QuickScan program as well as the professional scanning software SilverFast SE Plus or SilverFast Ai Studio. If one choses the Ai Studio version, then there is additionally an IT-8 calibration target.
The CCD sensor of the Plustek OpticFilm 7500i delivers an optical resolution of 7200 dpi; that's at least on the paper an extremely high resolution. A scan of a 35mm-negative or a slide results in a picture with approximately 70 megapixels, which produces with 24bit colour depth a decompressed picture file of about 210 Mbyte. With a colour depth of 48 bits the data doubles accordingly to about 420 Mbyte! To process such an amount of data one really needs a fast computer. A resolution test will show whether the effective resolution reaches the nominal resolution.
A source of infrared light is for the hardware-based dust and scratch correction. The multi-exposure function makes scanning of a target with two different exposures possible: one too bright and one too dark scan are being made, from which then a final picture is combined by calculations. This way the density range is supposed to increase. Furthermore it is possible to make multiple scans. The film is being scanned several times (up to 16 times) like with MultiExposure, however not with different exposures. The purpose of multiple scans is to minimize the coincidentally arising picture noise - particularly in dark picture portions.
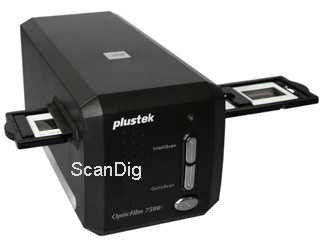
On the front of the device are, as in all models of the OpticFilm series, besides the power button the IntelliScan and the Quickscan key. With activated QuickScan application (this small tool resides in the system tray of the task-bar as soon as one installs the program) one starts the QuickScan software by pushing the first button, while with pressing on the latter one starts SilverFast. That's familiar from the predecessor models.
Installation and start-up
The installation of the provided software works problem-free. In the CD casing there are two CD's: one with the driver software and the provided tools (see the chapter on software), as well as one with the SilverFast scanning software.
One must however pay attention to one characteristic regarding the installation: contrary to most other scanners for the installation of the Plustek OpticFilm 7500i one must attach the scanner to the PC first, and afterwards install the software. As soon as one connects the scanner to the power and through USB to the computer, the scanner is recognized immediately and the assistant to add hardware is started. Now one is asked to insert the CD with the driver software, whereupon after confirmation the installation automatically takes place. Afterwards one can install the scanning software SilverFast, which is also problem-free and nearly fully automatic. After typing in the serial number from the CD cover, scanning can start.
A printed quick-start manual helps with the installation, if any questions come up. A detailed manual is given on CD as PDF; a printed version of the manual doesn't exist, thus one has to print it by oneself.
Now one has two possibilities to make a scan: with QuickScan or with SilverFast - one must only press the according key at the scanner front. The exact proceeding is further below explained.
Scanning framed 35mm slides
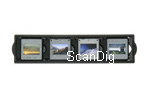
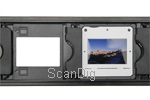
Plustek delivers the OpticFilm 7500i standardly with a slide holder, which has somewhat changed compared to the predecessor model: the structure with the 4 mounting plates for 4 framed 35mm slides remained the same, but the springs are now covered. What's caused by the cover over each of the 4 slots? The slide gets additional support, by being fixed at one side in the top, down and left. The disadvantage is of course that there is now a restriction of thickness; up to now one could insert practically arbitrarily thick slides into the film holder. Now there is a restriction to about 3 mm. However - except for the spring covers the slideframe holder remained the same.
The slideframe holder has 4 slots, whereby at the left side is in each case a spring, which one must squeeze together, in order to insert a slide and at the right side is a groove, so that one can reach with the finger into the slot. Inserting a slide into the slideframe holder is difficult at the beginning, since one must insert the slide and at the same time squeeze the spring together. If one slips, one can easily hit the bulls-eye, meaning to fully touch the film and even runs the risk to push the film out of the frame. Particularly during the first attempts with the film holder one should absolutely wear cotton gloves, so that one doesn't damage the film surface when slipping. After a certain training period one does however handle the inserting of the slides into the holder easier.
Inserting normal plastic frames works after a certain time of practice quite problem-free. Cardboard frames must be handled very careful to avoid bending of the cardboard due to the tension of the spring. The additional fixings fail for very thick glass-framed slides, but the spring can be squeezed together so far, that thick slides can be nevertheless inserted into the film holder. That the springs don't enjoy this forced step is clear.
Since to receive good results one will scan mainly with SilverFast, here is only briefly dealt with the procedure when scanning with QuickScan:
By a doubleclick on the icon in the system tray a window appears, in which one can make all for the scan necessary adjustments: e.g. the type of target (slide or negative), the desired file format (JPG or TIF), folder names, the destination folder and the desired resolution as well as various corrections such as brightness and contrast are being specified here. In addition one can select here whether first a preview or directly a fine scan is to be made. If all adjustments are done, one can close the window again. In order to start the scanning, one now only needs to push the QuickScan button on the device and the scan starts right away with the just made adjustments.
SilverFast as professional scanning software naturally offers far more extensive adjustment possibilities and produces the clearly better result regarding the pictures. The scan is done as usual: first pre-scan, make adjustments and start the fine scan. To talk more about the functions which SilverFast offers, would go beyond the scope of this scanner test. But so much should be said: this software offers the beginner the possibility to achieve good results after some training, but the professional also gets all possibilities to perfect his scans. Further information about SilverFast can be found on our SilverFast webpage.
After one gained something experience in handling the film holder, the scanning of slides works actually quite simple: equip film holder with 4 slides, insert, scan first picture, move film holder forward, scan next picture and so on. One asks himself naturally thereby, why the slideframe holder is needed at all. Comparing the Plustek OpticFilm 7500i to a Nikon Coolscan 5 or to a Reflecta RPS 7200, one will notice, that these devices don't need a slideframe holder: with these devices one inserts the slide simply into the front of the scanner and scans it. This spares one the time-consuming insertating of the slides into the film holder and naturally saves a lot of work.
When the Minolta Dimage Scan Elite 5400 still existed, one knew such film holders for the purpose of the batch processing: with this equipment one could insert 4 slides into the film holder and then scan them in the batch processing mode. It's a pity, that the Plustek requires manual shifting of the film holder into the next position after each slide. Here we strongly hope for a successor model with automatic transport.
Who would like to save some time when scanning framed slides, buys right away a second slide holder in addition, so that one can load the second film holder while the first is in the scanner. In addition to that one has then already a spare part, if one of the springs brakes.
Altogether one must state that the scanning of framed slides with the Plustek 7500 is rather complicated and requires a lot of work. Inserting 4 framed slides into the slide holder takes time and has no advantage compared to scanners, into which one can insert an individual slide directly. The use of a slide holder makes only sense, if one can process several slides automatically in a batch, but that's exactly the missing function in the OpticFilm7500.
Scanning 35mm film strips
The provided film holder for 35mm film strips takes a strip with up to six pictures, or also several smaller film strips with accordingly fewer pictures or individual single pictures. While loading the film strip holder one must make sure that the bars of the film are exactly above or below the bars of the holder. With a 6 pcs. film strip this itn't a problem, since one shifts the whole strip accordingly. With smaller film strips or with loose single pictures one has extreme difficulties with the positioning. Often one piece slips when one moves another one back into position, or a little breath moves the individual pictures out of the order. One really needs practice in order to be able to deal with small film strips or single pictures well.
The flap of the film strip holder can't be opened completely to 180°, just approx. 110°. Therefore one must make sure when opening it the first time, that one does not break the hinges by mistake. In my opinion this construction is not solved well; it would be better, if one could open the film holder completely, thus open it by 180°. Like this the flap is always hindering when inserting, this obstructs comfortable working with both hands and a slight push against the holder flap shifts the inserted film strip right away again. Too bad, this problem was already present in the predecessor model and unfortunately there was no improvement to the film strip holder.
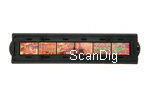
Inserting long flat film strips into the holder is simple and problem-free, whereas inserting curved or bowed film strips proves as extremely problematic, since there is no clamping mechanism or something similar. One inserts an even film strip into the holder, shifts it according to the bars and then closes the holder carefully. With a curved or bowed film strip difficult piecework is announced: one tries to position the film strip somehow halfway, then to close the film strip holder gently while thereby still making the horizontal adjustment at the bars and this way slowly reaching a closed flap. Whoever has many curved or bowed film strips to scan, needs good nerves in order to not despair with this kind of work.
One thing I'd apsolutely like to note: when dealing with negative strips one should obligatory wear cotton gloves or even anti-statics gloves. With bare hands it is nearly impossible to insert and position a film strip in the holder without touching the film surface with the fingers. With fine gloves one can touch the film strip comfortably and doesn't need to fear to destroy the film layer. For the removal of the film strips out of the film strip holder, I recommend tweezers, but absolutely with flat tips, since otherwise the film will become scratched.
The scanning of film strips works the same way like the scanning of framed slides: one inserts the film strip holder into the scanner, scans the first picture, moves the holder one position further, scans the next picture and so on. Here too I can only remark that one naturally misses an automatic film strip transport. How beautiful would it be, if one could simply insert the film strip holder loaded with 6 pictures into the scanner and then make 6 scans in batch mode by the push of a button.
Competitor models like the Nikon Coolscan 5 or the Reflecta RPS 7200 draw a film strip automatically in and scan all pictures automatically in the batch mode. That's what the Plustek should learn too! But the film strip holder offers the possibility of taking in single pictures; whereas the Nikon and Reflecta competitor models require single pictures to be mounted in a frame.
In summary one can thus say that scanning film strips with the Plustek OpticFilm 7500i works rather complicated too. Whoever has many regular film strips, is better adviced chosing models with an automatic film strip feed and batch processing. However who has a mix of short film strips and single pictures, gets better along with such an film strip holder.
The included software
The software equipment of the Plustek OpticFilm 7500i is exemplary: the delivery includes the QuickScan program, the NewSoft Tools Presto! Imagefolio, Presto! PageManager and Presto! ImageExplorer as well as of course the outstanding LaserSoft SilverFast SE or SilverFast Ai studio. This way Plustek provides everything regarding software which one needs for scanning.

As already mentioned above QuickScan is suitable for the fast and simple digitization of film material, however offers hardly adjustment possibilities.
ImageFolio is a simple picture processing program, which (regarding the range of functions) goes hardly beyond the MS-Paint contained in Windows. It can't keep up with Adobe® Photoshop® Elements Paintshop Pro. But it's coming free of charge with the scanner. With the PageManager you can organize your documents, such as pictures and text files, send them directly to the suitable programs or produce in conjunction with QuickScan PDFs from your scans. The likewise contained ImageExplorer is a program, with which you can view and sort your pictures.
SilverFast is a very extensive scanning software, with which one - even as a beginner - gets along well after a certain training period. To the professional it offers all possibilities for the optimization of the scans. It makes scanning with MultiExposure and MultiSampling possible. With version 6.5.0, which came with our test device, multi-exposure is possible only in combination with an output color depth of 48 bit. If one takes the free upgrades on the newest version, one can use the MultiExposure function also with 24 bit color depth. More information about SilverFast and the different versions is available on our SilverFast webpage.
Altogether it can be said that the Plustek 7500 comes with an outstanding software package. SilverFast Ai Studio is the ultimative scanning software and the other tools are also very useful. Unfortunately Adobe® Photoshop® Elements is missing, which actually comes with nearly every other (also lower-priced) scanner in the standard supply. Who still would like to work on his pictures after scanning, won't come too far with the standard software and should buy a better picture processing program like Photoshop® Elements; a cost-free alternative is the freeware Gimp.
Picture quality
NAfter the less convincing results from the other models of Plustek’s OpticFilm series, we want to examine now the present top model OpticFilm 7500i performs regarding picture quality.
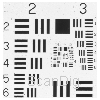
Let’s begin a resolution test with an USAF-1951 target. The horizontal and vertical bars of element 5.6 are still very well recognizable. In element 6.1 we can also still clearly recognize the corresponding 3 lines. Ultimately in element 6.2 the resolution-limit of this scanner is reached. According to our resolution table the element 6.1 represents a resolution of 3251 dpi, the element 6.2 indicates 3649 dpi. Since the resolution is closer to element 6.2 than to element 6.1, we give the Plustek OpticFilm 7500i an effective resolution of 3500 dpi. Compared to the OpticFilm 7200 and the OpticFilm 7300 this is an increase of 500 dpi, thus approximately 20%. That's not quite a bad result, however the effective resolution nevertheless reached hardly 50% of the claimend resolution of 7200 ppi. Whoever expects 7200 dpi and gets 3500 dpi is disappointed, but 3500 dpi is a very good value for a film scanner!
A scan with 7200 dpi resolution produces over 70 million pixels, meaning approximately 210 megabyte of data. From the 70 million pixels however only about 17 million are useful, which means of the 210 megabyte of data per image file some 50 megabyte remain - which contain the actual picture information. For the Plustek OpticFilm 7500i too counts:
In order to receive the maximum effective resolution of our measured 3500 dpi, one must scan with the highest resolution of 7200 dpi. The thereby blown picture files must be afterwards shrinked with a picture processing program.
One needs a very good computer, in order to be able to deal with such image files, and of course lots of memory on the hard-disk, if one works in the uncompressed TIF format. The image files reach by the way approx. 420 megabyte, if one works with 48 bits color depth.
The density range also increased compared to the predecessors. This way very bright and very dark picture areas are better drawn in scans made with the OpticFilm 7500i. Remarkable on these lights and shades is, that they appear very dull and that the tonal values aren't very well differentiated. A skillful, additional treatment of pictures is helpful here. Compared to the predecessors the Plustek OpticFilm 7500i thus improved also regarding density range and produces in this point very good results in its pricerange.


With the MultiExposure function integrated in SilverFast the density range is supposed to increase further. Scanning an image once with and once without MultiExposure however shows when comparing the results that they don't differ much. The picture scanned with MultiExposure is only a little darker and shows therefore minimum more detail in the lights. Thus we couldn't notice an increase of the density range.
The Plustek OpticFilm 7500i works with the hardware-based dust and scratch correction iSRD. The film is scanned similary to the ICE procedure by an infrared ray, so that changes or irregularities on the film surface can be recognized and removed. Both correction procedures, thus ICE and iSRD, function in the same way. They are both protected by patents, so that a scanner offers either ICE or iSRD. Further information about the different correction procedures is available on our SilverFast Q&A page.
Let's come to a big deficiency in the picture quality: the hardware-based dust and scratch correction of the OpticFilm 7500i unfortunately doesn't yield any convincing results at all. Many dust particles and small scratches were not properly removed.
Despite iSRD the scans still have many spots, which must later be manually removed with lots of effort e.g. with Photoshop®. Even worse is that the iSRD function touches some fine details in the picture and causes picture errors. Thus it is better to deactivate the iSRD function - anyway still lot of dust has to be removed and one avoids detail losses. Too bad, a working automatic dust and scratch correction is actually the state of art in good film scanners.


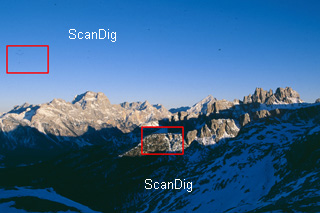
In order to demonstrate you the weaknesses of the iSRD function, we have scanned the shown motive once with and once without iSRD. We attached the red marked areas here as 100% cutouts, so that you can view them in original size when clicking on them. The then opening picture switches every 2 seconds between the scan made with - and the scan made without iSRD, so that you can see the differences clearly. It is remarkable that the dust within the sky-area was barely removed and that fine details within the area of the rocks disappeared and picture errors took their place.
Altogether it can be said about the picture quality that the Plustek OpticFilm 7500i makes good scans thanks to SilverFast Ai and IT-8 color calibration. The actual resolution of 3500 dpi is low compared to the promised 7200 dpi, but 3500 dpi is a good value for a film scanner.
The density range is also good and for most pictures sufficient. According to our experience one does not need to activate the time consuming multi-exposure function. It's a pity that the automatic dust and scratch correction did not provide satisfying results with our test device; that's what some other film scanners do much better. Therefore we judge the picture quality only with good and not with very good.
Scanning speed
For the determination of the scanning times the scanner was connected by USB 2.0 to a computer with a single core Pentium 3.2 GHz processor and 2 GB main memory.
First the times for scanning negatives:
| Procedure |
Duration without iSRD |
Duration with iSRD |
Duration with iSRD + MultiExposure |
| Preview |
0:14 min |
0:14 min |
0:14 min |
| Negative scan with 2000 dpi resolution |
0:28 min |
1:12 min |
2:42 min |
| Negative scan with 3600 dpi resolution |
1:12 min |
3:07 min |
5:18 min |
| Negative scan with 4000 ppi resolution |
3:24 min |
8:33 min |
13:53 min |
| Negative scan with 7200 ppi resolution |
3:24 min |
14:15 min |
21:04 min |
You can see the times for slide scans in the following table:
| Procedure |
Duration without iSRD |
Duration with iSRD |
Duration with iSRD + MultiExposure |
| Preview |
0:14 min |
0:14 min |
0:14 min |
| Positive scan with 2000 dpi resolution |
0:28 min |
1:21 min |
2:37 min |
| Positive scan with 3600 dpi resolution |
0:39 min |
2:56 min |
5:03 min |
| Positive scan with 4000 dpi resolution |
2:35 min |
10:20 min |
12:55 min |
| Positive scan with 7200 dpi resolution |
2:42 min |
19:04 min |
19:11 min |
It is remarkable that in scans without iSRD the digitization of slides works faster (with one exception at 2000 dpi), while with activated iSRD function the processing of negatives works faster with nearly all resolutions (except with 3600 dpi). The fact that the scans without iSRD at 4000 dpi and 7200 dpi take almost the same time, is because of the fact that the scanner does not offer an optical resolution of 4000dpi and thus switches to the next higher resolution available (in this case 7200dpi) scans the picture and shrinks it afterwards.
As we can see, the Plustek OpticFilm 7500i is not at all a fast scanner. While scans with lower resolutions and without iSRD go somewhat quickly, the digitization of a picture when using high resolutions in combination with iSRD takes intolerablly long time. Since one usually scans with highest resolution, one must really expect scanning times of 15-20 minutes per picture. Our test computer was during the scan with the Plustek 7500 mainly busy, so that one could not use the computer for other work during a scan. SilverFast devours all computer resources during a scanning procedure.
That's of course particularly bad, because one can not scan while surfing in the Internet or writing a letter. If one considers that with this scanner just 3-4 pictures per hour can be done and one has huge archives, it becomes clear that one should take months or years into account for his collection, until everything would be in the computer. And then still the time consuming treatment of pictures and reduction of the large image files to the actual information content is coming up.
CD containing Demo-Scans
For an expense contribution of 10.00 € (foreign countries 15 €) we offer you a demo CD for the Plustek OpticFilm 7500i. The CD contains scans of colour slides, colour negatives and black&white negatives, which we made with the OpticFilm 7500i Ai. If you wish such a demo CD, please transfer 10.00 € to our account or send us 10 € in cash in an envelope and mail/send us the shipping address for the CD.
Summary, result
The Plustek OpticFilm 7500i has compared to the previous model clearly improved regarding resolution and density range thus supplies better pictures, even if the very much announced multi-exposure function does not bring the hoped quality increase. Thanks to SilverFast Ai Studio and IT-8 calibration scans with good colors and high resolution can be made with the Plustek 7500i. The scanner is being delivered with a very good, extensive software package, although unfortunately without Adobe® Photoshop® Elements.
The Plustek OpticFilm 7500i has however two big deficiencies: the automatic dust and scratch correction iSRD doesn't work perfectly, so that one must still remove many dust particles in time consuming picture processing. In addition the scanning speed is intolerably slow. Whoever needs just occasionally a scan can wait 15-20 minutes for a scan in highest resolution. For the archiving of a complete film collection is the device way too slow. Since the batch processing is missing and the computer is to a very large extent busy during scanning, one progresses only with huge difficulties and lots of patience.
Buying a film scanner
Please, feel free to visit our online shop - it's the only shop on the Internet which is fully specialized on film scanners and accessories! We can provide you with any film scanner at an extremely attractive price and we also can supply you with accessories such as film holders or optional adapters.
Back to the film scanner tests index
|
)
)
)
)
)
)
)
)
)