Hasselblad Flextight X5 - Virtual drum scanner
The swedish manufacturer Hasselblad is known for its professional medium format camera systems. Many professionals have one and everyone wants one - the Hasselblad medium format cameras are both a status symbol and a professional tool in one.
As a manufacturer of digital high-end system cameras with some deep roots in the area of the analogue fotography, Hasselblad is commmited to both worlds of the fotography - the analogue and the digital. Therewith, it is not surprising that the Swedish company also offers some professional high-end scanners with which help it is possible to transfer the analogue photos to the digital world in best quality.

The Flextight scanners are devices designed for the professional use. They are offered in a price range that makes them unaffordable for most of the home users, as for the price of a Flextight scanner one can also get a well equipped car. But therefore, they should also achieve an image quality that cannot be achieved by the consumer devices.
As it is also the case of the drum scanners, the Flextight-scanners make use of an effect that positions the original material in a perfect way: Due to their structure as so-called virtual drum scanners, inside the flexible film adapters, the original material is curved in a radius and by this way guided around the sensor. Thereby, the original material is tightened so that it is in a perfect flat position. By this way, the well known problem of glassless scans with unsharp areas towards the image edges resulting from the curved film material is successfully solved.
This construction in conjunction with the technical data announced by the manufacturer make hope for an outstanding image quality. What the Flextight X5, the top-model amongst the model series consisting on two scanners, actually performs will be clarified in this report. We will also show you which possibilities of expansion are available for the Flextight X5 and we will specially get into the possibility of the batch scanning processing. On our page about the Hasselblad Flextight X1 we show you the most important differences between these two high-end scanners of Hasselblad and also provide you with a purchase advice about which device is the right one for a certain purpose.
Hasselblad has stopped the production of the Flextight scanners in May 2019; there are no successors. As an alternative we recommend the Nikon Super CoolScan 9000 ED or our Flextight Scan-Service. Masks and other accessories from Hasselblad are still available in our film scanner shop in the category Hasselblad accessories.
Equipment, accessoires and performance data of the Flextight X5
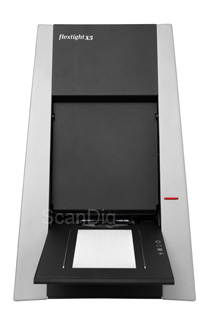
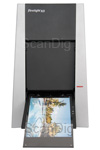
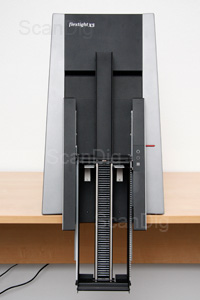
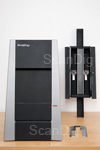
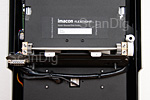
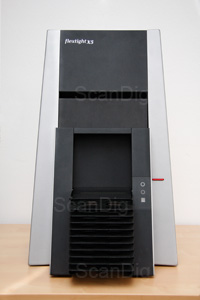
The Hasselblad Flextight X5 is delivered in a big carton box in which the device and all the accessoires are stored and well padded. Those who have never seen this device before will be first surprised about its size: The scanner measures 39x65x23 cm (WxLxD), thus it is highly built. Therewith, the whole optical system could be vertically built, whereby the CCD-sensor points downwards. This reduces significantly the risk of dust particles setting on the surface of the sensor.
With a weight of approximately 20,5 kilograms, the Flextight X5 is not a lightweight. But therewith, the device stands bombproof on the table, a thing that is also very important due to its upright alignment, as otherwise the whole structure would be too shaky.
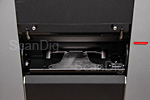
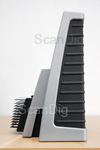
Furthermore, there is the power supply, a firewire-cable, each a film adapter for single 35-mm images in portrait and in landscape for 6x6 and/or 6x4,5 medium format single images and for 4x5" large format sheet films, an adapter for non transparent (e.g. paper patterns) materials up to a size of DIN A4 including a cover sheeting and a white-calibration card, a focus-calibration-slide as also two DVDs with the scan software, the instruction manual in several languages and a video-tutorial in the carton box. The film adapters are nicely packed in a foldable storage box in the slipcase where they can be stored safely and protected from the dust. Also the adapter for the non-transparent material is stored in a storage box that is closed with a velcro fastener, together with the cover sheetings and the white-calibration-card.
All film adapters are provided with a bar code that is read during the insertion into the scanner whereby it enables the automatic mask-recognition. This is why one must not choose the respective film adapter and by this way one also does not risk that due to the wrong adjustment, a film adapter that is shorter than the adjusted one gets too far into the device and therewith completely falls into the case. This would be certainly not a big problem as the case can be opened at the lower part by just loosening some few srews so that one could recuperate the "absorped" film adapter, but anyway it would be an annoying matter.
Thus, the equipment is complete and adapted to the professional use: Contrary to many consumer-devices, the scope of delivery of the Flextight X5 does not include any further software as for example an image processing software a la Photoshop® Elements. In this concern, the target customers are already equipped with everything they need and would anyway not be happy with the usually reduced versions of these programs.
For the Flextight X5, Hasselblad offers a wide range of optional accessiores: Starting with prefabricated film adapters for all common film formats to specially made film holders as per the customers wish, a feeder for the batch processing of several film adapters up to a feeder for framed 35-mm slides, any imaginable accessoire is available for the scanner. In our Online-Shop, there is an overview of the wide offer of the Hasselblad-scanner-accessoires.
The technical data of the Flextight X5 speak a clear language: A maximal resolution of 8000ppi for 35-mm images, 16 Bit internal colour depth and a maximum density value of Dmax of 4,9 make hope for an outstanding image quality. Some design features as the external power supply, a cold cathode fluorescent tube and an additional active cooling system of the CCD-sensor provide the best possible reduction of image noise caused by the heat generation. Moreover, the Flextight X5 is equipped with a light capacitor that emits the light of the cold cathode fluorescent tube, so that even the tiniest dust particles do not appear on the scan, a thing that makes the posterior retouching much easier. But this is also urgently needed, as unfortunately, the scanner does not have a hardware-based dust and scratch removal by means of an infrared technique (ICE). The autofocus enables a precise focussing to the pattern level. Combined with the virtual drum technique, it should be possible to accomplish scans which serve professional requirements.
The scanner cannot only digitalise transparent materials of a size up to 100x245 mm but also offers the possibility of accomplishing some non-transparent scans. The maximum size of a pattern is, in this case, of DIN A4, thus 210x297 mm.
The scan software FlexColor offers the possibility of generating some so-called 3F-Scans: It is a raw data format (Flexible File Format), that, similar to the raw data of a digital camera, contains the data of the information captured by the sensor without any kind of processing by the algorithms of the scan software. This means that all the adjustments that should be already accomplished during a common TIF-workflow can be accomplished afterwards and without any loss in the quality.
Thereby, the adjustments made during the scanning procedure or afterwards are not written straight into the data but saved as metadata. Thus, if you make some posterior adjustments and call up the image next time over FlexColor, all adjustments are retrieved and can be modified as wanted so that the new adjustments are applied straight away on the raw scan and without any further losses of the quality.
Installation and starting up the Flextight X5
The installation and start up of the Hasselblad Flextight X5 is an easy matter. In the following, we will describe the installation on a windows PC. But the installation on an Apple Macintosh is as simple.
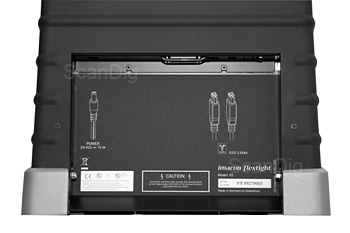
First, the driver software is installed. Therefore, one only has to insert the DVD and follow the screen instructions. As soon as the installation of the software is finished, the scanner can be connected to the power through the power supply and to the computer over the firewire - the device does not have any USB-port. Immediately after switching on the scanner, the operating system announces that it found a new hardware whereupon one lets the operating system search for the driver automatically (of course, a manual selection of the driver is also possible). Shortly afterwards, the installation is completed and one can put the scanner into operation.
Before getting really started with the scanning, one should calibrate the focussing of the scannner with the help of the calibration slide that is included in the scope of delivery of the scanner. The data are saved in the computer at which they have been executed. Thus, if one connects the scanner to another computer, one should also accomplish the calibration again. For accomplishing the focus calibration, one inserts the calibration slide into the 6x6 medium format holder into the scanner and activates the focus calibration in the maintenance menu of FlexColor that then runs automatically within a few minutes.
Thus, the installation and starting up of the Hasselblad Flextight X5 is a very easy matter and is not different to the procedure of most of the other firewire devices. In other words, the installation and starting up of a professional Hasselblad film scanner is as easy as the installation of a common consumer device.
Scanning transparent film material with the Flextight X5
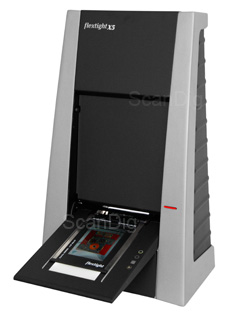
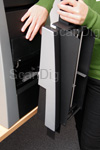
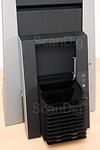
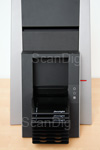
Before one can scan with the Flextight X5, first, the film adapter has to be loaded with a film. For the loading of the film adapter, the best is to make use of the exposed feed of the scanner. This consists on a lid that can be folded downwards for the operation with the scanner and that serves as a cover when closed. There is a light surface in the lid that is provided with a cross grid.
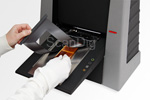
Thus, for loading the film adapter one puts it on the feed and pushes it so far into the device until it snaps in. Now it is possible to fold up the lid of the film adapter while one positions the film material with the other hand (see adjacent image). The cross grid on the light surface helps to align the image. Now, one has to fix the pattern at the lower end with one hand, while with the other hand, one gradually pushes the lid downwards. As soon as the upper part of the pattern is fixed by the lid, one can let it off and finish pushing the lid downwards.
It is, of course, also possible to load the film adapter outside the feed of the scanner, for example on a light panel. But herein, one has to be careful not to turn the cover plate too much backwards, as otherwise one risks to bend it over. In total, the loading of the film adapter is quite easy and comfortable. Only at the beginning one has to get used to the handling, as, as already said, one has to hold the cover plate with one hand and position and fix the material with the other hand. But after some time, one gets really routinated with the loading of the film adapter , so that this procedure gets, in case of normal film material, a matter of a few seconds.
Hasselblad offers an abundance of film adapters for the most different formats. It is possible to acquire film adapters for all common standard formats. And even in case one has not found a suitable film adapter for a certain appliance, Hasselblad offers the users of the Flextight a service to get some masks tailored according to their requirements.
As a standard, the Flextight X5 is delivered with three film adapters: The film adapter for single images in 35-mm format offers each one gap for an image with portrait orientation and one for an image with landscape orientation. Of course, it is also possible to turn the image in the scan software. But the difference is not only in the alignment of the material. An image that is inserted in the gap for portraits can be scanned with a higher resolution (max. 8000 ppi) than the one inserted in the gap for landscapes (max. 6300 ppi). Also, there are individual maximum resolutions available for all formats - the wider the pattern, the lower the maximum scan resolution. The reason for this is the structure of the optical system of the scanner.
35mm films (positives or negatives) can be scanned with 6300 ppi in the landscape format, in the portrait format, however, with 8000 ppi.
Beside the film adapter for 35-mm images, also a film adapter for the medium format of 6x4.5cm + 6x6cm as also a film adapter for large formats of 4x5" are included in the scope of delivery. Medium format films can be scanned with a maximum resolution of 3200 ppi, large format films with 2040 ppi. With the opional Hasselblad 6x4,5cm film holder 6x4.5 cm films can be scanned in the portrait format. The resolution increases from 3200 ppi to 4000 ppi.
Medium format films can be scanned with 3200 ppi, large format films with 2040 ppi. With an optional film holder 6x4,5cm films can be scanned with 4000 ppi.
After inserting and loading the film adapter, one can accomplish a preview-scan and make all desired adjustments. By clicking on the Scan-button, the fine scanning starts with the adjustments made. Thus, the scanning proceeding does not differ from the other scanners and everyone who already worked with a film scanner will also be able to handle the Flextight X5 and the FlexColor-software well.
Scanning non-transparent material with the Flextight X5
As a top-model of the Flextight-series, the Flextight X5 also offers the possibility to digitalize non-transparent materials up to a size of 210x297 mm (DIN A4). This feature is, according to our opinion, only to be considered as a nice additional give-away, as it is not very comfortable to accomplish a scan of a non-transparent material with the X5.

Also in this case, a flexible pattern holder is needed. It consists on a basic plate of steel which is provided with a matt black rubber layer at the side where the patterns are placed, so that the material is protected from slipping. There are several dashed lines provided as a help for the alignment. After one has positioned the material, a transparent covering sheet is placed over it. This covering is perforated on each corner that exactly matches to the metal pins on the basic plate. The covering sheet is needed for the material to be fixed on the holder when bent during the scanning procedure. If one wants to omit the use of this additional layer with two sides that have to be kept free from dust, one can also fix the material straight on the basic plate with some sticky tape.
The result of this construction is that it is only possible to scan some single and foldable paper patterns. It is not possible to digitalize a book cover or some of the pages of a book (without having to tear them off) and/or photo albums.
The are no guiding rails for the feeding into the scanner the way they are available for the film adapters on the feed, as it is much too wide for this. Thus, one has to pay attention that during the insertion into the scanner, the bar code of the holder is positioned in the centre, there where there is a gap for the bar code. The further procedure does not differ from other scannings of transparencies and from other scanners: Preview-scan, adjustments, fine scan.
As one can see, the Flextight X5 is not designed to digitalize the non transparent patterns in a comfortable way. There are much more cheaper and comfortable solutions for this purpose, specially because for the scannings of non-transparent materials, the capacity offered by this device is not needed. Neither high scan resolutions are needed nor a specially large range of density, as the non-transparent materials do not have this density of information.
The 3F-Workflow with the Flextight X5
With the so-called 3F-scan it is possible to generate some raw scans that, similarly to the raw data of a digital camera, contain some raw image data the way they were captured by the sensor. This means that these data did not run through the algorithms of the scan software for the computation of the finished image file. Thus, by saving the 3F-scan, one can always access to the raw data in a way as if one would scan the pattern straight away with the only difference that one does not access the currently generated data from the scanner but to the previously saved raw data on the data carrier.
In order to accomplish a 3F-scan, one simply clicks on the 3F-button in the scan software. In the thereupon appearing dialogue box, one determines, among other things, where the raw scan is supposed to be saved and the maximum size of the 16 bit file made from the raw scan. A raw scan is principally scanned with the highest possible resolution for the format. But if one wants to avoid to produce unnecessarily large files, for example, because one knows that only small copies are made, it is possible to determine herein that the file size should noy exceed a certain value.
In order to finally accomplish the 3F-scan, the only thing that remains to do is to click on the scanning-button. The scan is carried out and thereupon the raw data are saved into the determined path. Then, in order to access this raw scan, one opens it with the help of the thumbnail-browser, whereupon the image is shown in FlexColor. Now it is possible to apply all the adjustments on the raw scan that otherwise would have been done before the scanning. Thus, this means that one sees the image as if one would have just made a preview-scanning. And exactly like in this case, one now accomplishes all the adjustments until the image matches ones requirements.
In the case of a normal scan with a pre-view, one should now click on scanning, but in the case of a raw scan one clicks on the save-button that replaces the scan-button in the 3F-processing. Now a finished TIF-file (or also a JPG-file) is computed from the raw data under the consideration of the adjustments just made. Thereby, the adjustments are written as metadata into the raw scan file. This means the raw scan remains unchanged, only additional data are saved into the file which determine with which adjustments the raw scan was processed at last. Therewith, it is possible to access repeatedely the original raw data.
Thus, the 3F-workflow divides the scan processing into a hardware-based and a software-based part. Those who avoid the expensive acquisition of a Flextight X5 can get the 3F-scans done from a service provider and therefrom generate the finished image files with the FlexColor software. By this way, one practically scans by oneself, this means that one accomplishes the scan adjustments by oneself, only the mere handling of the scanner is delegated to a service provider.
The software FlexColor delivered with the Flextight X5
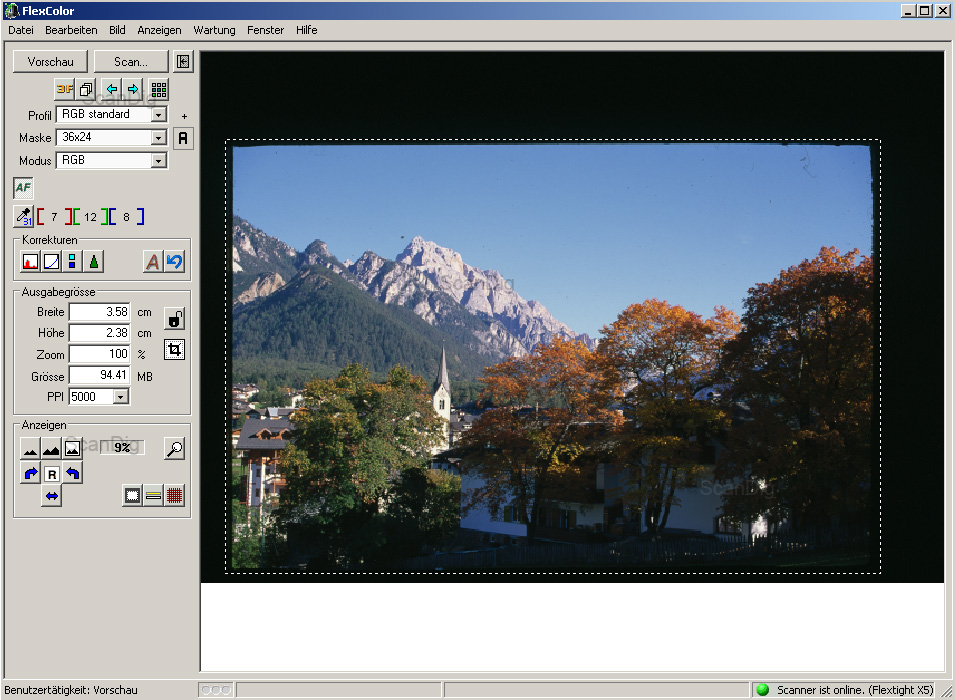
The scan software FlexColor is included in the scope of delivery of the Hasselblad Flextight X5. This software is also included within the scope of delivery of the digital cameras and the digital scan backs of Hasselblad. During the operation with a scanner, the software behaves the way one is used from a scan software. This means that the production of a normal scan is accomplished according to the standard scheme: Making a preview-scan, setting the adjustments, determine the save path and accomplish the fine scan. Flexcolor offers an abundance of possibilities for the adjustment. By this way, the user has, amongst others, the following tools at his disposal:

With the help of the histogram, the correction of the tonal value offers the possibility to adjust the black point, the white point and the gamma value either for all colour channels together or separatedely for each of the colour channels. Thereby, it is possible to switch the histogram display between the view before and after the correction, thus under the consideration of the adjustment of the slide control by a simple click on the respective button. Three pipettes enable the determination of the black point, the white point and the grey balance right over the preview image. Also the automatic correction of the tonal value is easy to accomplish by a simple mouse click.
The dialogue window of gradations has, beside of the slide controls for the contrast, brightness and shadow contrast, a tool for the gradation curves whith which it is also possible to adjust either all colour channels together or each colour channel separatedely.
In a further dialogue window that can be activated named colour correction is is possible to correct the colours in a selective way. Therefore, one chooses over a drop down-menu the colour to be modified from a list with the colours red, green, blue, cyan, magenta and yellow, so that they can be modified over some input fields or with the help of an arrow key in their colour scheme and their saturation per slide control. If one is not sure to which of the six colours the one to be modified belongs, it is also possible to click on the image with a pipette through which the respective colour is then choosen in the dialogue window.
Last but not least, it is possible to use the unsharp masking over the dialogue window sharpening, which can either be controlled over the three known parametres strenght, radius and threshold value (herein called Grain limit) and also ober the Black limit-parameter. With this, one determines under which tonal value no unsharp maskening should take place. Thereby it is possible to avoid that the image noise, which can be specially caused in vey dark image areas, is resharpened and therewith shows up more clearly.
For the adjustment of the resolution, the software has a dropdown-menu in which all available resolutions are listed. Thereby, the achievable and hardware-based resolutions are highlighted. If one chooses a resolution that is not hardware-based, the material is scanned with the next higher and hardware-based resolution available and then reduced by the software.
If one wants to scan several outcuts from the pattern, for example if one has inserted a medium format film strip into the film adapter, the way of proceeding is a little different to the majority of the known scan software: while in most other programs one simply marks several frames that are then consecutively processed, in the case of Flexcolor it is only possible to mark one frame at once.
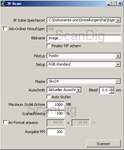
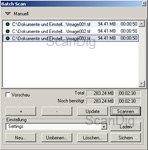
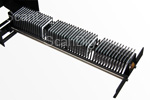
In order to scan several outcuts it is needed to use the batch-scan-function. If one activates it by clicking on the respective button, a dialogue window appears with a list that is empty at the beginning. Now, one determines the outcut to be scanned over the scan frame and accomplishes all adjustments as wished. Now, instead of clicking on scanning in order to start the fine scan of this outcut, one clicks in the batch scan dialogue window on the "+" button, with which after determining the place to be saved, the first scan job is added. Now, one determines the other desired scan jobs in the same way and finally clicks on the scanning-button in the dialogue window. After that, one job is automatically processed after the other. The illustration above shows a batch-job with 3 scans.
FlexColor enables the saving of adjustment-sets, the so-called profiles. The respective dialogue window can be activated over the menu option profile-preadjustments... in the file-menu. Here, it is possible to make some general adjustments as for example the type of film and the standard resolution as also the adjustments and the contrast, sharpening, colour correction and colour management and quickly save it over the drop-down menu to a profile that can be activated at any time.
Batch processing of framed 35-mm slides with the slide feeder
A scanner of Hasselblad is actually a device with which one accomplishes scans in a high quality. It is not a device for accomplishing mass scans automatically. And still, there are some optional accessiores available for the batch processing with the Flextight-scanners. With the feeders that can be acquired optionally, it is possible to scan up to 50 framed slides in the batch modus with the Flextight X5 . Therewith, it is also possible to scan large amounts of slides in the highest quality and in a comfortable way.
The main component of the feeder is a movable, vertically aligned magazine duct that takes up to 50 slides and that, driven by the scanner and/or the software, guides the slide to be scanned into the film adapter. Then, the film adapter catches the slide and pulls it into the scanner for the scanning. By looking at the finished scanner+feeder combination, one might image that the assembling of the slide feeder is complicated. But this is not the case, as the assembling is simple and, with a little practice, it is possible to accomplish it in less than 5 minutes. In the following, we will briefly describe the basic procedure of assembling the slide feeder.
First, the scanner has to be switched on but while the light box is closed so that afterwards the FlexColor software is switched on. In the menu Maintenance, one activates the dialogue box Feed and starts here the assembling process. Then the software guides the drum in the matching possition and switches off the scanner. From now on, the program guides the user step by step through the assembling process, so that at any time, one exactly knows what to do. Thus, one practically gets an online step-by-step instruction for assembling the slide feeder. Of course, it is also possible to read the instructions in the manual of the slide feeder, but the online-instructions are precise and easy to follow so that one can comfortably abstain from using the manual.
Basically, the assembling of the automatic slide feeder is proceeded as follows: with one hand, one has to keep the cover of the scanner duct while maintaining the lid of the light box open, while with the other hand, one sets the feeder into the scanner. Thereby, two register pins of the feeder catch the respective wholes in the scanner so that both components are aligned correctly and automatically and the plug connections between the scanner and the feeder are closed. After that, one switches the scanner on again, folds down the magazin duct, inserts the film holder which is delivered with the feeder and folds the magazin duct up again. Therewith, the assembling is completed.
For loading the magazin duct, one folds it down so that it is aligned to the scanner in an angle of 90°. Each of the slide slots are accessible now and can be loaded successively. Thereby, each slide has to be inserted individually - the insertion of several slides at once the way it is possible, for example, with the Nikon SF-210 Slide Feeder, is not possible here. During our tests, the complete loading of the magacin duct with 50 slides always took 2 minutes.
Once the magacine is fully loaded or if all slides to be scanned are inserted, one folds the duct upwards again. The slots for the slides are slightly diagonally structured so that during the folding up, the slides cannot fall off and are not aligned horizontally until the duct snaps in. Now, the film holder can take the slides from the slots and insert them successively into the scanner.

The film adapter is structured as follows: On a flexible metal plate, (the way it is also a component of the "normal" film holders) there is a rigid plate with a gap for the framed slide. At the left and the right of this gap, there are each two metal pins that are live and form a slit that captures the slides at its edges and holds them. The film adapter can capture any kind of frames: No matter if they nare thick or slim, made of plastic or carton or glass - during our test, there was no problem with any kind of frame.
By starting a scan, the adapter slides outside so that the slide is pushed into the orifices. Then, the film adapter slides with the slide into the interior of the scanner, whereupon a locking machanism closes in the feeder right behind the slide so that the slide cannot be returned to the duct. Once the scan is accomplished, this locking mechanism reopens and the film adapter slides the slide out again into the magazine. The locking mechanism closes again and the film adapter slides back into the interior of the scanner. The closed locking mechanism avoids that the slide is recollected - it remains in the magazine. For the next scanning, the magazine moves one position upwards so that the next slide is at the same height of the film adapter and the procedure can be restarted.
In our tests, the scanning of a fully loaded slide magazine with 5000dpi took approximately 1h 15 min. Further down in the chapter scan speed you will see that a scan of a 35-mm image with this resolution takes approximately one minute. This means that the transport of 50 slides in the batch modus takes approximately 25 minutes, thus approximately half a minute per slide. While the Flextight X5 can normally digitalize 35-mm slides with a resolution up to 6900 dpi, by applying the slide feeder, the maximal adjustable resolution is reduced to 5000 dpi. Thereby, the scanner gets a higher depth of field in order to compensate the frame thickness of the special film adapter.
The scan in the batch modus can be either accomplished as a 3F-Scan or as a normal scan for finished TIF-files. But a smooth workflow only results in the 3F-modus: Here, it can be simply adjusted whether it is continuously scanned until the whole magazine is processed, and/or all slides inside it are scanned, or one simply determines the start- and the end-position (number of the respective slot). In the 3F-modus, empty slots are recognized as such and not included into the scan. If two empty slots follow after each other, the batch scan processing is stopped. By this way, it is possible to subdivide the slides in the magazine duct in several piles by leaving two lots empty betrween each. For the next part, it is possible to set some new adjustments. In the 3F-modus, the simultaneous output of finished TIF-files can be activated.
If one only wants to generate some TIF-files in the batch modus, one has to add each slot manually into the list of orders in the batch scan window. But it is possible to save the batch scan presettings and activate them so that for example, an adjustment for the scanning of all 50 slides has to be accomplished only once instead of having to add any time 50 scans to the list. Contrary to the 3F-modus, in case one or several slot(s) are empty, these are included in the scan and some white and/or black images (depending on if positive or negative scans are adjusted) are generated.
The starting numbers for the automatic file numeration cannot be freely assigned, either in the 3F- nor in the batch scan-modus - the numeration always starts with 1 and/or the smallest assignable number of the current directory. But in the 3F-modus, the numeration is slightly more clever than in the batch modus: While in the normal batch modus, the first scan is not nominated with a number and the consecutive numbering does not start until the second scan starting with the number 1, in the 3F-modus, to the contrary, the number one is immediately assigned to the first scan.
Automatic scanning with the batch feeder
The optional available batch feeder can capture up to ten film adapters so that the film material that is inserted there can be scanned automatically in the batch modus. This enables an efficient workflow by scanning some larger image quantities.
The batch feeder has two departments in which it is possible to insert a film adapter in each. Thereby, it is irrelevant if it is about ten equal or ten different film adapters for different formats.
The installation of the batch feeder is very easy and similar to the installation of the slide adapter: The scanner is switched on while the light box is closed and afterwards one starts the software of FlexColor. Now, one activates in the menu Maintenance the dialogue box Feed and starts the assembling process there. The software drives then the drum into the right position ans switched off the scanner.
Also in this case, from now, the FlexColor-software guides one step by step through the procedure: While with one hand, one holds the cover of the scanner duct open, one sets the feeder with the other hand. The register pins at the back side capture the respective wholes of the scanner so that the feeder is rightly positioned and the cable connection between both components is closed. Now, one switches on again the scanner with which the assembling process is completed. As it is the case of the assembling of the automatic slide feeder, for the assembling of the batch feeder, it also applies that with a little practice, it is completed in less than 5 minutes.
The mechanism of the feeder works according to the following scheme: The back end stop in the divisions for the film adapter consists on each one elevation at the left and at the right side. By this way, the drum can catch the film adapter between these two elevations, which is then magnetically locked in the holder at the drum. In order that the holder can push the film adapter into the scanner, the movable unit with the divisions for the film adapter drives downwards, so that the film holder is set above the elevations and therewith has a free way into the interior of the scanner. Thus, the drum absorps the film adapter so that the pattern can be scanned. After the scan, the film adapter is released, the film adapter unit drives again a step upwards and the drum turns again inwards. The film adapter is now held in position by the elevations, so that during the run back of the drum it is not recollected. After this, the film adapter unit advances one position for scanning the next pattern.
For loading the feeder, one simply has to push each of the the film adapters into the divisions until the stop. Now, one can simply accomplish a prescan and determine all wished adjustments. Once the automatic mask recognition is activated, the scanner automatically recognizes the inserted film adapters so that it is possible to scan different formats in the batch modus without any problem. There are basically two possibilities for accomplishing the batch scanning: It is possible to accomplish them as 3F-scans or as normal scans with a TIF- or JPG-output.
The big adavantage of working in the 3F-modus is that the raw scans can be individually optimated afterwards without any loss of quality. As it is also the case with the slide feeder, it is possible to determine the starting and the end position (number of the film adapter divisions), thus it is, for example, possible to adjust that only the divisions from 3 to 7 should be scanned.
If one issues straight some TIFs and/or JPGs in the batch modus, one has to find an adjustment that can be generally applied in the best possible way to all patterns to be scanned. Thereby, each of the divisions have to be added manually to the order list. The better way to generate TIF files would be to scan in the 3F-modus and activate the option Save final TIF. Then, one can switch on the automatic correction of the tonal value so that automatically, some basically corrected TIFs are available.
Also the automatic image numbering works better in the 3F-modus: Here, the images which are saved in a directory are automatically numbered from 1 to n. In the case of a normal batch scan, the first image gets the adjusted file name without any image number and the numbering starts from the second image with the number one.
During the batch processing, one could theorically remove a film adapter that has been already scanned from the upper divisions of the feeder and reload it with new film material. By this way, one could, if one does not have enough film adapters available, put the film adapter again further down so that there will be no interruption of the batch scan processing. But the manufacturer clearly suggests not to move the film adapters during the batch processing. Anyway, an endless processing would not be achived by such an action, as the batch processing ends in any case when the last division of the feeder is processed. Thus, it is not possible to process more than ten film adapters in the batch processing.
Moreover, we would like to emphasize again that the batch processing is either suitable for the scanning of ten equal patterns, for example ten medium formats sized 6x7 cm, as also for the batch processing of different patterns. The software offers an automatic film adapter recognition so that it can be changed between medium formats, 35-mm formats, large formats and other formats as wished.
The image quality of the Hasselblad Flextight X5
Now it is getting interesting, as we now come to the big question of this test report: Does the Flextight X5 provide such a good image quality as the technical data and also the relatively high purchase price do make expect?
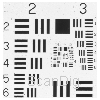
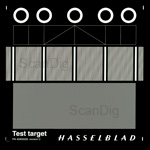
Also in the case of this high-end device, we start with a resolution test with the help of an USAF-test target. During the scan of the USAF-test chart in the 35-mm image mask, the horizontal lines of the element 7.2 and the vertical lines of the element 7.1 can be hardly distinguished. According to our resolution table, this results in an average resolution of approximately 6900ppi, whith which the Flextight X5 achieves about 86% of the optical resolution announced by the manufacturer, that is 8000ppi - by far, we have never measured such a high value in any other scanner! therewith, the Hasselblad Flextight X5 is set on the top position of all known film scanners up to now.
But this high resolution is only available in the case of 35-mm image scans in the portrait-aligned mask of the 35-mm image film adapter. Basically, for the scans done with the Flextight X5, the following applies: The narrower the image format to be scanned, the higher the achievable resolution. This is related to the structure of the optical system of the scanner that can be explained in a simplified way as follows: As sensor, a CCD-sensor with a certain number of photo diodes is applied. Over some optical lenses, the image is scanned line by line by this sensor. As there is always the same number of photo diodes available for one line, in the case of a narrow pattern (24mm width of a 35-mmimage), a higher resolution can be achieved than in the case of a wider film pattern (10cm in case of a 4x5" large format). We have detected the maximum achievable resolutions for the different formats. You can obtain these values from the following table:
| 35-mm Portrait |
35-mm Landscape |
Medium format |
Large format 4x5" |
| 6900 ppi |
6150 ppi |
3200 ppi |
2040 ppi |
According to the manufacturer, the 35-mm patters with landscape orientation can be digitalised with a resolution of 6300ppi, medium format patters on roll films with 120/220 and 3200ppi und 4x5" large sheet film patterns with 2040ppi. As you may see, the resolution values measured by us correspond quite exactly to the published ones. Therewith, the following maximum file sizes result in case of scans with a colour depth of 48bit: 580MB (35-mm), 370MB (6x7) and 460MB (4x5").
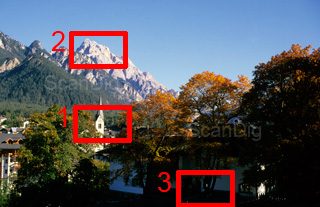
In order to show you the excellent image quality of the Flextight X5, we have compared the results with those of a high quality scanner from the (semi) professional field, the Nikon Super Coolscan 9000 ED. First, we will compare the resolution: Herein, the Nikon scanner already achieves a very good value of approximately 3900 ppi. Thus, in the case of 35-mm image scans, the Flextight X5 almost achieves double of the resolution. We will show the effect this huge difference has in practice by means of the adjacent picture that was scanne dwith both scanners, each in the respective highest resoluition, thus 8000 dpi in the case of the Hasselblad Flextight X5 and 4000 dpi in the case of the Nikon Super Coolscan 9000.


By clicking on the first (left) thumbnail, an image opens up that contains the outcut 1 marked above. Any two seconds it changes between the scan done with the Nikon Super Coolscan 9000 ED and the one done with the Hasselblad Flextight X5. We have projected the scan done with Nikon afterwards to obtain 8000ppi, so that it was possible to compare the results straight away with each other. The better sharpening provided by the Flextight X5 is clearly visible. By this way, in case of the scan done by Nikon, some digits of the dial of the clock are blurred, but in the case of the scan dome with the Flextight X5, the digits are clearly readable.
By clicking on the second (right) thumbnail, a 100% crop of the same outcut of both scans is shown, thus without any posterior adaptation of the resolution; thus, the outcut with the Nikon-scanner has a resolution of 4000 dpi, the outcut of the Hasselblad-device a resolution of 8000 dpi. As it is clearly visible here, the 35-mm patterns scanned with the Flextight X5 can be enlarged considerably more than the ones done with the Super Coolscan 9000.
In case of medium format scans, it is again Nikon which is a step ahead: Here, the 4000dpi of the Nikon scanner which are independent from the image format stand against the 3200ppi of the Flextight. But to be fair, it has to be mentioned that one will only seldom have the need to scan medium formats in a resolution higher than 3200ppi - for most of the appliances, 370MB are sufficient. Only for the very large printings in high quality more resolution is needed, but in this case the 4000ppi of the Nikon 9000 would not be sufficient and one had to get a drum scan from the pattern done (by a service provider) - as such high resolutions are only achievable with a drum scanner.


The maxumum density of the Flextight X5 of if about Dmax = 4,9. Therewith, the scanner can capture definition even in very dense shadow areas as no other scanner tested by us ever could. The related huge range of density enables the capture of the brightest lights and the darkest shadows. Click on the adjacent thumbnails in order to to see the image outcuts 3 and 3 of the image above in original size, whereby the representation changes again any two seconds between the scan made with Flextight X5 and the one mede wi+th the Super Coolscan 9000 ED. As one can see, in relation to the range of density, the Flextight outstands the already very strong device Nikon Super Coolscan 9000 ED again significantly. The shadows show more definition and also in the lights, the Flextight-scans seem more homogeneous.
As for the scanning of large format sheet films, except drum scanners only flat bed scanners can compete with the Flextight X5, we will compare the results in case of a 4x5"-large format scan with the one of a high quality flad bed scanner Epson Expression 10000XL. Herein, we only limit to the effective achievable resolution: The Epson offers an optical resolution of 2400ppi, thus therewith, it has a higher value than the 2040i of maximal resolution value that is possible with the Hasselblad in case of such large formats. But the result of the effectively achievable resolution is visible in our image example: By clicking on the right thumbnail, an image window opens with the marked outcut whereby the image changes any two seconds between the scan done with the Epson Perfection 10000 XL and the one made with the Flextight X5. Thereby, we have projected the 2400ppi scan of the Epson to 2040ppi, so that also here, a straight comparison was possible. What is clearly recognizable is that the scan made with Flextight is significantly sharper than the scan made with the Epson-device. But not only concerning the image sharpness but also concerning the range of density, the Hasselblad Flextight X5 outstands the Epson flat bed scanner by far. Herein, the huge class difference between the two devices gets very clear.
The always accurate focusing accompanies the structure of a virtual drum scanner and leads to a perfect sharpening. Also the curled or rolled material is put into a perfect position of flatness by the blending, so that the image area to be scanned is always 100%ly positioned at the focus. The partial unsharpness as e.g. towards the edges which represents a frequent problem in most of the other scanners does not exist in the case of the Flextight X5. For the Flextight X5, the image noise is practically unknown, a thing to which also the active cooling system of the sensor contributes, as a common cause for the image noise is the heat development in the image sensor that can be considerably reduced by the cooling.

The only shortcoming of the Hasselblad Flextight X5 related to the image quality is the missing hardware-based dust and scratch corrector. The device is provided with a light capacitor that generates a soft light with which small dust particles which are only visible at a 50% to 100%-view are removed. Click on the image with the thumbnail in order to see the comparison between the scan with a 35-mm image scanner Nikon Super Coolscan 5000 ED without ICE and the one made with the Hasselblad Flextight X5 - the illustration changes any 2 seconds between both scans. Thereby, we have been trying to keep the slide as clean and dust-free as possible - thus, there are no bigger dust particles on the scan. It is clearly recognizable that the capacitor of the Flextight X5 provides a good performance: On the scan done with the Coolscan 5000 without ICE there are many dust particles visible, while the scan made with the Flextight X5 is very clean.
But bigger particles cannot be outshined, so that a manual retouching of the scans is unavoidable, but that due to the light capacitor they result to be far less laborious as the scans done by devices without such a capacitor. Thus, by scanning with the Flextight X5, a possibly dustless pattern is to be considered. In this concern, the devices with the ICE technology as the Nikon Super Coolscan 5000 or the Nikon Super Coolscan 9000 ED fully play their hardware-based dust and scatch corrector, as normally, the posterior retouching can be omitted. Thus, by scanning with the Hasselblad Flextight X5, the cleaning of the film material previously to the scanning plays a very important role. On our Accessoires-page you will find some detailed information regarding the cleaning of the film material.

How well the ICE dust and scratch correction works and that the capacitor of the Flextight X5 cannot compensate the lack of this technique is shown by the 100%-outcut from the test scan of a dirty slide. By clicking on the thumbnail in order to open an image window with an enlarged representation, that changes any two seconds between the scan made with the Nikon Super Coolscan 9000 ED and the Hasselblad Flextight X5.
It is clearly recognizable that the scan made with the Super Coolscan is absolutely clean while the one made with the Flextight leaves the dirt uncompromisingly recognizable. As it is practically not possible to get a pattern of film material absolutely clean, the ICE function of the Nikon always provides valuable help. This is why the dust spots on the scans of the Hasselblad always have to be retouched. Of course, in this example, the pattern is extremely dirty, but by this way the example emphasizes again how important the film cleaning is in the case of the Hasselblad Flextight X5.
The scanning speed of the Flextight X5
Hasselblad announces the speed of the Flextight X5 with 300 MB/minute. In order to detect how fast the scanner is in practice, we have connected it to a Windows 7 64-Bit computer with an Intel Core i7 processor and 8GB RAM. With this at the test time high quality hardware it was possible to make use of the full speed of the scanner in order not to stop it by a slow process capacity.
| Procedure |
Duration |
| Scan of transparent film material of 35-images with a resolution of 2000ppi |
0:25 min |
| Scan of transparent film material of 35-images with a resolution of 5000ppi |
1:00 min |
| Scan of transparent film material of 35-images with a resolution of 8000ppi |
1:50 min |
| Scan of transparent film material of a medium format 6x6 with a resolution of 1600ppi |
0:29 min |
| Scan of transparent film material of a medium format 6x6 with a resolution of 3200ppi |
1:07 min |
| Scan of transparent film material of a large format 4x5" with a resolution of 1020ppi |
1:16 min |
| Scan of transparent film material of a large format 4x5" with a resolution of 2040ppi |
1:16 min |
| Scan of non-transparent documents 10x15cm with a resolution of 300ppi |
0:35 min |
| Scan of non-transparent documents 10x15cm with a resolution of 960ppi |
2:58 min |
| Scan of non-transparent documents DIN A4 (210x297 mm) with a resolution of 300ppi |
1:13 min |
| Scan of non-transparent documents DIN A4 (210x297 mm) with a resolution of 960ppi |
7:56 min |
As you can see, the Hasselblad Flextight X5 is an extremely fast scanner. A 35-mm image is, with a resolution of 5000ppi, ready in only one minute, a slide sized Dia with 3200ppi takes only minimally longer, and a slide sized 4x5" with 2040ppi is also digitalised in an unsignificantly longer time - this is a class of its own! The scanning times for negatives practically do not differ from the scanning times for positives.
The identical scanning time for large format scans sized 4x5" with 1020ppi and 2040ppi results from the fact that the scanner does not have a hardware-based resolution of 1020ppi but scans the original material with 2040ppi and projects it later down to 1020ppi. What is very interesting is that in the performance data, Hasselblad does not include the times mentioned in the table above but only 300 MB per minute are indicated.
By processing with a slowlier computer, it is possible that the Flextight X5 is stopped in its capacity. This results than in the fact that the device may already have completely scanned the pattern (the film adapter then goes back to its original position), but the software is still working. In our tests with a slowlier computer (Single Core 3,2 GHz, 2GB RAM), in case of some larger formats, the processing of the software after the completed scanning procedure partly took double as much time as the scanning procedure itself - thus the scanning time almost doubled.
Thus, the scanning times of the Hasselblad Flextight X5 depend significantly on the computers performance data at which the scanner is connected. The maximum speed value of the scanner announced by the producer of 300 MB/minute can be only achieved by connecting the scanner to an extremely high performance computer.
Resume, conclusion
The price level of the Hasselblad Flextight X5 is far beyond the ones of the consumer or semiprofessional devices. As it is also the case of the Hasselblad-cameras, this scanner is designed for the professional use. As shown in our test, the relatively high purchase price is also reflected in the image quality and the performance: The buyer gets an absolute professional device for his money which also meets the highest requirements.
The image quality that is achievable with the Flextight X5 is better than the one of any scanner available at a lower price. Even a model like the Nikon Super Coolscan 9000 ED is beaten in this case. The resolution, the range of density and the speed achieve the highest levels. Only the missing dust and scratch corrector based on the hardware is a small point of criticism, as the integrated light condensor can only partly compensate the lack of it. Thus, the Hasselblad Flextight X5 is recommended to anyone who wants (or has to) generate some scans of a real superior quality level and are ready to pay the respective price for such a quality level.
As we already mentioned on our site about its little brother Hasselblad Flextight X1, an equivalent quality to the one of the Flextight X5 is available with the cheaper Flextight X1, but at the cost of the scan speed.
Back to the film scanner tests index
|
)
)
)
)
)
)
)
)
)
)
)
)
)
)
)
)
)
)
)
)
)
)
)
)
)