Nikon film scanner Super CoolScan 5000 ED
At the End of a hot summer 2003 the Nikon boat was rocked. Suddenly customers were able to purchase Nikon scanners about 50% cheaper in the USA than in Europe. In Germany too some dealers offered consumers Nikon's filscanners for lower prices than a normal specialist dealer could buy them for directly from Nikon. There was much speculation over Nikon's launch of a new product range. Rumors of every discription was spread.
But why should Nikon launch a new range? After all Nikon was indisputably leading the market in all classes concerning quality and possibilities with the LS-40, Super Coolscan 4000 and the Super Coolscan 9000. However Nikon was front-runner concerning the prices as well.
In October 2003 Nikon surprised the filmscanner community with the successor of the well proven Super Coolscan 4000 ED. By means of specifications it was soon clear that some trivia has improved. The biggest surprise though was a radical price reduction of about 30% compared to its predecessor. Does this mean higher performance for lower prices? Not really. My following review will show that Nikon strongly saved costs, which is not obvious at first glance though.
Configuration and accessories
I have ordered my Coolscan V and Super Coolscan 5000 the same day and I also received them at the same day. When unpacking the scanners it became already clear that Nikon has rationalised: two identical boxes with different labelling, same wrapping and packaging inside, the same film adaptor, same connection cable, same software and even the same user guide - only the scanners are different, but not formally.
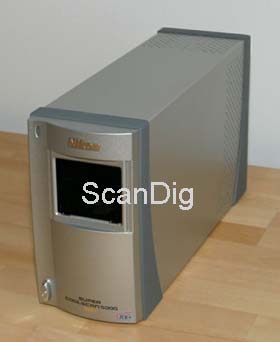
The dimensions and the form are the same as its predecessor's. The altered stands immediately catch one's eye though. While the Coolscan 4000 was standing on four rubber knobs, the new Coolscan 5000 is bordered by two rubber-like plastic attachments, so that it has a skid-proof stand on the desktop both horizontally and vertically. This attachment stood the test of time during the last years.
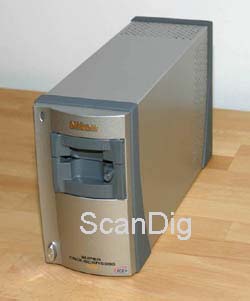
The most striking modification compared to the predecessor attracted my attention on the front side of the scanner: the LS-4000 had a sliding cover, which easily covered the interior of the scanner when no film adaptor was attached. Therefore, when the cover was closed, the scanner's interior was securely protected against dust. Nikon removed this creditable piece completely. So a film adaptor has to be attached to the Coolscan 5000 at all times, even when not in use. Actually this is not a big restriction, as long as the film scanner is placed on the desktop. But when you have to send your scanner to service or want to lend it to your friend, you always have to attach a film adaptor in order that the interior is protected. I think in this case Nikon economised too much and scored a classic own goal: suddenly the expensive Nikon scanners are the only devices in the market which do not have a direct dust protection of the interior. In this regard many a cheap discounter licks the expensive competitor Nikon.
There is also modification on the back side of the scanner: the Firewire port IEEE-1394 was sacrificed for the benefit of a USB 2.0 port. Some Mac useres won't like this change. At Windows PCs (especially at notebooks) USB 2.0 is more widespread though, and has the same transmission capacity as Firewire. The back side of the Super Coolscan 5000 also differs from his little brother: there is an opening for the 35mm roll film adaptor, which can be used to digitise whole 35mm film rolls at once.
Part of the standard configuration are two film adaptors. With the strip film adaptor SA-21 you can scan film strips (positive or negative) with 2-6 photos. With the slide mount adaptor MA-21 you can scan single mounted slides. With the old Nikon 4000 the strip film holder FH-3 was yet included in delivery. Nikon removed this film holder as well - you can only purchase it as optional accessory. I think it's a pitty, because with the serial strip film adaptor SA-21 it is impossible to scan a single negative which often remains when developing a film. Strongly curled film strips as well can not be processed with the SA-21. Here the FH-3 strip film holder is essential. Therefore every buyer of the Nikon 5000 has to purchase the FH-3 for extra charge. I think this sales policy is regrettable, because in my opinion this is not optional but necessary accessory.
For this reason the Super Coolscan 5000 in my opinion does not deserve the title "complete package" in the 35mm range any longer. Since the strip film holder FH-3 is virtually indispensable for people who want to scan not mounted 35mm film material, they are all but obliged to spend extra money for optional accessory when buying a Coolscan 5000. This is a large step backwards compared to the predecessor.
The strip film holder FH-3 is not included in shipment anymore, although it is an indispensible accessory for scanning film strips and single frames. Thus it must be ordered separately.
There is another step backward concerning the scan software. The famous SilverFast is not included in the purchase price of the Nikon Super Coolscan 5000 any longer. There is only the Nikon own scan software NikonScan. Everybody who knows SilverFast appreciates its advantages and would accept an accordant extra charge. For many users the Nikon own scan software is entirely sufficient though. Furthermore NikonView and Adobe® Photoshop® Elements is included in the software bundle. NikonScan has got the blatant drawback that the scanner can not be IT-8 calibrated. For doing so you have to buy SilferFast separately.
So the big price cut Nikon made with the Super Coolscan 5000 compared to the Super Coolscan 4000 isn't that big at all when considering the changes in the scanner's standard equipment. While the lack of a front cover is in my opinion a big drawback, I can live with the missing SilverFast software and strip film holder FH-3, because these parts still can be purchased separately. But anyway the most expensive extra charge appears not until you need additional film adaptors like the slide feeder or the roll film adaptor.
Specifications of the film scanner Nikon LS-5000 ED
There are two main reasons making the Nikon Super Coolscan 5000 ED unique and unbeatable: first is the exceptionally good performance not only on paper - you can see it in the scans as well. Second is the scanner's expandability with several optional film adaptors.
While the predecessor LS-4000 converts the analogue signals from the CCD-sensor with 14 bits per colour channel into digital signals the new Super Coolscan 5000 contains a 16 bits A/D converter. This means that there is 16 bits per colour channel (red, green, blue) available for the scanner, so it can differentiate 65.536 colours (explanation see our page colour depth). Thus a black&white picture can contain up to 65.536 different shades of gray with an optimal scan. In a colour picture 16 bits per colour channel mean a total of 248 different colours, which come up to the almost unimaginable number of 256 trillion colours. Hence Nikon specifies the scanner's density range with 4,8. Of course these are theoretic values which are unattainable in practice.
The scans are output with either 8 or 16 Bits per colour channel. The high resolution of 4000dpi generates about 20 million pixel out of a 35mm slide! If you save such a file in the uncompressed TIF format, you will get a file of a size of about 55 megabytes. This filesize yet doubles if you save with 16 Bits per colour channel. There isn't more to fetch out of a 35mm slide or negative.
What else distinguishes a Nikon scanner? Nikon uses high-class lenses. What counts for SLR cameras can also be transferred to film scanners to a certain amount: it's not the camera that takes the picture, it's the lens. Every professional photographer would agree to this statement. The light source is a four part LED which does a great job with colour images, but has some shortcomings with black&white images.
The Super Coolscan 5000 ED comes up with a set of image enhancement and correction techniques. We already know the automatic dust and scratches removal ICE, the Grain Equalization and Management GEM as well as the colour recreation tool ROC from the predecessor. DDE and a Scan Image Enhancer have been newly added. DDE is part of the new Advanced ICE4 and performs exposure compensation. The Scan Image Enhancer optimises colours and contrast of an image. Considering all these keywords for image correction you can easily lose sight of the most important process: with the Coolscan 5000 ED you can make multiple scans (2-, 4-, 8-, 16-fold), i.e. the image is scanned repeatedly and the individual results are automatically interpolated. With multiple scans you can decrease image noise and glitches while scanning.
Who operates his Nikon 5000 with the SilverFast Studio version 6.5 even gets to know the promise of multi exposure. With this tool the image is not only scanned repeatedly but also with different exposure settings. Out of these different images the scan software generates one optimum image with an expanded dynamic range. One has to commend a feature like this. However this special feature is charged extra as well.
The film scanner is connected to the computer via the USB 2.0 port (USB 1.1 is also possible). This ensures a fast data transfer. And this you'll need, because the amount of data generated by the scanner is extensive (up to 110 Megabytes from a 35mm slide). The fast data transfer is not only needed because of the extensive amount of data but also because the scanner works very quickly, i.e. the data is generated in a very short time. I think it's a pitty that Nikon abandoned the Firewire port - all my computers have this port which worked well with former scanner types.
The Nikon Super Coolscan 5000 ED possesses a powerful autofocus tool. With tidyly mounted slides and plain film strips the autofocus does a very good job. It's getting more delicate when scanning curled film strips, curved slides or - to some extent - glass mounted slides, because the depth of field of the Coolscan 5000 is less than 1mm. With this kind of originals the possibility of manual focusing helps. In my opinion a very reasonable feature - but scanning then takes a lot of time.
Let's deal with the second decisive reason for buying a Nikon Coolscan 5000 ED - the expandability. If you buy a Coolscan 5000 you will get good value for your money indeed, but you'll have limited possibilities: single slides can be processed with the serial slide mount adaptor MA-21. Film strips with 2-6 frames can be scanned with the serial strip film adaptor SA-21. So much for the standard equipment, now we'll gaze all the expensive extras.
There is the optional strip film holder FH-3 for strongly curled or curved film strips (positive or negative) as well as for single, loose frames. Those who want to scan large batches of mounted slides will be pleased with the shockingly expensive slide feeder SF-210. The roll film adaptor SA-30 is made for people who want to scan whole rolls of film. For APS-photographers there is the APS adaptor IA-20. And there is even a special adaptor for users who want to digitise medical or other preparates - the FH-G1. Every one of those additional film adaptors is shockingly and sometimes even deterringly expensive. But the possibility to process virtually anything in the field of 35mm film with the Super Coolscan 5000 ED makes this device one-of-a-kind, precious, expensive and in my opinion unbeatable at present.
Installation and startup of the Nikon LS-5000 ED
As I've unpacked my Nikon Super Coolscan 5000 ED first of all I was surprised at the amount of manuals accompanying the scanner. But quickly most of it turned out to be good for learning foreign languages only. The whole user guide is available in six languages. You get a manual with 70 pages per language which explain installation and operation of the scanner and the software detailed and understandable. The separate quick start guide was much more useful to me though. After all you want to kick off immediately, when you've unpacked your first or your new film scanner.
With the aid of the user guide or the quick start guide the installation is no problem even for beginners. But it was a problem for me, that I was able to install the new scan software NikonScan 4 not until the old version 3.x was completely uninstalled. Why doesn't the software perform an automatic update or doesn't automatically uninstall the old components? Not every user knows how to uninstall software via the control panel and what to do if he is asked repeatedly if components which may still be used by other programs should really be deleted.
Those who buy a Nikon film scanner for the first time naturally don't have this problem and the installation is easygoing. I found it very pleasant that the software installed the drivers for all current Nikon scanners at once. The normal user actually has got exactly one film scanner on his desktop, but there is people like me too, who got five different Nikon film scanners standing side by side.
At the end of the software installation process the computer reboots automatically. I would have preferred a callback. After this the scanner is ready for use, can be connected to the USB port of the computer and is automatically detected when turned on. So let the scanning begin!
But my first two scans with single mounted slides failed. Out of unknown reasons the scanning process got stuck after about 70% and the software as well as the scanner needed to be restartet. This effect appears every now and then - I couldn't find the reason yet.
Compatibility with former film adaptors
Someone who is buying a new SLR camera takes it for granted that he can still use his old lenses. It should also be a matter of course that old film adaptors can still be used when buying a new film scanner. As owner of the complete line of accessories by Nikon first of all I wanted to know if I will be able to use these expensive accessories any longer, or if investing in new pricy equipment is necessary. After all a new slide feeder SF-210 came out at the same time like the Super Coolscan 5000 ED. First time customers of a film scanner naturally don't have got this problem, but accessories are also available second hand - hence this chapter.
The first test with the slide feeder SF-200(S) succeeded, i.e. the feeder was detected by the scanner immediately and I was able to work with it without problems. So who still owns an old slide feeder or can buy one for good terms does not have to be concerned. I've tested two old SF-200(S) with the Super Coolscan 5000 ED and both worked properly when batch scanning. By the way I've also tested the new feeder SF-210 with the old LS-4000 - there was no problem as well.
My old roll film adaptor SA-30(S) could also be attached to the new Super Coolscan 5000 ED without difficulty and there was no problems when scanning whole film rolls. Using the old APS film adaptor IA-20(S) with the new Super Coolscan 5000 ED worked well too. Even an APS film adaptor >from the old series (bright finishing) made no problems.
Short Conclusion: I am happy and glad that I can make further use of my old film adaptors with the new Super Coolscan 5000 ED.
Scanning single mounted slides with the Nikon LS-5000
Included in delivery of a Nikon LS-5000 is the slide mount adaptor MA-21. This is the successor to the MA-20(S). I can hardly find any difference between these two models. The new adaptor got a little darker in colour - an outstanding trend with Nikon: the once light grey of the adaptors is getting always darker. In about ten years I dare say they'll be all black...
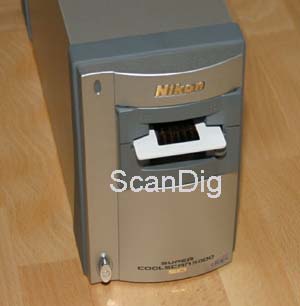
The new slide mount adaptor MA-21 has got an integrated cover protecting the scanner's interior against dust. This function is very important with the new Nikon LS-5000 because this scanner hasn't got a front cover anymore, which could be used to simply close the scanner when not in use. So the MA-21 not only acts as a film adaptor but as well as a cover for the front insertion.
You can insert a single mounted slide into the slide mount adaptor MA-21. Nikon specifies a slide thickness between 1mm (0,04in.) and 3,2mm (0,13in.). In my opinion there is nothing to be said against inserting a super thin slide mount with the thickness of only 0,5mm. There is no problem with thicker glass mounts neither, but attention while inserting the slide is advisable. If you push the button on the right hand side of the film adaptor the inserted slide is pushed out mechanically, so that it can be easily removed.
The slide mount adaptor MA-21 and his predecessor respectivley proved themselves during the years. Using those you can digitise single slides very quickly: simply insert the slide, make a prescan, adjust the settings and scan - fast and simple. Of course you have to scan every slide individually. Thus who want to digitise great quantities of slides have to sit next to the scanner/computer permanently when using the standard MA-21, and do the disc jockey.
The slide scanner Nikon Super Coolscan 5000 can operate either in horizontal or vertical position. For scanning single mounted slides with the MA-21 the upright position is advisable, because the slide is inserted horizontally into the adaptor. By doing so, you can avoid shifting of the film in the mount - a big advantage when processing old wobbly mounts that don't fix the transparency firmly anymore.
Note: Just like most film scanners the Nikon LS-5000 ED only knows landscape format. Thus portrait format slides have to be inserted at right angle into the slide mount adaptor and rotated afterwards with the scan software or any image processing software.
Scanning film strips with the Nikon Super Coolscan 5000 ED
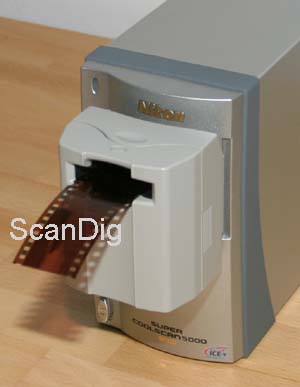
While the serial slide mount adaptor MA-21 is inserted into the scanner virtually just as a holder to carry slides, the also serial strip film holder SA-21 is inserted deeper and connected to the scanner by an interface with 35 pins. The adaptor is provided with data and power via this interface. After all the strip film holder not only has to carry the film material but also transport and correctly align it.
With the SA-21 it is possible to scan 35mm film strips with up to six frames automatically. To insert the strip film holder the scanner needn't be turned off. You gently insert the film strip (positive or negative) into the strip film holder. The scanner then automatically retracts the film to the right position. The film is transported by rubber rolls. In the beginning I was sceptical of this design - but in the meantime I've inserted hundrets of film strips into the scanner with the strip film holder, and there never was a problem. So this design works flawlessly. Of course it is very important that no dirt gets on the rubber rolls. You can imagine how a tiny dust paricle can wreak havoc on a rubber roll over which moves a whole film strip. So you should clean the rolls from time to time!
The function of automatically finding the beginning of the film and the division of the film strip into single frames respectively don't work flawlessly. On a negative film strip with night shots the software can't distinguish the bridge between the frames and dark areas of the image. That of course applies for positive film strips too. In such cases, after the index scan which tried to split up the single frames of a film strip automatically, it's hand time: you can set up the image position with the Nikon software using the menu item "Scanner Extras". After several trials whereas the index image is reloadaed consistently, you can find the right division of the images. The possibility of setting the image position manually is very useful and indispensible, but it costs a lot of time. That's the reason why I do not scan film strips with the Nikon Coolscan V or Super Coolscan 5000 anymore, but only with the big Nikon Super Coolscan 8000, where I can put the film strips into special film holders and fix them.
With the strip film adaptor SA-21 you'll know the true promise of batch scans the first time. Using the scan software you can choose which one of the up to six images you want to scan. And there is nothing to be said against scanning all six of them in one go. If you run NikonScan indirectly via an image editing software you'll get up to six windows with the image(s) for editing. If you run NikonScan as stand-alone application the software saves the single images in up to six consecutively numbered files (for example Image_01.jpg, Image_02.jpg, Image_03.jpg, ...) on your hard drive.
You can not automatically take over the settings you made for instance for the first image to the remaining images. Instead you have to save the settings and apply them to the other images. This works fast and comfortable though. Furthermore you can automatically apply these settings when scanning the next film strip, so that you don't have to make any settings again at all.
I would yet like to point at an unpleasing feature of using the strip film adaptor SA-21: the SA-21 can not be removed from the scanner when a film strip is inside the feeder. A sophisticated mechanism locks the adaptor in the scanner. If you forcibly pull on the adaptor you can damage the scanner. I don't like this construction at all.
The 35mm strip film holder SA-21 comes to its limits when scanning greatly curled or curved film strips. The automatic feeder possibly doesn't draw these strips in or incorrectly transports them. For scanning such film material you can only use the strip film holder FH-3, which was supplied in shipment with the predecessors, but has to be purchased separately now.
Scanning single frames
You can insert single mounted transparencies into the slide mount adaptor MA-21 and whole film strips into the strip film adaptor SA-21. 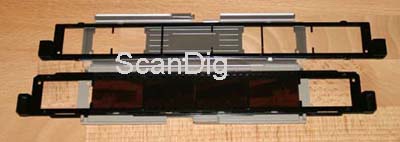 What to do if you have single loose negatives or positives as they often remain when developing the film in photographic labs? You can get the optional FH-3 strip film holder. This strip film holder was previously supplied with the Nikon 35mm film scanners LS-40ED / LS-4000ED but now it has to be purchased separately as optinal accessory for the new Coolscan 5 and Super Coolscan 5000. What to do if you have single loose negatives or positives as they often remain when developing the film in photographic labs? You can get the optional FH-3 strip film holder. This strip film holder was previously supplied with the Nikon 35mm film scanners LS-40ED / LS-4000ED but now it has to be purchased separately as optinal accessory for the new Coolscan 5 and Super Coolscan 5000.  Although the FH-3 is an indispensible accessory for Nikon film scanners.
You can place up to 6 single loose negatives or positives in the FH-3 and poition them exactly between the bridges. The inserted film meterial is fixed in the film holder with a spring lock so that it can not slip. The FH-3 is plugged into the slide mount adaptor MA-21. So an image in the FH-3 is handled like a single mounted frame and you can only scan one image at once. The image to be scanned is moved into a little window by an adjustable guide rail.
You could put single loose transparencies into slide mounts as well, if you want to spare the optional FH-3. The strip film holder FH-3 becomes really usefull not until you have greatly curled or curved negative or positive strips which the automatic strip film adaptor SA-21 processes incorrectly or doesn't draw in at all. Due to the spring lock such problematic film strips can be firmly fixed in the strip film holder and scanned frame by frame.
I'd recommend that everybody who buys a Nikon Coolscan V or Super Coolscan 5000 should order the strip film holder FH-3 as well, because in my eyes this is an indispensible accessory.
Scanning film rolls with the Nikon Super Coolscan 5000 ED
Those who want to scan whole 35mm film rolls need the roll film adaptor SA-30 as optional accessory for the Nikon Super Coolscan 5000. For dear money you'll get a film adaptor which is plugged into the front of the scanner just as any other adaptor. Additionally you'll get a film drum which is attached to the backside of the scanner. The drum is that big that one could believe that it can contain hundrets of images. Effectively the Nikon LS-5000 only handles film rolls with up to 40 images, which is the lenghth of a common 35mm film roll.
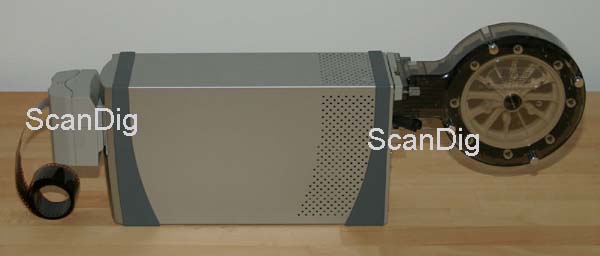
The 35mm roll film adaptor consists of two parts: the film roll feeder resembles the supplied strip film holder from Nikon. You simply plug it into the front side of the scanner and it's beeing detected automatically. Attaching the film drum to the backside of the film scanner is more difficult: first of all you have to attach a connecting piece with three screws to the backside of the Coolscan 5000. After that the film drum can be fixed to that connecting piece with its integrated assembling screws. The required space for the film scanner then increases considerably.
Scanning the film roll: you gently insert the film roll into the scanner via the roll film feeder on the front side. The film then gets drawn in automatically. It is very important that the film roll is correctly trimmed, because otherwise the scanner doesn't automatically find the beginning of the first image on the roll. After that everything goes on as already known: you can perform index scans, prescans and fine scans. It's amazing how fast an index scan is performed: in one minute the index images of a whole 36 frames film roll appear on your screen. This index scan is very important, because you can see if the film scanner drew the film correctly in and if the film roll is trimmed correctly.
By means of the index images you can make significant adjustments for every single frame by setting the image position. You can indeed define the scan area as usual with a frame, but if the scanner can't correctly distinguish the single frames on the film roll (for example with several night shots) you can find the correct images by setting the image position manually. This procedure is very time-consuming of course, because the settings have to be made for every single image. Often the software automatically detects the single frames though, so that there is no need to set up the image position at all.
| Scanning times |
with ICE |
| Index scanning 36 positives |
0:58 min |
| Scanning 36 positives with 4000 dpi |
43:20 min |
A few words to Nikon's sales policy: one could easily do without the film drum on the backside. It's nice indeed, if the film is neatly spooled onto a large drum, but scanning film rolls works well without a film drum on the back side of the scanner, too. The film adaptor which you insert into the scanner slot is practically identical to the serial SA-21. So those who scan film rolls only occasionally, could actually cope with the supplied accessory of a Nikon scanner. But those users as well have to buy the expensive roll film adaptor SA-30. Considering this I can only compliment Reflecta's sales policy, because virtually all of their scanners can not only handle film strips but film rolls as well.
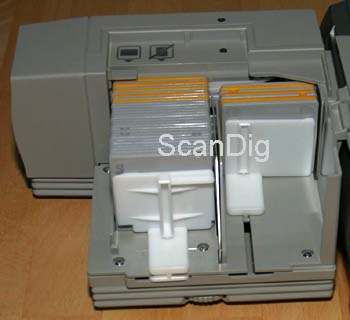
Batch scanning mounted slides with the slide feeder SF-210
How many people have thousands or even ten thousands of mounted 35mm slides in magazines, boxes and other containers, whitch they'd like to digitise? Often a whole family life is documented in a wardrobe full of slide magazines. With such stocks of films you won't get far with single scans or with film holders carrying 4-6 slides at once. For this kind of application there is Nikon's slide feeder SF-210 available as optional (and expensive) accessory for the Super Coolscan 5000 ED.
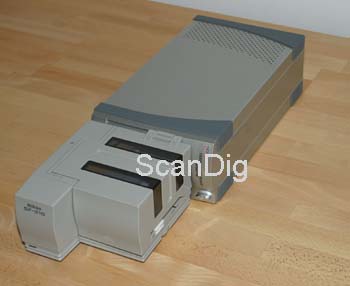
The slide feeder SF-210 is attached to the scanner in the same way as the serial film adaptors until it snaps in. The scanner needn't be turned off for doing that and the slide feeder is being detected automatically. For using the SF-210 the film scanner has to be in horizontal position though.
The slide feeder has got two drawers: into the outer one you put the slides which are to scan, while the finished slides get into the inner one. Two holders strained by springs fix the two batches of slides in their particular position. The two drawers are each 78mm long, so that 25-75 slides, depending on the thickness of the mounts, can be inserted. The whole device can be covered by a hatch, so that the slides and the mechanisms of the feeder are protected against dust and dirt. The slides all have to be inserted in the landscape format, i.e. all portrait format slides have to be rotated afterwards with Photoshop® for example.
The slides are automatically transported from the lower drawer into the scanner and after the scan is complete back out into the other drawer. A sophisticated mechanical turnout prevents the scanned slides getting back into the input magazine. Nikon specifies the possible mount thickness between 1,0 and 3,2 mm (0,4 - 1,3 in.) Inserting thinner slides theoretically is no problem, but there is often problems with the transport of those slides, so that you'd better scan them individually. Nikon supplies a small plate which can be attached to the transport slider when scanning thick slides. Thicker slides than 3,2 mm often get jammed when transported.
You can be sure that such a transport mechanism is afflicted with all perfidies you can imagine. It would be a sensation if all slide mounts >from all manufacturers, of different thicknesses and ages would be transported into and out of the scanner without a problem. Just like copiers the slide feeder too has known problems like jams, feeding twice, feeding nothing, etc.
But Nikon worked on this problem and came out with the SF-210, a highly improved successor to the SF-200. What has changed and what are the features of the new SF-210? In principle it's only a thumb wheel on the right hand side and a simple metal bar, that makes the difference to the old slide feeder SF-210. By turning the small wheel you can move the metal bar back and forth. Before scanning a batch of slides you set the metal bar to a position in which the transport slider can only move one single slide into the scanner. If two slides get stuck the metal bar prevents them being both drawn into the scanner simultanenously. This method works perfectly and I must praise this advancement! With the predecessor SF-200 batch scanning paperboard mounted slides was nearly impossible, because the transport slider drew in 1-4 slides at once. This shortcoming now doesn't exist any more, and scanning paperboard slides (for example Kodachrome) now works without any problems.
Naturally this adjustable metal bar only helps when scanning slide mounts of the same kind. If you put a potpourri of plastic, glass and paperboard mounts with thicknesses between 1 and 3,2 mm into the magazine you have to fully open the metal bar, and can not prevent two slides being drawn in at once. But you can move the metal bar during scan mode. So if 5 thin paperboard mounts follow 5 thick mounts you can accordingly adjust the metal bar before the scanner draws the paperboard mounts in.
There are the same kind of problems with the transportation of the slides just as with the predecessor: it happens that slides get stuck on their way into or out of the scanner, jam on the turnout or that the transport slider slips past the mounts. Thus the dream of automatically batch scanning 50 images at once becomes true only occasionally. Slides with double sided glass mounts get stuck almost categorically and can even damage the feeder. You'd better not digitse this kind of slides with the SF-210 at all.
The Nikon scan software brilliantly supports the SF-210: after prescanning the first image you can make all settings 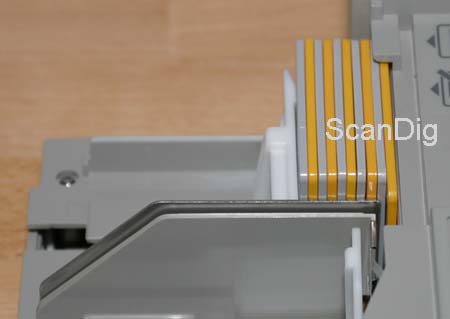 like scan area, resolution and colour settings. These settings then apply for all images being scanned in one pass. The maximum number of batch scans is 99 by the way, you can not set a higher number with the software. The images are automatically numbered serially, for example Image01.jpg, Image02.jpg, Image03.jpg... Of course you can't place 99 slides into the magazine at once. But nothing argues against placing further slides in the half-empty input magazine and remove the already scanned slides out of the half-full output magazine during scan mode, in order to allow non-stop scanning of up to 99 images.
Overall I can say that the slide feeder SF-210 is a worthwhile purchase for people who have to digitise thousands of slides. But you should be aware of the fact that not everything works fully automatically by itself and without problems, but that you have to check the scanning process from time to time and that - just like with a copier - you sometimes have to manually remove jams.
Scanning IX240 (APS) films with the Nikon Super Coolscan 5000
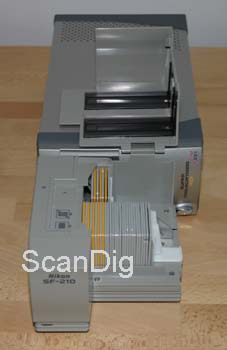
The APS film adaptor IA-20(S) is available as optional accessory for the LS-5000, which can be used for scanning whole APS films at once. The APS adaptor is installed in the scanner just like the strip film holder until it locks in place. The adaptor receives power and instructions >from the scanner via a 35-pin interface. After all ist's responsible for the automatic film transport.
You can place IX240 films with 15, 25 or 40 frames (negative or postive) in the adaptor. Attention: only developed films can be placed in the adaptor, otherwise a mechanism prevents closing the front cover. If you try 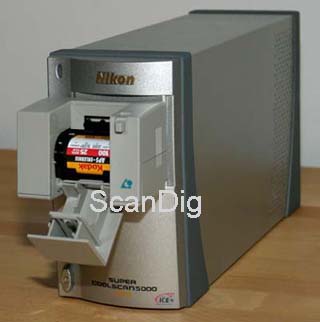 to close it anyway, you can damage the APS adaptor. Right after placing the film in the adaptor an automatic pulls the film out of the cartridge by itself. The cover of the APS adaptor is locked then and can not be opened any more. Even if the computer crashes the cover stays locked as long as the film wasn't rewind back into the cartridge. In this case only restarting the scan software and rewinding the film by clicking the appropriate button helps.
Scanning IX240 films is very easy to handle with the Nikon Super Coolscan 5000 ED. With an index scan you'll get thumbnails of all images on the film. Thereby you can see if all frames are exposed or if the film has been rewind before. When scanning a single image it can of course happen that the whole film has to be winded first, what can take a lot of time if you want to scan frame #3 and then frame #37 for example.
But it's really comfortable to scan a whole APS film at once: if you make the desired settings after prescanning for example image #1, then you can assign these settings to all other images and scanning the whole film proceeds fully automatically in batch mode. Via the scan software you can assign predetermined scan areas according to the APS formats Classic, HDTV and panorama to every single image. That's really comfortable!
| Auto focus + auto exposure for every image |
without ICE |
with ICE |
| Index scanning 25 frames |
1:06 min |
1:06 min |
| Scanning 25 frames with 4000 dpi |
22:40 min |
36:10 min |
It's not a pleasure to scan certain IX240 films which can not be winded easily. Here problems with drawing in the film frequently occur - the adaptor crashes and you can't use it anymore! Only resetting it by the Nikon servie helps, you can not do it by yourself. I had never problems with Kodak APS films though.
Scanning preparations and other graphical material
Now it's getting exotic but by no means unrealistic. The medical slide holder FH-G1 for medical preparates is available as optional accessory for the Nikon LS-5000 and the Nikon Coolscan 5. The field of application seems to be very small for this optional accessory at first sight, but preparates are produced in many sciences and not only in medical science. For example I have already scanned transparent cut preparates of different kind of rocks for a mineralogist. In principle a film scanner with a resolution of 4000 dpi can be used as a microscope with camera by means of the FH-G1.
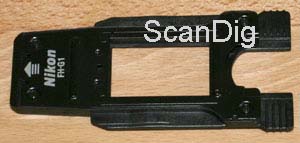
You can insert object slides with a width of up to 26 mm into the medical slide holder. Bearings on both left and right hand side fix the object slide so that it can't shake or fall off. In the slot area the object slide is secured by two assembling clips (springs) and at the bedstop another notch prevents movement of the slide. The medical slide holder FH-G1 can be inserted into the serial slide mount adaptor MA-21 just like a normal slide mount. There is no limitation in the length of the object slide, but the scan area is as big as the normal 35mm frames - about 23x35 mm.
The field of application for the FH-G1 designated by Nikon actually is digitising medical preparates. But you can scan virtually all sorts of things with it. Due to its guides on all four sides you can insert and fix virtually any original with a height of up to 2mm and a width of up to 26mm. In this way I've alread scanned 16mm films, glas pattern, samples of rocks between glass plates and pieces of microfilm.
The supplied software of the Nikon Super Coolscan 5000 ED
I've already mentioned that Nikon does not ship its new models of film scanners with Silverfast anymore. Thereby the price reduction compared to the predecessors LS-40 and LS-4000 levels out - thus the scanners didn't really get cheaper, they were only reduced in the scope of delivery. Nikon supplies a threepart software bundle with the filmscanners:
- Adobe® Photoshop® Elements 2.0
- Nikon Scan 4.0
- Nikon View 6.0
Some owners of a Nikon digital camera will ask themselves "What's Nikon View doing with a Nikon filmscanner?" We already know this programm for transferring our images from the camera to the computer, for viewing the images, sorting them, creating slide shows and so on. But what is this programm used for with a film scanner? Of course you can always create a slide show and so on with existing images, no matter if they accrue from a digital camera or from a scanner. But the actual application for owners of a Nikon film scanner should be the possibility to process NEF images. NEF is Nikon's own raw format which can be selected as output file format when scanning with NikonScan. This raw format contains (almost) all original information from the scan process, so that you have numerous possibilities of image enhancement and changing scan settings after the scan with the help of Nikon View. Supplying Nikon View makes sense by all means, although 99% of all users won't ever use this programm, because not everybody wants to spend 15-30 minutes for image processing, settings, enhancement and so on after scanning an image.
Many users already adjust the settings with the scan software, and for the "normal" image processing you'll get the Elements version of the best imaging software currently available (my humble opinion) anyway. With Adobe® Photoshop® Elements you can do typical changes of the image ratio like cropping, enlarging and down scaling, rotation and fliping. There are almost innumerable possibilities for colour enhancement - from a simple brightness slider up to the gradation curves tool there is virtually every nameable tool for processing colours available. And who wants to apply filters to his scan afterwards, for example to sharpen the image, finds almost boundless possibilities here, too.
Where are the limits of Photoshop® Elements? Does the extra charge of the 10 times more expensive full version pay off? For "normal" and semiprofessional users even the Elements verison of Photoshop® is too comprehensive to tap the full potential. I really do miss one appreciable feature in the light version: batch processing of images - whether embedded in the program or as separate batch processing software. And there is one more reason for the expensive full version: the Elements version can only process an image file with a colour depth of 16 bit if it is previously converted into 8 bit. The full version can load, process and save image files with 16 bit per colour channel.
Let's deal with the scan software Nikon Scan. At first glance the new Version 4 doesn't seem to have changed a lot compared to the old version. The user interface looks virtually identical, the settings work as known. A few drawbacks have been improved, new features have been added. And I'd like to mention a very pleasant one right at the beginning: you can choose for which scanners you want to use the program for already at the installation. Those who have five different Nikon scanners of different generations on their desktop (like me) will be very happy about not having to install every single driver separately. That's great! Of course John Doe purchases exactly one scanner and hence only benefits indirectly from this feature, for example when downloading a new version of the software.
So how good is NikonScan really? Can the software be recommended? There are people who are so sworn in the leading scansoftware Silverfast, that they depreciate any other program as crab without looking at it any closer. I've always had Silverfast and NikonScan for my Nikon scanners, and I've always preferred NikonScan. You'll easily realize the importance of the scan software when using a cheap film scanner. Owners of a cheap scanner who switch from the cheap scan software of the manufacturer to Lasersoft's Silverfast suddenly can see an increasement of quality of their scans as big as if they had purchased a new scanner. I've always said: it's not only the scanner that makes the image, it's also the software.
You definitely won't see a gigantic increase of quality when you use Silverfast instead of NikonScan. NikonScan is so good and extensive in the meantime that you can perfectly use it for comfortably producing very good scans. In my opinion it's rather a matter of personal prefernce which program you choose. Who already knows Silverfast from his flat bed scanner or even already owned another film scanner with Silverfast doesn't want to become acquaintetd with another scan software of course, because handling this kind of software correctly requires a lot of time.
So what are those special features of NikonScan that make scanning so easy? The user interface is very clear and easy to use: there is a preview window, a little window showing the scan progress and a palette window containing all settings. The special setting for Kodachrome slides proved to be very advantageous and virtually unique: with this special setting (in the line of positive, negative, b/w, Kodachrome) it's possible to scan Kodachromes with very high quality. Most other film scanners fail with this special task.
You can adjust all scan settings in a palette window: image format (portrait or landscape) and image size can be set in different ways and units. For setting the colour there is gradation curves, colour balance sliders, a LCH editor and an analog-amplifying slider. To achieve a higher sharpness you can use the function "unsharp mask" with a live preview in the preview window. Finally there are individual sliders for the scanner's special features ICE, which is the dust and scratches correction, the grain equalization GEM, the colour restoration ROC and the exposure extender DDE. Furthermore you can switch the Scan Image Enhancer (automatic setting of brightness and contrast) on and off.
But what would all those settings which can be comfortably adjusted one after another be, if they could not be saved? NikonScan provides the opportunity to save and load complete sets of settings. So you can save for example all settings for mounted colour slides as "Slide4000jpgICE.set" and easily load these settings when scanning such film material. Once you have made and saved your different settings you can quickly perform a scan or a series of same scans virtually at the push of a button. That's really comfortable and in my opinion no other software handles this task better than NikonScan.
Of course NikonScan has got some shortcomings too which I don't want to keep secret. While scanning it happens every now and then that the software totally crashes. But it doesn't crash with an error message or demands restarting the computer - no, it simply quits itself with the motto "I don't feel like scanning today. Let's try again tomorrow...". Another shortcoming is that sometimes the communication with the scanner doesn't work anymore - the software then messages that no scanner is connected. It's annoying when suddenly the progress bar stands still in the middle of the scan process and nothing happens for a couple of minutes.
Another drawback of the NikonScan software is enormously annoying: when using the Nikon Super Coolscan 5000 ED together with the slide feeder SF-210 the maximum number of slides you can set is 99. But what if you want to digitise a whole slide magazine with exactly 100 images at once in batch mode? It's clear that you can't put 100 slides into the feeder at once. But it's no problem to keep supplies coming during the scan process, so that the scanner virtually runs non-stop. This actually works perfectly, but after 99 slides the scanner stops. It's annoying everytime you have to manually scan exactly one leftover image.
Conclusion for the NikonScan software: I am very pleased with NikonScan. The scan software is very clearly arranged and easy to learn. The settings for a good scan can be adjusted easily and intuitively. And last but not least the scan software delivers very good images and really makes the best out of the connected scanner. For me NikonScan still is the best film scanner manufacturer own scan software.
Appendix 2016: The scan software NikonScan from Nikon does not run on actual operating systems any more. With the scan software SilverFast Ai Studio the Nikon Super Coolscan 5000 ED can be used with actual operating systems, too.
Image quality of the Nikon Super Coolscan 5000 ED
How can the image quality of a Nikon Super Coolscan 5000 be actually judged? Should we scan maybe 10 standardized test slides with resolution bar, colour patterns and gray scales to check to what extent the scans match the original? With such experiments you can indeed determine certain numerical values, but you often can't use them to find out what an image will look like. Maybe it's better to simply scan 1000 different images to make a conclusion by rule of thumb. Or should we just assume the Nikon 5000 scans normal snap shots perfectly and fade to discerning originals like night shots or back light shots?
A good image is first of all made by a good film scanner, second by the scan software and third by the following image editing. It's clear that you can't fix too much with the image editing software if already the first link of this chain is weak. The second link of the chain is also very important - and often overlooked: the scan software.
If you perform a normal standard scan with the Nikon Super Coolscan 5000 you'll get brilliant scans of 90% of all images using the standard settings. A scan of an underexposed image though will be too dark as well if scanned with the standard settings. Does this mean poor image quality? An image like this can be slightly lightended either directly with the scan software or afterwards with an image editing software. You can make all settings adjusted with the scan software with the image editing software, too, except for one: the dust and scratches correction ICE.
ICE works perfectly with the Nikon 5000: dust, scratches, fingerprints, lint etc. are automatically retouched effectively. An additional infrared source identifies what doesn't belong to the image and sophisticated algorithms correct the corresponding spots with close pixels. ICE works that good with the Nikon that I always keep it turned on, except for scanning B&W shots or Kodachrome images.
Back to my statement that all settings which can be made within the scan software except ICE can be made with the image editing software, too. From this it follows that it's not that important what the scanned image effectively looks like, but rather which information it contains. Example: a black and white astronomy shot looks worthless with standard scan settings. A lot of stars, dust (in space, not on the image) and clouds disappear. But if the corresponding area can be neatly displayed by adjusting the levels with Photoshop®, I speak about a good scan. And in exactly this respect I can only praise the Nikon Super Coolscan 5000 ED. If you scan an image with 48 Bit colour depth and save the outcome in the TIF format, you'll have all image information in a large file, so that you can make a virtually perfect digital image by editing it afterwards. You can particularly see it with discerning twilight or night shots.
When performing a resolution test the Nikon 5000 shows its strength. The horizontal and vertical lines of the second element of the sixth group are still clearly visible - the corresponding resolution is 3650 dpi. If you enlarge element 6.3 (correscponds 4100 dpi) so that you can clearly recognize the individual pixels, you will find that you can still distinguish the three horizontal lines, but you can not differentiate the three vertical lines from the grey pixels on the other hand. When fully zooming into element 6.4 you can't see clear structures anymore. So I conclude that the Nikon Super Coolscan 5000 ED has got an effective resolution of horizontal 4100 dpi and vertical 3650 dpi, thus it averages about 3900 dpi. This is a sensational performance, which just characterizes a Nikon scanner. You can hardly find other scanners which effectively almost reach their nominal resolution.
The scan software NikonScan offers to the user a multitude of settings to immediately perform a good looking fine scan after the prescan. Just like with an image editing software you can achieve the same effects on the individual gradation curves by using different controls. I myself prefer working directly with the gradation curves, although setting brightness and contrast could be done more comfortable as well.
So what is this ICE4, DDE, Scan Image Enhancer - catchwords Nikon is advertising with, which are rushing through the scanner community like magic words? I already mentioned that the ICE dust and scratches correction works flawlessly. I can only confirm rumors which accuse a certain blur to the ICE process insofar that in areas where big dust particles have to be corrected away with the surrounding pixels a certain impression of blur inevitably occurs. But this does by no means apply for the whole image.
We already know the grain equalization GEM and the colour enhancement ROC from the predecessor. GEM works very well with very coarse grained film material. Analyzing the image for repeating patterns which can be assigned to the grain works very well, but inevitably causes a slight blur, too. Thus GEM is not a function that you can always keep turned on without hesitation, but you should perform tests with every single film to find out if there is any annyoing grain effect or not. When scanning APS films the grain equalization GEM proved its worth so that I always turn it on by default.
The automatic colour enhancement ROC somtimes works wonders. Ancient, faded images suddenly appear like newly shot, just like restored. See my page about image correction. Corrections as they are done by the ROC technique can be done manually, too, but you'll need a lot of time to adjust the individual colour channels in a way that the restoration effect is visible. You should in no case turn ROC on permanently though. With a night shot or an image of the sea or of a ski trail you will get such disguised images, that it's rather manipulation than restoration we're talking about.
Besides the three already known ICE3 techniques a fourth one now came along with the Nikon Super Coolscan 5000 ED: when scanning underexposed images or back light shots the digital DDE technique reportedly performs automatic corrections which enhances the details in very dark and very bright areas and achieves natural colours and brightness. This sounds very promising, but after careful consideration and a little testing you will quickly find out that you can achieve this kind of effects by changing the gradation curves, too. By the way you can not only automatically adjust the shadows with DDE but the highlights as well. In my opinion the DDE function is needless, because it's not generally useable, i.e. it must be adjusted individually for every image, and it can be displaced by changing the gradaton curves. But I don't want to ignore those users who are not familiar with using gradation curves: for them the DDE slider is a comfortable way to get more details into very dark image areas.
So we still have to talk about the Scan Image Enhancer as a new feature: this technique performs an automatic adjustment of brightness and contrast, so it complies with Photoshop®'s "auto levels". This function is a very recommendable feature of the NikonScan software, because it can notably improve a bigger part of the images. But as aforementioned this kind of function does not enhance image quality but only allows comfortable adjustment of image editing tools directly within the scan software. An image scanned with the Scan Image Enhancer in fact appears better than a standard scan, but this advantage is leveled out by the following image editing though. The Scan Image Enhancer is also a very useful feature that must not be turned on permanently. Everybody knows what auto level does with an image of a ski trail: the few people shilhoutted against the consistent white become extremely coloured and glaring.
Conclusion of the last 5 paragraphs: The scan software of the Nikon 5000 contains a great many algorithms for automatic image enhancement which positively affect the image qualitiy in a comfortable way. But the actually good image quality is not due to these comfort features, but it's due to the fact, that the Nikon Super Coolscan 5000 ED is capable of distinguishing finest shades of colours. In a scan with a colour depth of 16 Bit there can easily be 2000 shades of grey between black and dark grey - and that makes up the image quality.
One more word about the sharpness: it's sensational what the Nikon LS-5000 produces with a standard scan with 4000 dpi: you can see smallest details and a 20 megapixel image is still sharp when fully zoomed in, provided that appropriate film material is being used, of course. Who needs a feature like the "unsharp mask" in the scan software then? Naturally this artificial sharpening gives the final touch of details to the scan, but I'd recommend to do the sharpening with the image editing software afterwards, because a once performed unsharp mask can not be undone easily, particularly if the parameters were set to high values.
Another postive issue of the Nikon 5000 that surprised me: while I had some problems with scanning Kodachrome slides with the predecessor LS-4000 ED, the new Nikon can handle this film material very well. There is a special setting for Kodachromes in the scan software, and only with this setting the colours match the originals. Unfortunately ICE does not work with the most Kodachrome films, so that you have to lower your sights on the automatic dust and scratches removal.
When scanning Kodachrome images, where noise has more effect than with normal positive transparencies, the multiple scan feature proved itself for me. With the Nikon 5000 an original can not only be scanned once in a time, but up to 16 times. Such a scan naturally takes ages, but you can achieve a considerable enhancement considering noise if you apply multiple scans. An innocent feature with partly groundbreaking effects!
Concludingly I can say that I am absolutely positive about the image quality of the Nikon Super Coolscan 5000 ED. The details and the dynamic range are sensational. For normal images even the standard settings provide execellent digital images. For scanning difficult shots complex settings have to be adjusted either with the scan software or with the following image editing. It's very important for good image editing that the file contains all necessary image information, and I can fully approve that for the LS-5000ED.
Scanning times of the Nikon Super Coolscan 5000 ED
You can clearly see the difference between the new Nikon Super Coolscan 5000 ED and its predecessor Super Coolscan 4000 ED considering the scanning time. The new Nikon considerably gained speed and hence outpaces its competitors even more decidedly than its predecessor already did.
Rating the speed of a film scanner is a very hard thing, because many factors play a decisive role, which you don't necessarily think of. Naturally the resolution and the settings of the scan software are important factors. But there are also a few issues you don't immediately think of which affect the scanning time:
- Computer: even though you might think that the scanner does a better part of the work, the computer to which the scanner is connected has to handle huge data volumes. Converting the raw data into image data takes a lot of computing time, filters like ICE are computationally very intensive, but also saving big files on your hard disc drive can be decisive.
- Data transfer: huge data volumes have to be transferred from the scanner to the computer. The scanner itself only delivers raw data, compressed JPG files are generated by the computer. Using an USB 1.1 port instead of the 2.0 version considerably extends scanning time, mainly when working with the highest resolution.
- The scan area plays a decisive role. If you cut away the 35mm slide mount you will get about 30% less image information than by activating the whole scan area.
When prescanning single mounted slides with ICE it catches one's eye that there's always made an exposure. I can't tell if this is a software bug or serves a purpose. But the scanning time is at all hazards sensationally short when scanning a single slide with auto focus, auto exposure and ICE turned on: 1:11 min. with the highest resolution is a benchmark for all filmscanners! The scanner is digitising single slides so quickly in every process (auto focus, exposure, preview, fine scan), that it does not pay off to leave the workplace.
| Scanning single mounted slides |
without ICE |
with ICE |
| Auto focus 1 slide |
0:05 min |
0:05 min |
| Auto exposure 1 slide |
0:12 min |
0:12 min |
| Preview 1 Slide |
0:12 min |
0:27 min |
| Preview 1 slide with auto focus and auto exposure |
0:29 min |
0:32 min |
| Single scan slide 2000 dpi |
0:19 min |
0:38 min |
| Single scan slide 4000 dpi |
0:21 min |
0:54 min |
| Single scan slide 2000 dpi, auto focus, auto exposure |
0:36 min |
0:55 min |
| Single scan slide 4000 dpi, auto focus, auto exposure |
0:38 min |
1:11 min |
The scanning times are longer when scanning negatives instead of positives. That applies to all film scanners. It's very convenient though that you can generate an index scan of the inserted film strip very quickly for getting a first overview and selecting the images to scan. Of course it's very comfortable if the scanner scans the whole film strip at once. The even a short computer break pays off.
When scanning negatives transporting times always add to the scanning times. Transporting the film from frame 1 to frame 6 takes about 5 seconds including fine adjustment.
| Scanning single negatives |
without ICE |
with ICE |
| Index scan 6 frames |
0:15 min |
0:15 min |
| Auto focus 1 negative |
0:05 min |
0:05 min |
| Auto exposure 1 negative |
0:25 min |
0:25 min |
| Preview 1 negative |
0:21 min |
0:30 min |
| Preview 1 negative with auto focus and auto exposure |
0:46 min |
0:52 min |
| Single scan negative 2000 dpi |
0:28 min |
0:47 min |
| Single scan negative 4000 dpi |
0:30 min |
1:05 min |
| Single scan negative 2000 dpi, auto focus, auto exposure |
1:05 min |
1:20 min |
| Single scan negative 4000 dpi, auto focus, auto exposure |
1:09 min |
1:38 min |
The Nikon LS-5000 ED plays to its strength not until you use it in combination with the slide feeder SF-210. You will clearly see the difference to the old LS-4000 when batch scanning mounted slides: it's amazing how fast the new Nikon chases the slides through the feeder (if there is no jam...). With the current speed the transporting times preponderate yet, because pushing out a scanned slide and drawing in a new one takes more than 10 seconds.
The following times are detected with the SF-210 and scanning with auto focus and auto exposure for every slide. Without these functions the performance would be even much higher, but the image quality would notably decrease.
| Scanning mounted slides with the feeder SF-210 |
without ICE |
with ICE |
| Slide batch scans with 2000 dpi |
68 frames/hour |
43 frames/hour |
| Slide batch scans with 2700 dpi |
64 frames/hour |
40 frames/hour |
| Slide batch scans with 4000 dpi |
61 frames/hour |
37 frames/hour |
All scans mentioned above were made with a PC with following key data: Pentium 4 processor 3 GHz, 800 MHz front side bus, 2 GB DDR-400 RAM, USB 2.0 port. Just to demonstrate to what extent the PC affects the scanning times I connected the Nikon Coolscan 5000 to another computer with the following key data: Pentium processor 1,6 GHz, 768 MB RAM, USB 1.1 port. The achieved scanning times are shocking compared to the first PC:
| Scanning mounted slides with the feeder SF-210 |
without ICE |
with ICE |
| Batch scan 2700 dpi with slide feeder |
24 frames/hour |
18 frames/hour |
| Batch scan 4000 dpi with slide feeder |
24 frames/hour |
18 frames/hour |
You can clearly see that the USB 1.1 port is a bottleneck when working in batch mode with the Nikon Super Coolscan 5000 ED. With single scans the port does not attract attention to itself that obviously. The weak computing power additionally thwarts the ICE.
Conclusion
Nikon maintains his role as leader in the field of 35mm film scanners with the new Nikon Super Coolscan 5000 ED. The image quality provided by this scanner is brilliant, particularily with problematic images like night shots. Above all the scanner is very fast, faster than every other film scanner, and this is the most important improvement compared to the predecessor LS-4000 ED.
When buying a LS-5000 ED you'll get a complete package including all necessary cables, scan software and image editing software for scanning mounted 35mm slides and 35mm film strips. Unfortunately Nikon removed the strip film holder FH-3 from the scope of delivery. You'll have to purchase this part additionally because it's indispensible for scanning curled or curved film strips and single loose frames. You'll even have more fun with your Nikon 5000 if you're going to scan mounted slides with the feeder SF-210 or whole film rolls with the SA-30.
I am very pleased with my Nikon Super Coolscan 5000 ED and wouldn't exchange it for the old Coolscan 4000 anymore considering the lunatic speed. The LS-5000 is sold for a high price, but you'll get the in fact best 35mm film scanner available at present for it.
Back to the film scanner tests index
|
)