Test report Plustek film scanner OpticFilm 7300
Early in August 2007 Plustek placed with the film scanner OpticFilm 7300 a modified version of the Plustek OpticFilm 7200 on the market. I intentionally do not talk about a follow-up model, since Plustek did not abandon the old model for the introduction of the new one.
Whoever compares the new 7300 with the old 7200 will externally just notice a changed housing colour. The technical data remained practically identical, the scanning software however changed. SilverFast SE Plus is being delivered instead of SilverFast SE. This basically means that multi sampling and multi exposure are available for the scanning - much promising features, which allegedly improve the picture quality substantially.

Personally it surprised me that Plustek introduced this device to the market. Even though the OpticFilm 7300 is being delivered with a famous scanning software, it is still a slide scanner without dust and scratch correction (ICE) in hardware. The absence of this feature makes the scanner second-class or even third-class. Since there are already competitor models with dust and scratch correction available in the price segment of the OpticFilm 7300, for example the Reflecta CrystalScan 7200 or low-priced flatbed scanners from Epson or HP, the Plustek OpticFilm 7300 might have difficulties to become established on the market.
Whether there are actually reasons to prefer a film scanner without ICE dust correction/scratch correction but with multi-exposure like the Plustek OpticFilm 7300 over a competitor model with automatic dust correction but without multi-exposure, is what this test report has to show.
Equipment, accessories and technical data of the film scanner
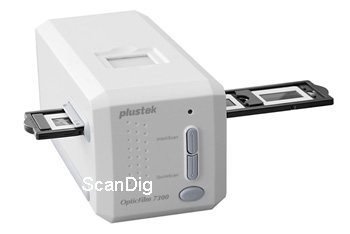
The Plustek OpticFilm 7300 differs outwardly only by another housing colour (now white instead of grey) from the Plustek OpticFilm 7200, and the equipment also corresponds to that of the OpticFilm 7200 with exception of the provided software.
When purchasing, you receive a complete package with the scanner, two film holders (one for framed slides and one for film strips), power supply, USB cable, an unnecessary carrying bag as well as a software package consisting of the outstanding scanning software SilverFast SE plus, the simple QuickScan, ImageFolio and ImageExplorer. On the top side of the device is a practical, lit viewing-window built in, with which one can comfortably view individual framed slides.
According to manufacturer's data, the film scanner has a sensational resolution of 7200 dpi. Taking a 35mm-slide or a negative, a scan in highest resolution thus yields pictures of 70 megapixels - a league, in which normally only professional drum scanners play. I don't know any 35mm-picture positive or negative film, which is so fine, that a scan with 7200 dpi would be worthwhile, but one can switch to a lower resolution at any time. A scan with 7200 dpi produces a file of approximately 210 megabytes in the uncompressed TIF format. If one sets the colour depth to 48 bit, the data volume even doubles to approximately 420 megabytes! To process such files one needs a very fast computer with plenty of main memory.
The Plustek OpticFilm 7300 doesn't offer an automatic dust- and scratch correction procedure, a big shortcoming, since that's nowadays nearly standard in film scanners.
By the way - in the data sheet of the scanner the manufacturer gives even another maximum resolution of 24.000 dpi, which is reached by software interpolation. However this value is to be regarded as a commercial joke, because an artificial inflating of the picture through software interpolation makes no sense at all and can just as well be done with any picture using a picture processing program. If the scanner would come even only close to the resolution of 7200 dpi, it would be already a sensationally high value. So keep caution by such high figures, don't let them dazzle you!
The nominal optical resolution corresponds thus to that of the Plustek OpticFilm 7200. The resolution test will show whether the effective resolution comes nearer to this extremely high value than it is the case with the OpticFilm 7200, which effectively achieves just 2900 dpi.
Installation and starting
The installation of the Plustek OpticFilm 7300 and the provided software works problem-free: connect scanner to power and by USB to the computer, switch on, follow the instructions on the screen (select "automatic software installation"), and the scanner is already prepared to be used. With the automatically along-installed "QuickScan" program you could make the first scan right away.
But naturally we want to use SilverFast, since this professional scanning software promises substantially better picture results. We thus install SilverFast right afterwards - works also problem-free. After activating it by entering the serial number, which is on a sticker on the CD cover, we can start.
I was able to accomplish the first scan quickly. Who however did not work before with SilverFast, will need some time to get himself through the variety of buttons, options and menus. SilverFast is well known as a professional scanning software with nearly innumerable possibilities; but a beginner can also obtain very good results after some training with this powerful software.
With further scans I received now and then the error message that the scanner was not ready - like with the OpticFilm 7200. The practical solution is quite simple: push several times on scan, after a few times it will already work. I never found out what's causing this error. Perhaps a software update will solve the problem one day.
Scanning framed 35mm slides
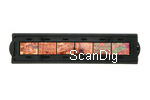
In the shipment of the Plustek OpticFilm 7300 a slide holder for the scanning of framed 35mm slides is included. This slide holder has 4 slots, where one framed slide can be placed into each slot. There are numerous different slide frames, each has certain pros and cons, many resemble each other a lot. Already for the OpticFilm 7200 Plustek designed a completely new slide holder, which has besides the task of holding of a framed 35mm slide, the function to provide correct positioning in the scanner. This slide holder was now a little bit modified - the in the old holder openly accessible clamping springs are now protected by covers.
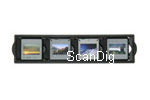
Inserting a slide into the slide holder is going easy: one simply places a slide at the left side of a slot and compresses the spring. Now one can push down the slide until it locks firmly. However one must watch out that one does not slip when simultaneously pressing the spring and pushing the slide down; once I slipped thereby and fully touched the film - how good that it was just a test slide. With a valuable slide however such a slipping would be a nuisance. In order to make sure that one does not by mistake destroy a slide when inserting or removing it, I recommend the wearing of cotton gloves.
The film holder construction with the springs is a successful design, particularly since the inserted slide is well fixed from two sides through small holders. When it comes to the question how long the springs can last in continuos operation, I'm unable to tell. With very thick glass-framed slides these additional fastenings fail, but the spring can be squeezed together so far, that thick slides can be nevertheless inserted into the film holder. That the springs do not enjoy such a coercive measure is clear.
One moves the slide holder then either from the left or from the right side into the scanner. The scanner does not have an automatic film holder draw-in, so that one must position the slide holder accurately without seeing where exactly the correct position is. Helpful are some slots in the slide holder, which slightly click when pushing in. This enables the correct positioning of a picture held by the slide holder above the CCD sensor. The protection of the scanner against dust is very well solved: Two flaps on the left and on the right of the scanner close automatically, if no film holder is inserted or if the film holder is visible only on one side.
Scanning takes place according to the proven pattern: make a preview, make adjustments and do the main scan. A slide frame with space for 4 slides may suggest batch processing. That's however not the case! One must scan each slide individually and also individually name the file. Here is still improvement potential given.
Luckily the scanning times have decreased compared to the OpticFilm 7200.
| Procedure |
Duration |
| Preview |
0:25 min |
| Scan with 2000 dpi resolution |
0:40 min |
| Scan with 3600 dpi resolution |
0:53 min |
| Scan with 4000 dpi resolution |
2:45 min |
| Scan with 7200 dpi resolution |
2:55 min |
With these scanning times the OpticFilm 7300 became clearly faster than its predecessor, but is nevertheless not a sprinter among the film scanners. Perhaps I must revise this statement, because a faster computer was used for the test of this device. These scanning times are however anyway only a rough reference value. Depending upon adjusted functions in the scanning software, depending upon the computer configuration and depending upon the operating system utilization, completely different values for the scanning time can result. Thus please regard these results only as a reference value, but not as purchasing criteria.
Scanning 35mm film strips
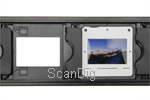
For the scanning of 35mm negative or positive strips a film strip holder is included in the regular shipping of the scanner. Into the holder one can insert a strip with up to 6 pictures in length. Two small strips or 6 loose pictures can also be inserted into the film holder as well.
The film holder is hinged; when first opening one must watch out that one does not tear off the lid, because unfortunately the film holder can not be opened completely (180°) but just partially (approximately 110°). Thus the cover is always disturbing when inserting a film strip and one always runs the risk to open the lid too far, so that the hinges break.
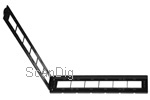
One places the film strip comfortably on the holder, whereby at the top side and at the lower surface six small fixations are present in each case, so that one can position the negative strip safely. One moves the film strip horizontally in a way, that the individual pictures come accurately between the retaining bars. These are fortunately so narrow, that one does not have to inevitably cut off parts of the picture. While one can manage inserting of the film strip carefully with the hand, one needs tweezers with rounded tips for taking them out, since otherwise one can easily touch the film and leave own traces on it.
Inserting normal film strips and frames works problem-free - between difficult to impossible is the inserting of bowed or curved strips, since there are no fixations, into which the film strip could be clamped. There are clearly better film strip holders available. So there's no alternative when it comes to bowed negative strips, but to get them in there somehow and to position them approximately right while closing the film holder flap - a very difficult business.
Inserting the film strip holder into the scanner works similarly to the slideframe holder. One must ensure by himself that the correct picture is in the correct place in the scanner; the slots at the lower surface of the filmstrip holder are helpful here. The film strip holder can take up up to 6 positives or negatives, but each picture must become individually scanned. There is no batch mode, since the scanner does not have an automatic transportation for the holder.
| Procedure |
Duration |
| Preview |
0:25 min |
| Scan with 2000 dpi resolution |
0:40 min |
| Scan with 3600 dpi resolution |
1:25 min |
| Scan with 4000 dpi resolution |
3:40 min |
| Scan with 7200 dpi resolution |
3:45 min |
As it is the case when scanning framed slides, it is noticeable here too that starting with a resolution of 4000 dpi the scanning time increases disproportionally compared to the increase of the resolution. That's because of the fact that the scanner does not offer optical resolution of 4000 dpi and thus scans with the in terms of hardware next higher available resolution (in this case 7200 dpi), then afterwards shrinks the picture.
When scanning negatives the same applies as with scanning framed slides - these times are only reference points and shall not be regarded as purchasing kriteria. And here can again be said, that the Plustek OpticFilm 7300 is not a sprinter among the slide scanners.
The included software
Plustek delivers the OpticFilm 7300 with a complete software package. Besides the simple scanning software QuickScan, which is suitable for scanning slides and negatives without big effort, but also just with minimal adjustment possibilities; the picture processing program ImageFolio as well as the picture organisation- and viewing software ImageExplorer, the package contains the professional scanning software SilverFast SE Plus. This little plus in the name makes the main difference between the OpticFilm 7200 and the here tested OpticScan 7300.
SilverFast SE Plus differs from the regular SE particularly through the MultiExposure feature. With MultiExposure the picture in question is scanned several times (here twice) with different exposure each time. Hence one too bright and one too dark picture are produced, which are then automatically combined by the software to one correctly exposed picture. This way one receives more detail in the light parts and in the shaded ones: for the bright picture parts the picture information of the too dark scan is used, whereas in the dark picture areas the information from the too bright scan is used. The combination of these two pictures then results in a picture with an increased contrast range.
BUT: to use this function with the OpticFilm 7300 is not easily possible! MultiExposure can be used only with an output colour-depth of 48 bit. Internally the scanner can work with 48 bit, one can however not set 48 bit as output colour-depth - this option is deactivated in the provided SilverFast version, just like the 16 bit gray mode. The only possibility to get a file with 48 bit is the 48 bit HDR mode. With selected HDR option SilverFast produces a kind of raw scan, comparable to a RAW file of a digital reflex camera. In this setting one can also use MultiExposure. BUT (and now comes the big catch): these raw scans can only be processed correctly with SilverFast HDR. This is a software for the conversion of such raw scans into normal pictures. It looks like - and can be handled like the SilverFast scanning program, only that one can make all adjustments such as tonal correction, colour, sharpness and so on afterwards.
If one opens the raw scan (which is saved as TIF file) in a regular picture processing program, without first converting it by SilverFast HDR, one gets a completely dark picture, which has a lot of nice detail in the bright parts, but where everything below the medium tones is shown as nearly black. Only SilverFast HDR allows the transformation of such of a picture into a "normal" image. One could (to some extent) get it also done with Photoshop®, but only if one is really experienced with it and even then there is a loss of quality to be expected.
The OpticFilm 7300 is being promoted with the MultiExposure function as a great new feature, but it is however completely concealed that one can use this feature only properly, if one spends at least another 300 Euro on additional software.
According to Lasersoft it is however possible with the latest version of Silverfast to use the MultiExposure function also with 24 bit colour depth. We could however not duplicate this at the time of our test. A free update to the newest version can be done at any time through the program.
A further function of SilverFast SE Plus is MultiSampling. As it is the case for MultiExposure, the original is here being scanned several times too (up to 16 times), however without different exposure. This function decreases the picture noise particularly in dark picture portions, by scanning the target several times, and with this it can substract randomly developed picture noise. In practice also works well and can improve the results of scans of very dark pictures.
The software package also contains Presto! ImageFolio, which offers rudimentary picture processing functions, which hardly go beyond the functions of MS-Paint, which is included in Windows. In addition there is the Presto! ImageExplorer, with which one can view and sort his pictures. With the likewise shipped Presto! page manager, one can organize his pictures and other documents, as for instance text files or PDFs, send them directly to the according programs or in connection with Quickscan make PDFs or text files from the scans with the help of OCR text recognition. However one will rarely scan text documents with a film scanner.
Picture quality
After the bad results of the OpticFilm 7200 regarding resolution and density range, one is naturally curios about the results of the Plustek OpticFilm7300.
With our test device we made the here shown USAF-1951-scan. One can still well recognize the horizontal and vertical bars of the element 5.6, the vertical ones somewhat better than the horizontal ones. Looking at element 6.1 we can no longer distinguish the horizontal lines, while in vertical direction we can still see rudiments of 3 bars. According to our resolution table we determine from it an effective resolution of approximately 3000 dpi. That means the OpticFilm 7300 delivers just 42% of its nominal resolution of 7200 dpi. Compared to the Plustek OpticFilm 7200 this still means an increase of around 100 dpi. However this increase can be varying from device to device, so I come to the result that the resolution practically didn't change compared to the OpticFilm 7200.
It's important to know that one must really scan with 7200 dpi, in order to actually receive 3000 dpi. We tried to scan with only 3000 dpi or 3600 dpi; however thereby the effective resolution decreased approximately by 20%, so that we received only around 2500 dpi. This results inevitably in the problem that one has always to scan with 7200 dpi and thus receives extremely big files. Scans with 7200 dpi of 35mm material result in a data set of roughly 210 megabyte. Such a scan contains however only effective information of about 35 megabyte. One thus gets unnecessarily bloated files, which occupy a lot of memory on the harddisc and take a long time until they are loaded in the picture processing program or the viewer. For this high-performance computers are needed.
In order to receive the maximum effective resolution of our measured 3000 dpi, one has to scan using the highest resolution of 7200 dpi. The thereby blown files have to be afterwards shrunk through a picture processing program.
The maximum density range did also not change compared to the OpticScan 7200. The 7300 has a far too small density range and thus bright and dark picture portions are very quickly blooming out or drowning.
Most low-priced film scanners have a low maximum density, so that detail in dark picture portions is hardly present and one receives a uniformly black surface instead of fine black nuances. This can be reconstructed also with the OpticFilm 7300 easily, by scanning an astro-slide, where almost the whole picture is dark and is lightened only by some stars. During the picture processing of such a scan one notices clearly, how little picture information is in the scan file; nearly nothing meaningful can be done there.
The Plustek OpticFilm 7300 suffers however like his predecessor not just from a too small maximum density but also from a too high minimum density, and that's much worse for many amateur photographers. A too high minimum density means that bright colour tones cannot be differentiated cleanly. So it can happen e.g. that clouds in a picture do not show detail anymore and form a uniformly white surface. One gets the impression that the clouds have been simply afterwards painted on the picture with a brush. Here really a lot of picture information is getting lost. The effect of the too high minimum density becomes even more flagrant, if one scans winterly mountain photographs.
The much to small density range naturally also affects the scans of negatives. With my first negative scans I received dreadful results; there was no trace of true colours left, I received completely irrational pictures, which had nothing more to do with the reality. With negatives however SilverFast helped me to get out of trouble, because this scanning software has fixed profiles stored to select from for a large number of negative films. Therefore one must sure enough undergo the effort to figure out the used film brand as well as the type of film and make an appropriate adjustment. This effort pays out, because the picture quality of negative scans improves substantially through this adjustment.
When I adjusted the film type of the colour negatives for each film strip individually, I received a just as good picture quality as with positives. That's amazing, because most film scanners produce better pictures from slides than from negatives. The lack due to the too small density range is however not correctable through a film type adjustment, since it's immanent in the scanner hardware, so no software can help here.
Altogether I may say that the picture quality for an average photo showing a person is merely enough. As soon as a picture has dark (night photographs, photographs in the forest) or bright portions (sky, clouds, beach), the reached scan quality becomes however inacceptable.
Another large deficiency is the absence of a hardware-based dust and scratch removal: this makes the preparing of the scans a complex and complicated, since you must clean each picture manually with a picture processing program. The provided Presto! ImageFolio cannot help you with this task however, because it does not contain retouching tools.
Summary, result
The Plustek OpticFilm 7300 promises great features and performance data on the paper, which it cannot keep in practice by far. So is the indication of an optical resolution of 7200 dpi pure blinding and the particularly emphasized MultiExposure function can't be used correctly, without the additional investment of hundreds of Euros.
The low effective resolution and the small density range are clear minus points of the scanner. The extensive software equipment is positive, of which however not all features can be used easily. However in this price class there are devices, which deliver a substantially better picture quality than the Plustek. Thus we cannot express a purchase recommendation for this scanner.
Note: We made this scanner test in November of 2007 with a scanner package, how it was delivered at that time. We don't automatically update changes regarding the equipment (hardware or software) or the performance data in the course of the product's lifespan.
Buying a film scanner
Please, feel free to visit our online shop - it's the only shop on the Internet which is fully specialized on film scanners and accessories! We can provide you with any film scanner at an extremely attractive price and we also can supply you with accessories such as film holders or optional adapters.
Back to the film scanner tests index
|
)
)
)
)
)